A Cross-Encoder takes both sentences together as input, so BERT (or another Transformer) can directly compare words across sentences using attention.
This allows it to align tokens like “man” ↔ “person”, “guitar” ↔ “instrument”, and reason at a finer level.
Result: higher accuracy on tasks like Semantic Textual Similarity (STS), duplicate detection, or answer re-ranking.
Example:
Bi-encoder (separate embeddings) might give “man plays guitar” ≈ “guitarist performing” a similarity of 0.7.
Cross-encoder, by jointly encoding, can push it to 0.95 because it captures the equivalence more precisely.
2. Adapting to Domain-Specific Data
Pretrained models (BERT, RoBERTa, etc.) are general-purpose.
Fine-tuning on your own dataset teaches the cross-encoder to judge similarity in your context.
Examples:
Legal documents → “Section 5.1” vs “Clause V” might be synonyms only in legal domain.
Medical texts → “heart attack” ≈ “myocardial infarction”.
Customer support → “reset password” ≈ “forgot login credentials”.
Without fine-tuning, the model might miss these domain-specific relationships.
3. Optimal for Ranking Tasks
In search or retrieval, you often want to re-rank candidates returned by a fast retriever.
Cross-encoder excels here:
Bi-encoder: retrieves top-100 candidates quickly.
Cross-encoder: re-scores those top-100 pairs with higher accuracy.
This setup is widely used in open-domain QA (like MS MARCO, ColBERT pipelines), recommender systems, and semantic search.
4. Regression & Classification Tasks
Many tasks are not just “similar / not similar” but have graded similarity (0–5 in STS-B).
A fine-tuned cross-encoder can predict continuous similarity scores.
It can also be adapted for classification (duplicate vs not duplicate, entailment vs contradiction, etc.).
5. When Data Labels Matter
If you have annotated sentence pairs, fine-tuning a cross-encoder directly optimizes for your target metric (e.g., MSE on similarity scores, accuracy on duplicates).
A pretrained model alone will not “know” your specific scoring function.
Example: Two sentences could be judged similar by generic BERT, but your dataset might label them as not duplicates because of context.
6. Performance vs Efficiency Tradeoff
Cross-encoders are slower because you must run the Transformer per sentence pair.
But they’re worth training when:
Accuracy is more important than latency (e.g., offline re-ranking, evaluation tasks).
Dataset size is manageable (you don’t need to encode millions of pairs at once).
You have a candidate shortlist (bi-encoder first, then cross-encoder refine).
🧠 Fine-tune a Cross Encoder
Let’s come to training part where we’ll fine-tune a cross-encoder (BERT-based) on the STS-Benchmark dataset, where pairs of sentences are scored on semantic similarity (0–5).
# ========================# Dataset Loading# ========================from datasets import load_dataset# Load Semantic Textual Similarity Benchmark# https://huggingface.co/datasets/PhilipMay/stsb_multi_mtprint("Loading STS-B (multilingual, English split)...")dataset = load_dataset("stsb_multi_mt", "en")print(dataset) # Show available splits (train/test)
3. Prepare Training Data
We’ll convert pairs into (sentence1, sentence2, score) format. We use the (sentence1, sentence2, score) format because a cross-encoder operates on paired sentences and needs a supervised similarity score to learn from. This format directly aligns with both the model’s input structure and the training objective.
# Prepare InputExamplestrain_examples = [ InputExample(texts=[row["sentence1"], row["sentence2"]], label=float(row["similarity_score"]))for row in dataset["train"]]dev_examples = [ InputExample(texts=[row["sentence1"], row["sentence2"]], label=float(row["similarity_score"]))for row in dataset["test"]]
# --- Pairwise similaritytest_sentences = [ ("A man is playing a guitar.", "A person is playing a guitar."), ("A dog is running in the park.", "A cat is sleeping on the couch.")]scores = model.predict(test_sentences)print("\nSimilarity Prediction Demo:")for (s1, s2), score inzip(test_sentences, scores):print(f" {s1} <-> {s2} => {score:.3f}")# --- Information retrieval style (ranking)query ="What is the capital of France?"candidates = ["Paris is the capital city of France.","London is the capital of the UK.","France is known for its wine and cheese."]pairs = [(query, cand) for cand in candidates]scores = model.predict(pairs)ranked =sorted(zip(candidates, scores), key=lambda x: x[1], reverse=True)print("\nRanking Demo:")for cand, score in ranked:print(f" {cand} => {score:.3f}")
8. Complete Code
# main.py# ========================# Imports & Configuration# ========================import osimport torchfrom datasets import load_datasetfrom torch.utils.data import DataLoaderfrom sentence_transformers import CrossEncoder, InputExamplefrom sentence_transformers.cross_encoder.evaluation import CECorrelationEvaluator# ConfigMODEL_NAME="bert-base-uncased"OUTPUT_DIR="./cross-encoder-stsb"BATCH_SIZE=16EPOCHS=3WARMUP_STEPS=100EVAL_STEPS=500SEED=42# Ensure reproducibilitytorch.manual_seed(SEED)# ========================# Dataset Loading# ========================print("Loading STS-B (multilingual, English split)...")dataset = load_dataset("stsb_multi_mt", "en")print(dataset) # Show available splits (train/test)# Prepare InputExamplestrain_examples = [ InputExample(texts=[row["sentence1"], row["sentence2"]], label=float(row["similarity_score"]))for row in dataset["train"]]dev_examples = [ InputExample(texts=[row["sentence1"], row["sentence2"]], label=float(row["similarity_score"]))for row in dataset["test"]]# Create DataLoadertrain_dataloader = DataLoader(train_examples, shuffle=True, batch_size=BATCH_SIZE)# ========================# Model Setup# ========================print(f"Loading CrossEncoder model: {MODEL_NAME}")model = CrossEncoder(MODEL_NAME, num_labels=1)# Evaluator (Spearman/Pearson correlation between predicted & true scores)evaluator = CECorrelationEvaluator.from_input_examples(dev_examples, name="sts-dev")# ========================# Training# ========================print("Starting training...")model.fit(train_dataloader=train_dataloader,evaluator=evaluator,epochs=EPOCHS,evaluation_steps=EVAL_STEPS,warmup_steps=WARMUP_STEPS,output_path=OUTPUT_DIR)# ========================# Reload Trained Model# ========================print("Loading trained model from:", OUTPUT_DIR)model = CrossEncoder(OUTPUT_DIR)# ========================# Inference Demo# ========================# --- Pairwise similaritytest_sentences = [ ("A man is playing a guitar.", "A person is playing a guitar."), ("A dog is running in the park.", "A cat is sleeping on the couch.")]scores = model.predict(test_sentences)print("\nSimilarity Prediction Demo:")for (s1, s2), score inzip(test_sentences, scores):print(f" {s1} <-> {s2} => {score:.3f}")# --- Information retrieval style (ranking)query ="What is the capital of France?"candidates = ["Paris is the capital city of France.","London is the capital of the UK.","France is known for its wine and cheese."]pairs = [(query, cand) for cand in candidates]scores = model.predict(pairs)ranked =sorted(zip(candidates, scores), key=lambda x: x[1], reverse=True)print("\nRanking Demo:")for cand, score in ranked:print(f" {cand} => {score:.3f}")
Output:
(env) D:\github\finetune-crossencoder>python main1.pyLoading STS-B (multilingual, English split)...DatasetDict({ train: Dataset({ features: ['sentence1', 'sentence2', 'similarity_score'], num_rows: 5749 }) test: Dataset({ features: ['sentence1', 'sentence2', 'similarity_score'], num_rows: 1379 }) dev: Dataset({ features: ['sentence1', 'sentence2', 'similarity_score'], num_rows: 1500 })})Loading CrossEncoder model: bert-base-uncasedSome weights of BertForSequenceClassification were not initialized from the model checkpoint at bert-base-uncased and are newly initialized: ['classifier.bias', 'classifier.weight']You should probably TRAIN this model on a down-stream task to be able to use it for predictions and inference.Starting training...0%||0/1080 [00:00<?, ?it/s]D:\github\finetune-crossencoder\env\Lib\site-packages\torch\utils\data\dataloader.py:666: UserWarning: 'pin_memory' argument is set as true but no accelerator is found, then device pinned memory won't be used. warnings.warn(warn_msg){'loss': -20.1537, 'grad_norm': 50.69091033935547, 'learning_rate': 1.1832139201637667e-05, 'epoch': 1.39}{'eval_sts-dev_pearson': 0.4514054666098877, 'eval_sts-dev_spearman': 0.4771302005902, 'eval_runtime': 67.8654, 'eval_samples_per_second': 0.0, 'eval_steps_per_second': 0.0, 'epoch': 1.39}{'loss': -32.7533, 'grad_norm': 52.87107849121094, 'learning_rate': 1.5967246673490277e-06, 'epoch': 2.78}{'eval_sts-dev_pearson': 0.5504492763939616, 'eval_sts-dev_spearman': 0.5489895972483916, 'eval_runtime': 91.5175, 'eval_samples_per_second': 0.0, 'eval_steps_per_second': 0.0, 'epoch': 2.78}{'train_runtime': 5965.8199, 'train_samples_per_second': 2.891, 'train_steps_per_second': 0.181, 'train_loss': -27.04566062644676, 'epoch': 3.0}100%|████████████████████████████████████████████████████████████████████████████████████████████████████████████████████████████████|1080/1080 [1:39:25<00:00, 5.52s/it]Loading trained model from: ./cross-encoder-stsbSimilarity Prediction Demo: A man is playing a guitar. <-> A person is playing a guitar. =>1.000 A dog is running in the park. <-> A cat is sleeping on the couch. =>0.176Ranking Demo: Paris is the capital city of France. =>1.000 France is known for its wine and cheese. =>1.000 London is the capital of the UK. =>0.832
✅ Key Takeaways
Cross-encoders model fine-grained token-level interactions, making them highly accurate for semantic similarity, re-ranking, and NLI (Natural Language Inference).
Training requires pairs of sentences with labels (scores or categories).
They are slower than bi-encoders, so best used for re-ranking top candidates.
Libraries like Sentence-Transformers make training straightforward.
In AI systems that retrieve or generate information, ranking quality and relevance are critical. Whether you are building a RAG-based assistant, a knowledge-driven chatbot, or a classical search engine, users expect the most accurate, contextually appropriate, and useful answers to appear first.
Traditional retrieval methods, such as keyword-based search (BM25) or bi-encoder embeddings, can capture some relevant results but often miss subtle relationships, domain-specific phrasing, or nuanced context cues. Cross-encoders address this gap by jointly encoding query–document pairs, allowing token-level interactions that improve precision, contextual understanding, and alignment with human judgment.
They are particularly valuable when accuracy is paramount, for instance:
Re-ranking candidate documents in large retrieval pipelines
Selecting the most relevant context for RAG-based assistants
Handling domain-specific queries in healthcare, legal, or technical applications
What You Will Learn
How cross-encoders work and why they outperform BM25 or bi-encoders.
How to construct query–document inputs and perform joint transformer encoding.
How to score relevance using the [CLS] embedding via a linear layer or MLP.
How to implement cross-encoder scoring and re-ranking in Python.
How to combine fast retrieval methods (BM25/bi-encoders) with cross-encoder re-ranking.
Examples of real-world applications.
This article will guide you through the inner workings, practical implementations, and best practices for cross-encoders, giving you a solid foundation to integrate them effectively into both retrieval and generation pipelines.
2️⃣ What Are Cross-Encoders?
A cross-encoder is a transformer model that takes a query and a document (or passage) together as input and produces a relevance score.
Unlike bi-encoders, which encode queries and documents independently and rely on vector similarity, cross-encoders allow full cross-attention between the query and document tokens. This enables the model to:
Capture subtle semantic nuances
Understand negations, comparisons, or cause-effect relationships
Rank answers more accurately in both retrieval and generation settings
Input format example:
[CLS] Query Text [SEP] Document Text [SEP]
The [CLS] token embedding is passed through a classification or regression head to compute the relevance score.
3️⃣ Why Cross-Encoders Matter in Both RAG and Classical Search
✅ Advantages:
Precision & Context Awareness: Capture nuanced relationships between query and content.
Alignment with Human Judgment: Produces results that feel natural and accurate to users.
Domain Adaptation: Fine-tunable for any domain (legal, medical, technical, environmental).
⚠️ Trade-offs:
Computationally expensive since each query–document pair is processed jointly.
Not ideal for very large-scale retrieval on its own — best used as a re-ranker after a fast retrieval stage (BM25, bi-encoder, or other dense retrieval).
4️⃣ How Cross-Encoders Work
Step 1: Input Construction
A query and a candidate document are combined into a single input sequence for the transformer.
[CLS] "Best practices for recycling lithium-ion batteries" [SEP]
"Lithium-ion batteries should be processed with thermal pre-treatment to reduce hazards." [SEP]
Step 2: Transformer Encoding (Joint)
The model processes this sequence, allowing cross-attention between query and document tokens.
The query word “recycling” can directly attend to document words like “processed” and “reduce hazards”.
The model learns fine-grained relationships.
Step 3: Relevance Scoring
The final [CLS] token embedding is passed through a classification or regression head to produce a relevance score (e.g., 0.0–1.0).
Following diagram depicts the above steps:
5️⃣ Why Use Cross-Encoders?
✅ Precision → Capture subtle differences like negations, comparisons, cause-effect. ✅ Contextual Matching → Understand domain-specific queries and rare terminology. ✅ Human-Like Judgment → Often align better with human rankings than other methods.
⚠️ Trade-Off: Expensive. They require joint inference per query–document pair, making them unsuitable for very large-scale retrieval directly.
6️⃣ Cross-Encoders in a Retrieval Pipeline
Since cross-encoders are slow, they are typically used as re-rankers:
Candidate Retrieval (fast)
Use BM25 or a bi-encoder to retrieve top-k candidates.
Re-Ranking (precise)
Apply a cross-encoder only to those candidates.
Final Results
Highly relevant docs surface at the top.
7️⃣ Python Examples: Scoring with a Cross-Encoder
7.1 Scoring with a Cross-Encoder
pip install sentence-transformers
from sentence_transformers import CrossEncoder# Load a pre-trained cross-encoder modelmodel = CrossEncoder('cross-encoder/ms-marco-MiniLM-L-6-v2')# Query and documentsquery ="Best practices for recycling lithium-ion batteries"documents = ["Lithium-ion batteries should be processed with thermal pre-treatment to reduce hazards.","Wind turbines generate clean energy in coastal regions.","Battery recycling reduces environmental footprint significantly."]# Create pairspairs = [(query, doc) for doc in documents]# Predict relevance scoresscores = model.predict(pairs)for doc, score inzip(documents, scores):print(f"Score: {score:.4f} | {doc}")
Score: 0.4742| Lithium-ion batteries should be processed with thermal pre-treatment to reduce hazards.Score: -11.2687| Wind turbines generate clean energy in coastal regions.Score: -0.7598| Battery recycling reduces environmental footprint significantly.
👉 Output shows recycling-related docs with higher scores than irrelevant ones.
7.2 Cross-Encoder as Re-Ranker
pip install rank-bm25 sentence-transformers
from rank_bm25 import BM25Okapifrom sentence_transformers import CrossEncoder# Candidate documentscorpus = ["Wind turbines increase electricity generation capacity in coastal regions.","Battery recycling reduces lifecycle carbon footprint of EVs.","Hydrogen electrolyzers are becoming more efficient in Japan.",]# Step 1: BM25 Retrievaltokenized_corpus = [doc.split(" ") for doc in corpus]bm25 = BM25Okapi(tokenized_corpus)query ="Efficiency of hydrogen electrolyzers"bm25_scores = bm25.get_scores(query.split(" "))# Select top candidatestop_docs = [corpus[i] for i in bm25_scores.argsort()[-2:][::-1]]# Step 2: Cross-Encoder Re-rankingmodel = CrossEncoder('cross-encoder/ms-marco-MiniLM-L-6-v2')pairs = [(query, doc) for doc in top_docs]rerank_scores = model.predict(pairs)print("nFinal Ranked Results:")for doc, score insorted(zip(top_docs, rerank_scores), key=lambda x: x[1], reverse=True):print(f"{score:.4f} | {doc}")
Final Ranked Results:5.5779| Hydrogen electrolyzers are becoming more efficient in Japan.-11.3173| Battery recycling reduces lifecycle carbon footprint of EVs.
Here, BM25 gives a rough shortlist, and the cross-encoder ensures true relevance comes first.
8️⃣ Real-World Applications
Search Engines → Re-ranking documents for more precise results
Legal & Policy Research → Matching queries to exact statutes/clauses
Healthcare AI → Ranking medical literature for clinical questions
Customer Support → Matching troubleshooting queries to correct FAQ entries
E-commerce → Ranking products based on nuanced query matches
9️⃣ Strengths vs. Limitations
Feature
Cross-Encoder
Bi-Encoder
BM25
Precision
✅ High
Medium
Low-Medium
Speed (Large Corpus)
❌ Slow
✅ Fast
✅ Very Fast
Scalability
❌ Limited
✅ High
✅ Very High
Contextual Understanding
✅ Strong
Medium
❌ Weak
Best Use Case
Re-Ranking
Retrieval
Candidate Retrieval
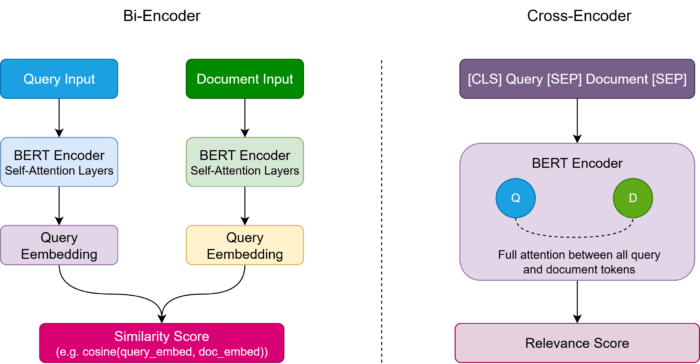
🔟Bi-Encoder vs Cross-Encoder Architecture
Figure: Bi-Encoder vs Cross-Encoder
💡Conclusion
Cross-encoders are the precision workhorses of modern information retrieval. They are not designed to scale across millions of documents alone, but as re-rankers, they deliver results that feel much closer to human judgment.
If you’re building any system where accuracy is critical — from search engines to knowledge assistants — a cross-encoder should be part of your stack.
Search is at the heart of every AI application. Whether you’re building a legal research assistant, a compliance monitoring tool, or an LLM-powered chatbot, the effectiveness of your system depends heavily on how well it can retrieve relevant information.
But here’s the problem:
If you rely only on keyword search (BM25), you’ll capture statutory phrases like “Section 420 IPC”, but miss paraphrases like “cheating law”.
If you rely only on vector search (embeddings), you’ll capture semantic meaning like “right to equality” → Article 14, but risk ignoring the exact legal terms that practitioners care about.
Neither approach is enough on its own. This is where Hybrid Search comes in — blending the precision of keywords with the flexibility of semantic vectors. And when we push it further with Cross-Encoder re-ranking, we get retrieval quality that feels much closer to human judgment.
👉 In this article, we’ll build a production-style hybrid search system for legal texts, packaged into a single Docker container. You’ll learn:
How hybrid search works (BM25 + vectors) and why it matters for AI
How to build and deploy a full-stack demo with FastAPI + a browser-based UI
How to measure retrieval quality with Precision, Recall, and NDCG
How to add Cross-Encoder re-ranking for significantly better top results
How to extend this system for real-world, large-scale AI applications
By the end, you’ll have a working legal search engine that you can run locally or deploy in production — and a clear understanding of how to balance precision, recall, and semantic coverage in retrieval systems.
Following diagram depicts the overall flow of the application.
2️⃣ Motivation: Why Hybrid Search for Legal Text?
Legal documents are tricky:
Keyword search (BM25) is precise for statutory phrases like “Section 420 IPC”, but brittle if a user types “cheating law.”
Vector search (Sentence Transformers) captures meaning (e.g., “right to equality” → Article 14), but sometimes misses terms of art.
Hybrid search combines them by weighting both signals, providing more reliable retrieval.
Cross-Encoders further refine results by deeply comparing the query with candidate passages, improving ranking precision.
This is especially important in legal AI, where accuracy, recall, and ranking quality directly impact trust.
Imagine you type “best Python tutorials” into a search engine. Millions of web pages match your query—but how does the engine know which pages are most relevant?
At the core of modern search ranking lies Information Retrieval (IR). One of the most robust and widely-used ranking algorithms in lexical search is BM25 (Best Matching 25), part of the Okapi probabilistic retrieval family.
What you’ll learn in this article:
How BM25 ranks documents and handles term frequency and document length.
Differences between BM25 and TF-IDF.
Practical Python implementation with Rank-BM25.
BM25 variants, optimizations, and hybrid search integration.
Applications, advantages, and limitations in real-world systems.
By the end, you’ll be ready to implement BM25 in search systems and combine it with modern retrieval methods.
1️⃣ What is BM25?
BM25 is a ranking function estimating how relevant a document D is for a query Q.
The following diagram illustrates the BM25 (Best Match 25) ranking algorithm pipeline, which is used to score documents against a search query.
1.1 Query
The starting point—your search terms that need to be matched against documents in a corpus.
1.2 TF Adjustment (Term Frequency)
This stage calculates how often query terms appear in each document, but with a saturation function to prevent overly long documents from dominating. BM25 uses:
k₁ = controls term frequency saturation (typically 1.2-2.0)
b = controls length normalization influence (typically 0.75)
|D| = document length
avgDL = average document length in corpus
1.3 IDF Weighting (Inverse Document Frequency)
This assigns importance to terms based on their rarity across the corpus. Common words get lower weights, rare words get higher weights:
IDF = log((N – n + 0.5) / (n + 0.5))
Where:
N = total number of documents
n = number of documents containing the term
1.4 Length Normalization
This is actually embedded in the TF adjustment (via the b parameter), but conceptually it prevents longer documents from having unfair advantages simply due to containing more words.
1.5 Score
The final BM25 score is computed by summing the contributions of all query terms:
BM25(D,Q) = Σ (IDF(qᵢ) × TF_adjusted(qᵢ, D))
This produces a relevance score for ranking documents against the query.
2️⃣ BM25 vs TF-IDF
BM25 and TF-IDF are both popular algorithms for ranking documents in information retrieval, but they approach relevance differently. TF-IDF scores a document based on how frequently a query term appears (term frequency, TF) and how rare the term is across all documents (inverse document frequency, IDF). However, it treats term frequency linearly and doesn’t account for document length, which can skew results. BM25, on the other hand, builds on TF-IDF by introducing a saturation effect for term frequency—so repeating a word excessively doesn’t overly boost relevance—and normalizes for document length, making it more effective for longer texts. Overall, BM25 is generally considered more robust and accurate in modern search engines compared to classic TF-IDF.
Feature
TF-IDF
BM25
Term frequency
Linear
Saturated (non-linear)
Document length normalization
Optional
Built-in
IDF smoothing
Rarely
Smoothed with 0.5
Tunable parameters
None
k1, b
Practical performance
Good for small datasets
Excellent for large corpora
3️ Practical Implementation in Python
Required library:
pip install nltk rank-bm25
Python code example:
import nltkfrom nltk.corpus import stopwordsfrom nltk.stem import WordNetLemmatizerfrom nltk.tokenize import word_tokenizefrom nltk.corpus.reader.wordnet importNOUN, VERB, ADJ, ADVfrom rank_bm25 import BM25Plus# ----------------------------# Download NLTK resources# ----------------------------nltk.download("punkt", quiet=True)nltk.download("punkt_tab", quiet=True)nltk.download("stopwords", quiet=True)nltk.download("wordnet", quiet=True)nltk.download("omw-1.4", quiet=True)nltk.download("averaged_perceptron_tagger", quiet=True)nltk.download("averaged_perceptron_tagger_eng", quiet=True)# ----------------------------# Preprocessing setup# ----------------------------stop_words =set(stopwords.words("english"))lemmatizer = WordNetLemmatizer()defget_wordnet_pos(tag: str):if tag.startswith("J"):returnADJelif tag.startswith("V"):returnVERBelif tag.startswith("N"):returnNOUNelif tag.startswith("R"):returnADVelse:returnNOUNdefpreprocess(text: str): tokens = word_tokenize(text.lower()) tokens = [t for t in tokens if t.isalnum()] tokens = [t for t in tokens if t notin stop_words] pos_tags = nltk.pos_tag(tokens)return [lemmatizer.lemmatize(t, get_wordnet_pos(pos)) for t, pos in pos_tags]# ----------------------------# Example corpus# ----------------------------corpus = ["Python is a popular programming language for data science and AI.","Machine learning and deep learning are subsets of artificial intelligence.","The fox is quick and brown, jumping over a lazy dog.","Developers use Python for natural language processing and search engines.","Dogs are loyal animals, often considered man's best friend."]tokenized_corpus = [preprocess(doc) for doc in corpus]# ----------------------------# Initialize BM25Plus with parameter tuning# ----------------------------k1 =1.5# term frequency saturationb =0.75# length normalizationbm25 = BM25Plus(tokenized_corpus, k1=k1, b=b)# ----------------------------# Query# ----------------------------query ="python search ai"tokenized_query = preprocess(query)# ----------------------------# Compute scores# ----------------------------scores = bm25.get_scores(tokenized_query)# ----------------------------# Rank documents# ----------------------------ranked =sorted(zip(scores, corpus), key=lambda x: x[0], reverse=True)print(f"Query: {query}\n")print("Ranked Results with k1 =", k1, "and b =", b)for score, doc in ranked:print(f"{score:.4f} -> {doc}")
Output:
(env) D:\projects\ranjankumar.in\posts\bm25>python bm25.pyQuery: python search aiRanked Results with k1 =1.5and b =0.757.6091-> Python is a popular programming language for data science andAI.7.4349-> Developers use Python for natural language processing and search engines.4.6821-> Machine learning and deep learning are subsets of artificial intelligence.4.6821-> The fox is quick and brown, jumping over a lazy dog.4.6821-> Dogs are loyal animals, often considered man's best friend.
✅ What this script demonstrates:
Preprocessing pipeline:
Converts text to lowercase
Removes punctuation
Removes stopwords
Lemmatizes using POS tags
BM25Plus scoring:
Assigns higher scores to documents that match query tokens
Avoids negative scores (common in small corpora)
Ranking documents:
Displays the most relevant documents first
✅ Parameter Tuning
BM25 has two main tunable parameters:
k1 – controls term frequency saturation
Higher k1 → repeated terms matter more
Typical range: 1.2 – 2.0
b – controls document length normalization
b=1 → full normalization (long docs penalized)
b=0 → no normalization (like TF only)
Typical range: 0.5 – 0.8
We add these as arguments when initializing BM25Plus and make it flexible to tune per corpus.
How to tune these parameters?
Short documents (tweets, messages): lower b → reduces length normalization
Long documents (articles, reports): higher b → penalizes very long docs
k1: adjust depending on whether repeated terms should contribute more
Example experimentation:
k1
b
Observations
1.2
0.5
Short docs weighted less by term repetition
1.5
0.75
Default, works well for medium-length docs
2.0
0.8
Long documents get penalized less, repeated terms matter more
4️⃣ Integrating BM25 with Embeddings (Hybrid Search)
Problem: BM25 is purely lexical — it cannot capture semantic similarity. Two documents with different words but same meaning (synonyms, paraphrases) are missed.
The Internet once felt like a boundless public square: anyone could publish, anyone could read. But the rise of large language models (LLMs) like ChatGPT is reshaping that landscape. Increasingly, these systems sit between us and the web, summarizing, compressing, and redirecting the flow of information.
The have drawn the following diagram that maps three stages in this transition: the open web we knew ➡️ today’s model-mediated hybrid, ➡️ and a possible future in which AI systems become the primary gatekeepers of knowledge.
Figure 1: Three stages of the web: before (open, peer-to-peer), now (hybrid — models ingest and serve distilled content), and coming soon (models as gatekeepers that can block or silo the live web).
1️⃣Stage 1: Before — The Open Web
In the early days, the flow of content was simple and transparent:
Individuals and entities published content directly to the open Internet. Blogs, forums, wikis, and websites were visible to anyone with a browser.
Readers consumed that content directly. Search engines were mediators, but they pointed you back to the original source, where you could verify authorship and context.
The arrows in this stage represent two-way open flows:
🔵Blue arrow: content publishing went straight to the web.
🟢Green arrow: content consumption came straight from the web.
✅The open Internet acted as the canonical source of truth. If you wanted to know something, you looked it up, navigated to the source, and judged for yourself.
2️⃣Stage 2: Now — The Partially Hidden Internet
Fast-forward to today. Generative AI systems now sit in the middle of the content pipeline.
Publishers still put their work online, but that content is increasingly being ingested by LLMs for training and contextualization.
Models like ChatGPT internalize vast amounts of this content. Through training, they compress millions of documents into patterns, weights, and probabilities.
Users often bypass the open web, asking the model instead. They receive distilled, synthesized answers — convenient, but detached from the original sources.
Here’s the nuance: the Internet is still open, but it’s becoming partially hidden by neglect. As fewer people click through to original sites, those sites effectively fade from visibility. The information is still there, but user habits obscure it.
The diagram’s arrows highlight this:
Blue arrow: publishing still goes to the web.
Internet → ChatGPT: the web now feeds training and context data.
ChatGPT → Individuals/Entities: consumption increasingly comes from the model.
This subtle shift already has profound consequences:
Publisher economics: Traffic declines as users no longer need to visit the source. Ad revenues and subscriptions shrink.
Loss of provenance: Model answers rarely carry full citations. Readers get knowledge, but not its origin story.
Data latency: Models update on snapshots. If you rely on them exclusively, you may be seeing outdated knowledge. But with ChaptGPT like system, this is not of much issue, as when it sense it needs to access the Internet, it does and pulls whatever required.
Centralized mediation: Instead of many-to-many publishing and reading, we now have a few centralized AI intermediaries distilling the web for billions.
3️⃣Stage 3: Coming Soon — A Hidden and Outdated Internet?
The final panel of the diagram sketches a possible future if current trends accelerate.
Content flows directly into AI platforms. Creators may publish through APIs or platform-specific formats. Over time, publishing “to the web” could become secondary.
AI platforms block outward flow. Knowledge distilled by the model stays inside it. Links back to the open web may diminish or disappear altogether.
The open Internet risks obsolescence. If new content bypasses the web and users stop visiting it, the web itself becomes outdated, stale, and hidden — not by censorship, but by disuse.
This creates a one-way street:
Internet → AI → Users remains active (the web continues feeding the model).
AI → Internet is blocked (knowledge doesn’t flow back into the open, linkable space).
Users → AI dominates consumption.
So, question is: “Will the Internet die out?”.
“I’m in no rush to draw conclusions, but the trend is already clear: usage of Google Search — once the primary gateway to web portals — is rapidly declining.”
If unchecked, this scenario leads to several risks:
Centralized knowledge control: A handful of companies decide what is surfaced and how it is phrased.
Epistemic narrowing: The diversity of the web shrinks into a homogenized model output.
Economic collapse of publishing: With no traffic, many creators won’t sustain open publication.
Knowledge stagnation: The open Internet could freeze into a ghost archive of outdated material, while new insights circulate only inside proprietary silos.
2. What’s Really at Stake🌟
The arrows and blocks in this diagram tell a bigger story about attention, power, and trust.
Attention: People follow the path of least friction. If the fastest way to get an answer is through a model, they’ll use it — even if that hides the source.
Power: Whoever controls the model controls access to knowledge. This centralizes influence in unprecedented ways.
Trust: Without links or provenance, we must trust the model’s synthesis. But trust without transparency is fragile.
3. Three Possible Futures🔮
The diagram presents a pessimistic scenario, but the future is not locked. Here are three trajectories:
1️⃣Model-First Monopoly (pessimistic)
LLMs dominate consumption. The open web shrivels. Knowledge lives in silos controlled by a few companies. Transparency and diversity decline.
2️⃣Hybrid Web with Safeguards (moderate, plausible)
Models remain central, but they integrate retrieval from live sources, enforce provenance, and link back to original sites. Publishers are compensated via licensing. The open web shrinks in importance but stays relevant.
3️⃣Open, Accountable AI Ecosystem (optimistic)
Standards, regulation, and user demand ensure models must cite sources and share value with creators. Open-source models and decentralized tools keep the open Internet alive as the foundation for all AI.
4. What Needs to Happen Next✅
The Internet doesn’t have to become hidden and outdated. There are practical steps stakeholders can take:
For publishers and creators:
Use structured metadata (schema.org, sitemaps) to make content machine-readable.
Explore licensing or API partnerships with model providers.
Build direct community value: newsletters, podcasts, events — channels models can’t easily replicate.
For AI developers:
Prioritize provenance: always link to sources in outputs.
Reduce knowledge latency: combine training with live retrieval (RAG).
For policymakers:
Require transparency about training datasets.
Mandate citation and fair compensation mechanisms.
Protect the open Internet as critical public infrastructure.
For users:
Demand answers with citations.
Support creators directly.
Stay aware: a model’s convenience comes with tradeoffs in diversity and context.
5. Conclusion: Will the Web Die Out?
The arrows in my diagram are more than technical flows. They are signals of where culture, economics, and trust may shift.
The open Internet flourished because it was transparent, participatory, and decentralized. Generative AI offers enormous convenience, but if it becomes the only interface to knowledge, we risk burying the very ecosystem that gave rise to it.
The Internet doesn’t have to die. But unless we actively design models, policies, and habits that keep it alive, the most likely outcome is slow neglect — a gradual hiding of the web, not by censorship, but by inattention.
The question isn’t just whether the web will survive. The deeper question is: Do we want our knowledge ecosystem to be open and diverse, or closed and centralized?
The way we write code is changing faster than ever. For decades, developers have relied on traditional IDEs like IntelliJ IDEA, Eclipse, and Visual Studio, or lighter editors like VS Code, to build applications. These tools provide powerful static analysis, debugging, and integrations with build systems — but they all share a common trait: they’re manual-first environments. Developers do the heavy lifting, and the IDE simply supports them.
Enter AI-first development. With the rise of large language models (LLMs) such as GPT-4, Claude, and others, it’s now possible for your editor to act not just as a tool, but as a collaborator. Instead of writing boilerplate code, digging through documentation, or manually wiring up APIs, developers can ask their editor to do it — and receive high-quality, context-aware results in seconds.
This is the promise of Cursor, a next-generation code editor that reimagines the developer experience around AI. Unlike IntelliJ or even AI-augmented VS Code extensions, Cursor is built from the ground up with AI at its core. It doesn’t just autocomplete it:
Understands your entire codebase (not just the current file).
Lets you chat with your repo to ask architectural or functional questions.
Automates refactoring, documentation, and test generation.
Integrates with external tools through the Model Context Protocol (MCP), bridging the gap between coding and DevOps.
In practice, Cursor feels less like a static IDE and more like having a pair-programming partner that knows your project intimately, works at lightning speed, and is always available.
Why does this matter? Because developers spend up to 60% of their time on repetitive tasks: writing boilerplate, reading legacy code, setting up CI/CD pipelines, or debugging infrastructure issues. Cursor eliminates much of this friction, letting teams focus on core logic, design, and innovation.
One of the most immediate benefits developers notice when switching to Cursor is its AI-driven autocomplete and context-aware refactoring capabilities. While traditional IDEs like IntelliJ and VS Code provide smart suggestions based on syntax trees and static analysis, Cursor goes further by understanding your project holistically.
Instead of just predicting the next token or keyword, Cursor considers the entire repo context (function names, comments, libraries in use, even related files) to produce semantically accurate suggestions. This allows it to assist with everything from simple autocompletion to large-scale refactoring.
Let’s now go through some python examples.
Example 1: Smarter Autocomplete
In a typical editor, when you start typing:
def calculate_user_...
Traditional IDE autocomplete might suggest:
calculate_user_input()
calculate_user_score() (if already defined elsewhere in the same file).
But in Cursor, if your project already has a PaymentService, a User model, and related billing functions, it might suggest:
Why? Because Cursor has scanned your entire repo and understands that:
user_id is commonly used as a parameter in your project.
There’s a discount field in models/user.py.
cart_total appears in checkout logic.
This makes the autocomplete contextually relevant instead of generic.
Example 2: Boilerplate Elimination
Suppose you’re writing a REST API in FastAPI. Normally, you’d write:
@app.get("/users/{user_id}")defget_user(user_id: int):# TODO: Fetch user from database
Cursor can immediately expand this into:
@app.get("/users/{user_id}")defget_user(user_id: int): conn = get_db() cur = conn.cursor() cur.execute("SELECT * FROM users WHERE id = ?", (user_id,)) row = cur.fetchone()if row:returndict(row)raise HTTPException(status_code=404, detail="User not found")
This saves you from retyping standard database access logic.
At first glance, both functions do the same thing — make an API request, handle errors, return JSON. This violates the DRY principle (Don’t Repeat Yourself).
With Cursor, you can highlight both functions, right-click → “Refactor with AI”, and it produces a cleaner version:
In a large repo, you might have hundreds of print() calls sprinkled across different modules. Cursor can scan the entire repo and replace them with a consistent logging pattern.
Here, one function has no type hints, while another partially does. Cursor can normalize all functions to use consistent Python type hints across the repo.
Cursor didn’t just add logging; it expanded the error handling into best practices:
Specific exception handling (FileNotFoundError).
logger.exception() to capture stack traces.
Type hints for clarity.
✨ Why Repo-Wide Consistency Matters
Code Quality: Enforces modern Python standards across the codebase.
Maintainability: Future contributors see consistent patterns, reducing onboarding time.
Reduced Bugs: AI can suggest best practices like structured logging or typed error handling.
Faster Reviews: PRs become easier to review when style is consistent.
2.2 Repo-Wide Understanding 🧠
One of Cursor’s biggest differentiators is its ability to understand the entire codebase holistically, not just the file you’re currently editing. Traditional IDEs like IntelliJ or VS Code rely mostly on static analysis and language servers. While they are great at local code navigation (e.g., finding references, renaming symbols), they lack the semantic, AI-driven comprehension of how different parts of the code interact.
Cursor changes that by leveraging large language models (LLMs) trained to read and reason across multiple files, enabling developers to query, refactor, and maintain large repos with much less friction.
Why Repo-Wide Understanding Matters
Cross-File Awareness: Cursor understands relationships between classes, functions, and APIs spread across different modules.
Better Refactoring: Instead of just renaming a variable, Cursor knows when a deeper semantic change is needed across files.
Onboarding Speed: New developers can ask Cursor questions about the repo and get guided explanations without reading every line of code.
Consistency: Ensures that architectural patterns and coding practices are applied uniformly across the project.
Practical Use Cases
1. Asking High-Level Questions About the Repo
Instead of manually digging through files, you can ask Cursor:
Prompt:
Explain how authentication works in this repo.
Cursor Output (summarized):
Authentication logic is implemented in auth_service.py.
JWT tokens are generated in jwt_utils.py.
Middleware auth_middleware.py validates tokens for API routes.
User roles are checked in permissions.py.
👉 This gives developers a map of the system instantly.
2. Tracing a Feature Across Files
Suppose you’re debugging how a user registration request flows through the system.
Prompt:
Trace what happens when a new user registers,from API call to database insertion.
Calls user_controller.create_user() in controllers/user_controller.py.
Which calls user_service.create_user() in services/user_service.py.
Finally inserts user data into users collection in db/user_repository.py.
👉 Instead of manually jumping across files, Cursor explains the end-to-end execution flow.
3. Detecting Architectural Inconsistencies
Imagine a large repo where some API endpoints are returning raw dicts, while others return Pydantic models. Cursor can flag this by scanning multiple files.
Prompt:
Check if all API responses in this repo use Pydantic models.
Cursor Output:
user_routes.py: ✅ uses UserResponse (Pydantic).
order_routes.py: ❌ returns raw dict.
invoice_routes.py: ❌ returns JSON via json.dumps.
👉 This kind of repo-wide consistency check is almost impossible in IntelliJ without heavy manual effort.
4. Repo-Wide Search and Refactor
Unlike traditional “Find & Replace,” Cursor can do semantic-aware replacements.
Example:
Replace all instances of `datetime.now()` with `datetime.utcnow()` across the repo, and ensure all files import `from datetime import datetime`.
Cursor applies the change across multiple files and presents diffs for review, ensuring correctness.
Why This Is a Game-Changer
For Large Teams: New developers can get “guided tours” of the repo from Cursor.
For Refactoring: Changes don’t break hidden dependencies because Cursor understands usage across files.
For Documentation: You can generate repo-level summaries, API documentation, or dependency graphs directly.
For DevOps: Repo-wide analysis helps enforce coding standards before merging into production.
2.3 Faster Onboarding for New Developers (Playbook)
When a new developer joins a project, the biggest hurdle isn’t writing new code — it’s understanding the existing codebase.
Traditionally, onboarding involves:
Reading incomplete or outdated documentation.
Searching through hundreds of files to understand architecture.
Asking senior developers countless questions.
Spending weeks before feeling confident to contribute.
Cursor dramatically accelerates this process with its AI-powered, repo-aware assistance. Instead of relying only on tribal knowledge or digging into scattered READMEs, developers can ask Cursor directly and get instant, context-rich answers.
Instead of throwing a new developer into the deep end, you can give them a structured playbook that uses Cursor’s repo-wide intelligence. This transforms onboarding from a passive reading exercise into an interactive learning journey.
Step 1: Get the Big Picture
Action: Open Cursor and ask:
Give me a high-level overview of this repository. What are the main modules and their purposes?
Expected Outcome: Cursor summarizes the repo into sections like routes/, services/, db/, utils/, etc., giving the developer a mental map of the project.
Step 2: Explore a Key Feature
Action: Ask Cursor to explain an important workflow (e.g., user signup, order processing).
Trace the flow of user signup,from the API endpoint to database insertion.
Expected Outcome: Cursor describes each step across files (routes → controllers → services → db → utils), showing how modules interact.
👉 This builds end-to-end system understanding quickly.
Step 3: Understand Important Utilities
Action: Pick a shared utility (e.g., authentication, email sending, logging) and ask Cursor:
Explain the `auth_utils.py` file and show me where its functions are used.
Expected Outcome: Cursor explains the role of each function and lists references across the repo.
👉 The developer gains context of shared dependencies.
Step 4: Learn by Refactoring
Action: Practice making a small repo-wide change with Cursor, e.g.:
Replace all print() calls with logger.info().Ensure logger is initialized correctly in each file.
Expected Outcome: Cursor applies changes across the repo, and the developer reviews diffs.
👉 This teaches safe, AI-assisted editing.
Step 5: First Contribution Roadmap
Action: Ask Cursor for step-by-step guidance on adding a new feature.
Generate API documentation for all routes in this repo.
Expected Outcome: Cursor generates a roadmap: update routes → controller → service → utils → tests.
👉 The developer has a clear task plan for their first PR.
Step 6: Generate Documentation
Action: Ask Cursor to auto-generate missing documentation.
Generate API documentation for all routes in this repo.
Expected Outcome: Cursor produces an up-to-date list of endpoints, methods, and descriptions.
👉 The developer sees living documentation that matches the code.
Step 7: Self-Check Understanding
Action: Ask Cursor quiz-style questions to reinforce learning.
What happens if an invalid JWT is passed to a protected route?
Which function handles the validation?
Expected Outcome: Cursor explains error-handling flow, showing how requests are rejected.
👉 This ensures the developer has absorbed practical knowledge.
One of the toughest parts of onboarding isn’t just learning the codebase — it’s learning the team’s DevOps practices:
How do I run tests?
How does CI/CD work?
What are the deployment steps?
What coding standards do we enforce?
Cursor accelerates this by acting as a DevOps mentor alongside being a coding assistant.
Step 8: Running Tests the Easy Way
Action: Ask Cursor how tests are organized:
Explain the test structure in this repo.
How do I run all tests locally?
Expected Outcome: Cursor identifies whether the repo uses pytest, unittest, or another framework, and shows the exact command (e.g., pytest -v).
👉 This ensures new devs start contributing with test-driven confidence.
Step 9: Understanding CI/CD Pipelines
Action: Ask Cursor to explain the CI/CD setup:
Explain how the CI/CD pipeline works in this repo.
What happens when I push a new branch?
Expected Outcome: Cursor explains:
Tests run on GitHub Actions.
Lint checks enforce PEP8.
Docker image is built and pushed to registry.
Deployment is triggered on staging after merge.
👉 New developers instantly grasp the release lifecycle.
Step 10: Enforcing Coding Standards
Action: Ask Cursor to check code quality rules:
What linting or formatting rules are enforced in this repo?
Expected Outcome: Cursor identifies tools like black, flake8, or pylint, and explains how they’re configured in pyproject.toml or .flake8.
👉 New devs learn what the CI expects before pushing code.
Step 11: Security & Dependency Awareness
Action: Ask Cursor about security checks:
Does this repo have any tools for dependency vulnerability scanning?
Expected Outcome: Cursor might highlight:
pip-audit or safety in use.
GitHub Dependabot alerts.
Docker scanning via Trivy.
👉 This helps new developers build security-first habits.
Step 12: Automating DevOps Tasks
Cursor can help new devs write or modify automation scripts:
Prompt Example:
Generate a GitHub Actions workflow to run pytest and flake8 on every pull request.
👉 New developers learn hands-on DevOps by example, guided by AI.
3. Sample Project: Building an E-Commerce Checkout Microservice with Cursor🛠️
To showcase the true power of Cursor, let’s walk through building a Checkout Service for an e-commerce platform. This service handles:
Cart validation
Payment processing
Order creation
Inventory update
Step 1: Project Setup with Cursor
Create a new repo: checkout-service.
Scaffold the project in Python + FastAPI using Cursor’s AI-assisted boilerplate generation.
Prompt Example:
“Generate a FastAPI microservice with endpoints: /checkout, /cart, and /order. Include request/response models.”
Try the above prompt in your cursor’s AI agent’s console:
Step 2: AI-Powered Autocomplete & Refactoring
While adding logic, Cursor suggests payment validation functions and error handling.
Later, we ask Cursor to refactor duplicated inventory code into a utility module.
Prompt Example:
“Refactor the repeated stock check logic into a reusable check_inventory() function.”
Step 3: Repo-Wide Understanding
The service has models across multiple files (cart.py, order.py, inventory.py).
Ask Cursor:
“Update all references of cart_id to shopping_cart_id across the repo.”
Cursor updates consistently across all files — even SQLAlchemy models and tests.
Step 4: MCP for Database Queries
Instead of manually switching to psql:
Prompt Example:
“Using the MCP Postgres server, show me the last 10 failed transactions in the orders table.”
Cursor generates and runs:
SELECT*FROM orders WHEREstatus='failed'ORDER BY created_at DESCLIMIT10;
Results appear inline in the IDE.
Step 5: MCP for Linting & Security
Run MCP-powered ESLint/Pylint:
“Lint the entire repo and auto-fix style issues.”
Run MCP-powered Trivy security scan:
“Check for vulnerabilities in Python dependencies.”
Cursor not only runs these but also summarizes findings and suggests fixes.
Step 6: Testing with MCP
Ask Cursor:
“Run all pytest unit tests and summarize failures.”
Cursor uses MCP to execute tests and highlight failing cases.
AI suggests fixes, e.g., updating mock data in test_checkout.py.
Step 7: CI/CD Automation with MCP
Finally, deploy to staging:
“Trigger the GitHub Actions workflow for checkout-service:staging.”
Cursor streams pipeline logs directly into the IDE.
4. Productivity Gains for Developers 🚀
Cursor doesn’t just make coding easier — it reshapes how teams deliver software. By combining AI assistance with repo-wide awareness, Cursor drives measurable productivity improvements across coding, reviews, onboarding, and DevOps.
4.1 Reduced Context Switching
Traditional Pain Point: Developers constantly toggle between IDE, docs, Stack Overflow, and internal wikis.
With Cursor: You can query your repo or external docs directly inside the IDE.
Example Prompt: “Explain the password reset flow in this repo.”
Case Study – SaaS Startup: A 6-person SaaS team estimated each developer spent ~40 minutes/day searching docs. With Cursor, that dropped to ~5–10 minutes.
Net Savings: ~3 hours/week per developer → ~18 hours/week across the team.
4.2 Faster Refactoring and Maintenance
Traditional Pain Point: Repo-wide renames or logic changes are error-prone and time-consuming.
With Cursor: Repo-wide consistency tools ensure safe, traceable diffs.
Example Prompt: “Rename customer_id to client_id across the repo and update all references, including migrations and tests.”
Case Study – Fintech App: A fintech company needed to update all references when migrating from account_number to iban. Normally estimated at 4–5 dev-days. Using Cursor, the change was executed, reviewed, and tested in under 6 hours.
Net Savings: ~80% faster turnaround.
4.3 Accelerated Onboarding
Traditional Pain Point: New hires take weeks to understand system architecture.
With Cursor: AI can explain modules, trace workflows, and summarize dependencies in minutes.
Example Prompt: “Trace the entire user signup flow from API endpoint to database insert.”
Case Study – HealthTech Platform: A new backend engineer onboarded in 4 days instead of 3 weeks by using Cursor to:
Summarize key services.
Generate architectural diagrams.
Auto-explain error handling conventions.
Net Impact: Faster contribution → the engineer shipped their first PR in week 1 instead of week 3.
4.4 Smarter Code Reviews
Traditional Pain Point: Senior engineers spend significant time flagging style inconsistencies and missing test cases.
With Cursor: Developers can pre-check their own code.
Example Prompt: “Check this PR for repo style, error handling, and missing tests.”
Case Study – E-commerce Company: Developers began running AI self-reviews before opening PRs. Reviewers reported a 40% reduction in nitpick comments. Review cycles shortened from ~3 days to ~1.5 days.
Net Impact: Faster feature releases and happier reviewers.
4.5 DevOps & CI/CD Integration
Traditional Pain Point: Debugging failing pipelines requires deep CI/CD knowledge.
With Cursor: AI explains workflow YAMLs and failure logs in plain English.
Example Prompt: “Why is this GitHub Actions workflow failing?”
Case Study – AI Startup: After adopting Cursor, junior developers could debug and fix 70% of CI failures themselves, without escalating to DevOps.
Net Impact: Reduced DevOps bottleneck → quicker deployments.
4.6 Continuous Learning Without Breaking Flow
Traditional Pain Point: Learning a new library or API breaks focus.
With Cursor: Developers can ask repo-contextual questions like:
“How do we use FastAPI dependencies for authentication in this project?”
Case Study – Agency Work: An agency onboarding multiple client projects reported 50% less time spent ramping up on new frameworks, as developers learned inline while coding.
📊 Measurable Impact
Area
Traditional Time
With Cursor
Savings
Searching docs
30–40 mins/day
5–10 mins
~3 hrs/week
Repo-wide refactor
3–5 dev-days
< 1 day
70–80% faster
New hire onboarding
2–3 weeks
3–5 days
~2 weeks saved
Code review cycles
~3 days/PR
~1.5 days
40–50% faster
Debugging CI failures
1–2 hrs/failure
15–20 mins
~75% faster
Bottom Line: A 10-person dev team can save ~40–50 hours/week, freeing engineers to focus on innovation rather than grunt work.
5. Leveraging MCP Servers for Development Productivity 🔗
Cursor by itself is already a powerful AI coding companion, but it becomes a true end-to-end developer productivity hub when combined with MCP (Model Context Protocol) servers. MCP enables Cursor to talk to external tools, services, and data sources in a structured way, making it possible for developers to bring DevOps, security, testing, and database operations directly into the IDE.
5.1 What Are MCP Servers?
MCP (Model Context Protocol) is an open standard that allows AI tools like Cursor to:
Call external tools (e.g., run linters, CI/CD jobs, security scans).
Standardize workflows across teams with shared integrations.
Think of MCP servers as adapters that plug your AI assistant into your development + operations stack.
Figure 1: Overview
5.2 Why MCP Servers Matter
Without MCP, Cursor is mostly limited to your local codebase. It can refactor, autocomplete, and understand repo context — but it cannot take action outside your files.
With MCP servers, Cursor becomes an active co-developer that can:
Run tests
Query databases
Scan dependencies for vulnerabilities
Kick off CI/CD pipelines
Fetch logs and metrics
This eliminates the need to constantly switch between IDE, terminal, dashboards, and monitoring tools.
5.3 Practical Use Cases with Connections
5.3.1. Database Exploration 🗄️
Use Case: Inspect orders or failed transactions directly inside Cursor.
“Fetch error rate for the checkout-service from 2–3 PM yesterday.”
✅ Benefit: Debugging production issues directly inside the IDE.
5.4 Best Practices
Minimal Scope: Connect only the tools you actually need.
RBAC Security: Use least-privilege roles for DB/CI/CD connections.
Shared Prompt Library: Standardize MCP usage with cursor-prompts.md.
Fail-Safe Defaults: Configure MCP servers in read-only mode for prod DBs.
Team Adoption: Use version-controlled configs so all devs share the same MCP setup.
5.5 Future of MCP
Teams will build custom MCP servers for internal systems (billing APIs, HR data, analytics).
Large orgs will adopt company-wide MCP configs, ensuring consistency in DevOps tooling.
Cursor + MCP will evolve into a true DevOps copilot — writing, testing, deploying, and monitoring software seamlessly.
6. DevOps Benefits with Cursor ⚙️
Developers don’t just code—they deploy, monitor, and maintain software. Cursor helps across the DevOps lifecycle:
CI/CD Automation
AI can scaffold GitHub Actions, GitLab pipelines, Jenkinsfiles.
Example prompt: “Create a GitHub Actions workflow to run tests, build Docker image, and push to Docker Hub.”
Infrastructure as Code (IaC)
Generate Terraform, Ansible, or Helm configs with AI assistance.
Monitoring & Debugging
Stream logs from Docker/Kubernetes into Cursor.
Ask: “Why is my pod restarting?”
Security & Compliance
AI explains vulnerabilities found in scans and suggests remediation steps.
Collaboration
AI-generated PR summaries make code reviews faster.
Documentation and changelogs stay up to date automatically.
7. Best Practices for Using Cursor 📌
While Cursor brings AI superpowers to coding, the way you use it determines how much value you extract. Below are proven best practices to maximize productivity, maintain code quality, and ensure seamless collaboration in a team setting.
7.1 Treat Cursor as a Coding Partner, Not a Replacement
Cursor is powerful, but it’s not infallible. Think of it as a pair programmer who:
Suggests boilerplate and refactoring ideas.
Explains code quickly.
Helps with consistency across files.
But you are still the architect. Always review AI-generated code before merging.
👉 Example:
Cursor suggests a database query.
You validate that it uses indexes properly and doesn’t introduce security issues like SQL injection.
7.2 Start with Clear Prompts
The quality of AI suggestions depends on how you prompt Cursor. Be explicit:
Instead of: “Fix this code.”
Try: “Refactor this function to use async/await and follow the error handling style used in auth_service.py.”
👉 Tip: Always include context — reference filenames, frameworks, or conventions in your prompt.
7.3 Use Cursor for Repetitive & Boilerplate Work
Cursor excels at mundane, repetitive coding tasks, freeing you to focus on logic and design.
Auto-generate CRUD routes.
Convert functions to follow typing standards.
Insert consistent logging.
7.4 Combine Cursor with MCP Servers for Superpowers
Don’t limit yourself to autocomplete. MCP servers integrate external tools right inside Cursor:
👉 Best Practice: Use MCP to run automated consistency checks repo-wide before merging PRs.
7.5 Always Cross-Check Business Logic
Cursor understands syntax & patterns, but not your business rules.
If you’re coding tax calculations, financial rules, or compliance logic → don’t blindly trust AI.
Use Cursor to draft, then validate against requirements/tests.
👉 Tip: Encourage test-driven development (TDD) when using Cursor — let tests confirm correctness.
7.6 Encourage Team-Wide Usage
To maximize benefits, standardize how your entire team uses Cursor:
Agree on prompt styles (“always mention file name + purpose”).
Store common prompts/snippets in your wiki.
Use Cursor’s repo-wide AI features for consistency across developers.
7.7 Keep Human-in-the-Loop for Reviews
Even with Cursor’s refactoring and summarization:
Always run CI/CD pipelines.
Ensure code reviews remain mandatory.
Treat AI-generated code as junior dev contributions → helpful, but need supervision.
7.8 Use Cursor for Knowledge Sharing & Onboarding
Encourage new devs to use Cursor’s:
Summarization for quick repo understanding.
Code navigation for finding functions.
Refactoring for learning repo conventions.
👉 This accelerates onboarding without overwhelming seniors with repeated questions.
✅ Quick Do’s & Don’ts
✅ Do
❌ Don’t
Use Cursor for boilerplate, refactoring, docs
Blindly merge AI-generated code
Be specific in prompts
Use vague one-liners like “fix this”
Integrate MCP servers for productivity
Rely on Cursor alone for security checks
Treat AI as a coding partner
Expect Cursor to understand business rules
Share prompt/playbook across team
Let each dev use Cursor in isolation
✅ Conclusion
Cursor is more than just another code editor—it’s a paradigm shift in how we build and maintain software.
Developers benefit from AI-driven autocomplete, repo-wide search, and code refactoring.
Teams adopt best practices for safer, AI-assisted workflows.
MCP servers connect Cursor to external tools, reducing context switching.
DevOps engineers gain automation for CI/CD, infrastructure, monitoring, and security.
By blending AI-native coding with DevOps automation, Cursor allows developers to focus on what matters most — solving real business problems instead of wrestling with boilerplate.
Annexure
1. Cursor Prompt Playbook (Reusable Templates)
Here are some battle-tested prompt templates you can adapt to your project.
1.1 Refactoring Prompt
👉 Use when you want Cursor to improve code readability, maintainability, or follow repo standards.
Prompt:
Refactor the following function to improve readability and follow the repo-wide style.
Use typing hints
Add a docstring following Google style
Handle errors consistently (as in auth_service.py)
fromtypingimportOptionaldefget_user(user_id:int) ->Optional[User]:"""Fetch a user by their ID. Returns None if user is not found. """try:returndb.query(User).filter(User.id==user_id).first()exceptExceptionase:logger.error(f"Error fetching user {user_id}: {e}")returnNone
1.2 Bug Fix Prompt
👉 Use when debugging failing tests or runtime errors.
Prompt:
Analyze this error and suggest a fix. Ensure the fix is consistent with the repo’s existing patterns. Provide both the corrected code and a short explanation.
👉 Use to generate missing docstrings or improve inline comments.
Prompt:
Add detailed docstrings to the following Python file using Google style. Include argument types, return types, and edge cases. Do not change any logic.
1.4 Consistency Check Prompt
👉 Use for repo-wide alignment.
Prompt:
Review this code and ensure it is consistent with the repo’s style:
Typing hints
Logging format
Error handling
Function naming conventions
1.5 Repo Exploration Prompt
👉 Perfect for onboarding or exploring unknown code.
Prompt:
Summarize what this file/module does, including:
Its primary responsibilities
Key functions/classes
Dependencies on other files
Any external libraries used
1.6. DevOps/CI Prompt
👉 Use to understand pipelines or automate checks.
Prompt:
Explain what this GitHub Actions workflow does in simple terms. Highlight:
Trigger conditions
Key steps (build, test, deploy)
Any secrets/environment variables needed
🎯 How to Use This Playbook
Individual developers → Keep a copy of these prompts inside CONTRIBUTING.md.
Teams → Share them in Slack/Notion for consistent usage.
Onboarding → New devs can use these as “training wheels” when starting with Cursor.
✅ Cheat Sheet (one-line prompts for quick copy-paste)
Refactor function (quick): Refactor this function to add type hints, a docstring, and repo-consistent error handling: <PASTE CODE>
Bug fix (quick): Explain and fix this error: <PASTE ERROR MESSAGE + CODE>
Docstrings (quick): Add Google-style docstrings to this file: <PASTE FILE>
Consistency check (quick): Make this file consistent with repo style: add typing, logging, and handle errors like auth_service.py
Repo explore (quick): Summarize this repo/folder and list key modules and their responsibilities.
CI explanation (quick): Explain this GitHub Actions workflow in plain terms: <PASTE YAML>
Replace print with logger (quick): Replace print() with logger.* across selected files and add logger initialization where missing.
Generate tests (quick): Generate pytest tests for this function/endpoint: <PASTE CODE OR PATH>
Security triage (quick): Analyze this vulnerability report and suggest fixes: <PASTE REPORT>
✅ Best practices & governance
Always review diffs. Treat AI output as a first draft.
Use branches. Run repo-wide refactors in a feature branch and run full CI.
Share prompt templates. Put this file in docs/ so the whole team uses consistent prompts.
Keep prompts up to date. As your repo evolves, refine templates (e.g., change logging style).
Human-in-the-loop. Keep code review and testing mandatory for AI-generated changes.
MCP integrations. Pair prompts with MCP servers for linting, security scanning, DB introspection, and running pipelines from Cursor.
Data privacy is one of the biggest challenges in deploying AI systems. From healthcare to finance, sensitive datasets are often required to train or run machine learning models — but sharing raw data with cloud providers or third-party services can lead to regulatory, security, and trust issues.
What if we could train and run models directly on encrypted data? That’s the promise of Homomorphic Encryption (HE) — a cryptographic technique that allows computations on ciphertexts without ever decrypting them.
In this blog, we’ll build a series of demo applications in Python that showcase how homomorphic encryption can power privacy-preserving machine learning:
🔑 Introduction to homomorphic encryption
🧮 Linear regression on encrypted data
🌐 FastAPI-based encrypted inference service
✅ Logistic regression classification with encrypted medical data
Traditional encryption protects data at rest (storage) and in transit (network), but not during computation. Once data is processed, it must be decrypted — exposing it to whoever is running the computation.
Homomorphic encryption changes this paradigm. It enables computation on encrypted values such that when decrypted, the result matches the computation as if it were done on plaintext.
For example:
Client encrypts 5 and 7
Server computes (enc_5 + enc_7)
Client decrypts → gets 12
The server never saw the numbers 5 or 7, but still produced a meaningful result.
This opens the door for privacy-preserving AI services where cloud providers can run models on user data without ever seeing the raw inputs.
2. Python Libraries for Homomorphic Encryption
Several libraries bring HE to Python developers:
Pyfhel → general-purpose HE (wrapper around Microsoft SEAL)
For our demos, we’ll use TenSEAL, which is designed for encrypted machine learning use cases.
Install it:
pip install tenseal
3. Demo: Linear Regression with Encrypted Data
Let’s start with a toy regression task: predict house price from house size using encrypted training data.
Step 1: Setup TenSEAL Context
import tenseal as tsimport numpy as npdefcreate_context(): context = ts.context( ts.SCHEME_TYPE.CKKS,poly_modulus_degree=8192,coeff_mod_bit_sizes=[60, 40, 40, 60] ) context.global_scale =2**40 context.generate_galois_keys()return context
This function creates a CKKS homomorphic encryption context with polynomial modulus degree 8192, precision scale 2^40, and Galois keys enabled. This context is the foundation for performing encrypted computations (like addition, multiplication, or rotations) on encrypted real numbers.
It’s creating a toy dataset where the price is directly proportional to the size, with a multiplier of 15.
Step 3: Encrypt Data
context = create_context()enc_X = [ts.ckks_vector(context, [val]) for val in X]enc_y = [ts.ckks_vector(context, [val]) for val in y]
This snippet takes the plaintext training data (X and y) and converts each number into an encrypted vector using CKKS. After this step, you can do computations (like addition, multiplication, scaling) directly on the encrypted data without ever decrypting it.
Step 4: Training (Simplified Gradient Descent)
For demo purposes, we decrypt inside gradient computation — but in a real HE setup, all computations could remain encrypted.
deftrain_linear_regression(enc_X, enc_y, lr=0.1, epochs=20): w, b =0.0, 0.0 n =len(enc_X)for epoch inrange(epochs): grad_w, grad_b =0, 0for xi, yi inzip(enc_X, enc_y): y_pred = xi * w + b error = y_pred - yi grad_w += (xi * error).decrypt()[0] grad_b += error.decrypt()[0] grad_w /= n grad_b /= n w -= lr * grad_w b -= lr * grad_bprint(f"Epoch {epoch+1}: w={w:.4f}, b={b:.4f}")return w, b
The code trains a simple linear regression model using gradient descent. It starts with weight and bias set to zero, then for each epoch it computes predictions, calculates the error, and derives gradients with respect to the weight and bias. These gradients are averaged, then used to update the parameters by stepping in the opposite direction of the gradient. Although the inputs are encrypted, the gradients are decrypted during computation (for demo purposes). Finally, the function prints progress each epoch and returns the learned weight and bias.
Step 5: Train and Predict
w, b = train_linear_regression(enc_X, enc_y)print(f"Final model: price = {w:.2f} * size + {b:.2f}")enc_input = ts.ckks_vector(context, [6.0])enc_pred = enc_input * w + bprint("Prediction for size=6:", enc_pred.decrypt()[0])
The code trains the model, prints the learned equation, and demonstrates making a prediction on new encrypted data.
✅ We successfully trained & inferred on encrypted data.
4. Challenges and Limitations
While homomorphic encryption (HE) makes it possible to run machine learning on encrypted data, there are several practical challenges that must be understood before deploying such systems at scale:
4.1 Performance Overhead
Problem: HE computations are significantly slower compared to traditional machine learning on plaintext data.
For example, a single encrypted addition or multiplication can take milliseconds, while the same operation on plaintext takes microseconds or less.
Complex models that involve thousands or millions of operations (like deep neural networks) can become prohibitively slow.
Why it happens: Encryption schemes like CKKS or BFV encode values as large polynomials. Each multiplication or addition involves expensive polynomial arithmetic, number-theoretic transforms (NTT), and modulus switching.
Impact: HE is currently more suitable for smaller models (linear regression, logistic regression, decision trees) than large-scale deep learning, unless heavily optimized.
Performance → HE computations are slower than plaintext ML.
Ciphertext size → Encrypted data is much larger than plaintext.
Limited operations → Non-linear functions (sigmoid, softmax) must be approximated.
Training → Training fully on encrypted data is possible but heavy; many systems use federated learning + HE for practicality.
4.2 Ciphertext Size & Memory Consumption
Problem: Encrypted data (ciphertexts) are much larger than plaintext data.
For example, a single encrypted floating-point number might take a few kilobytes, whereas the raw value is just 8 bytes.
Why it happens: HE ciphertexts must include redundancy and structure (e.g., modulus, polynomial coefficients) to allow encrypted computations.
Impact:
Storing large datasets in encrypted form can require 10–100× more space.
Network communication between client and server becomes bandwidth-heavy.
Memory usage on the server can be a bottleneck if too many encrypted vectors are processed simultaneously.
4.3 Limited Supported Operations
Problem: Homomorphic encryption schemes support only a restricted set of operations efficiently.
Linear operations (addition, multiplication) are natural.
Non-linear functions like sigmoid, tanh, softmax, ReLU are not directly supported.
Workaround: Use polynomial approximations of non-linear functions.
Example: Replace the logistic sigmoid with a simple polynomial
These approximations work well in limited ranges but reduce accuracy.
Impact:
High-accuracy deep learning models cannot be fully ported to HE without approximation losses.
Research is ongoing into better polynomial or piecewise approximations that preserve accuracy while being HE-friendly.
4.4 Training on Encrypted Data
Problem: Training machine learning models entirely on encrypted data is computationally very expensive.
Gradient descent requires repeated multiplications, non-linear activations, and updates across many iterations.
Even a small logistic regression trained under HE can take hours or days.
Practical Approach:
Federated Learning + HE:
Clients keep data locally.
They compute model updates (gradients) on plaintext but encrypt them before sending to a central server.
The server aggregates encrypted updates (without seeing individual contributions) and updates the global model.
This hybrid approach combines efficiency with privacy, making it more realistic than fully HE-based training.
Impact: End-to-end encrypted training is still an active research area, with most production-ready solutions focusing on encrypted inference or encrypted aggregation of updates.
Homomorphic encryption is a breakthrough for privacy-preserving machine learning, but it comes with trade-offs: slower computations, larger ciphertexts, limited function support, and impracticality for large-scale training. For now, HE is most effective in encrypted inference and in combination with federated learning for training.
5. Future Directions
Homomorphic encryption for machine learning is still in its early stages, but the pace of research and applied innovation is accelerating. The next few years will likely bring advancements that address today’s limitations and open new possibilities for privacy-preserving AI. Here are some promising directions:
5.1 Federated Learning with Homomorphic Encryption
What it is:
In federated learning, multiple clients (e.g., hospitals, banks, mobile devices) train a shared model collaboratively without centralizing raw data.
Each client computes local updates (gradients or weights) and sends them to a central server for aggregation.
With HE, these updates can be encrypted before transmission. The server aggregates encrypted updates and sends back an improved global model — all without ever seeing the clients’ raw data or gradients.
Why it matters:
Protects sensitive datasets such as medical records, financial transactions, or user behavior logs.
Prevents the server or malicious insiders from inferring private information from model updates.
Enables cross-organization collaboration — e.g., pharmaceutical companies jointly training models on encrypted clinical trial data.
Challenges ahead:
Scaling to millions of clients while keeping training efficient.
Handling non-IID data (when different clients’ data distributions differ significantly).
Balancing HE’s computational overhead with the real-time needs of federated learning.
5.2 Encrypted Deep Learning
The vision: Run full-scale deep learning models like Convolutional Neural Networks (CNNs) for image classification or Transformers for natural language processing directly on encrypted inputs.
Progress so far:
Research prototypes have shown CNNs running on encrypted images for tasks like digit recognition (MNIST) or medical imaging.
Transformers under HE are being studied for privacy-preserving NLP, where users can query encrypted documents without revealing their text.
Why it’s hard:
Deep models rely heavily on non-linear functions (ReLU, softmax, attention mechanisms), which HE does not natively support.
Even polynomial approximations for these functions become unstable as model depth increases.
The ciphertext growth and computational cost scale rapidly with network complexity.
The future:
Research into HE-friendly neural architectures — custom-designed layers that avoid costly operations.
Use of bootstrapping optimizations (refreshing ciphertexts) to enable deeper computations.
Hybrid models where only the most privacy-sensitive layers are run under HE, while less critical parts run in plaintext.
5.3 Hybrid Privacy Technologies
Homomorphic encryption is powerful, but it isn’t a silver bullet. The most promising direction is combining HE with other privacy-preserving technologies to build robust, end-to-end secure ML systems:
HE + Differential Privacy (DP):
HE ensures the data remains encrypted during computation.
DP adds statistical noise to outputs or gradients to prevent leakage about individual records.
Together, they provide both cryptographic security and formal privacy guarantees.
HE + Secure Multi-Party Computation (SMPC):
SMPC splits data across multiple parties who jointly compute without revealing their shares.
HE can accelerate or simplify SMPC protocols by reducing communication rounds.
This hybrid approach is useful for high-stakes collaborations (e.g., banks jointly detecting fraud without revealing customer data).
HE + Trusted Execution Environments (TEE):
TEE (like Intel SGX) provides hardware-based secure enclaves.
HE can complement TEEs by reducing the trust required in hardware vendors — even if an enclave is compromised, the data remains encrypted.
5.4 Looking Ahead
The long-term vision is fully private AI pipelines, where:
Data is encrypted at collection.
Training happens across multiple entities without any party seeing the raw data.
Inference is run on encrypted queries, producing encrypted outputs.
Clients alone decrypt results, ensuring data confidentiality, model confidentiality, and output confidentiality.
If today’s limitations are addressed, such pipelines could transform industries like:
Healthcare: AI diagnosis on encrypted medical scans without hospitals sharing raw images.
Finance: Fraud detection on encrypted transaction streams.
Government & Defense: Secure intelligence sharing across agencies.
Consumer Tech: Voice assistants or chatbots that process encrypted user inputs without “listening in.”
6. Conclusion
The future of homomorphic encryption in machine learning is not about HE alone, but about ecosystems of privacy technologies — federated learning for collaboration, HE for encrypted computation, DP for statistical privacy, SMPC for secure multi-party workflows, and TEEs for hardware-level isolation. Together, these will bring us closer to a world where AI can learn from everyone, without exposing anyone.
AI engineers spend a lot of time building, training, and iterating on models. But as pipelines grow more complex, it becomes difficult to answer simple but crucial questions:
Which dataset version trained this model?
Which parameters were used?
Who triggered this training job?
Can I reproduce this run six months later?
Without structured provenance tracking, reproducibility and compliance become almost impossible. In regulated domains, this is not optional — it’s mandatory.
In this article, we’ll show how to integrate W3C PROV-O (a standard for provenance modeling) with MLflow (a popular experiment tracking framework) in a PyTorch pipeline. The result: every training run not only logs metrics and artifacts but also generates a machine-readable provenance graph for accountability, auditability, and governance.
MLflow is widely used for experiment tracking. It records metrics, parameters, and artifacts like models and logs. However, MLflow’s logs are application-specific and not standardized for knowledge sharing across systems.
W3C PROV-O is a semantic ontology (built on RDF/OWL2) that provides a standardized vocabulary for describing provenance: Entities, Activities, and Agents, and their relationships (prov:used, prov:wasGeneratedBy, prov:wasAttributedTo).
By combining the two:
MLflow provides the data source of truth for training runs.
PROV-O provides the interoperable representation of lineage, useful for audits, governance, and integration into knowledge graphs.
🏗️ Architecture Overview
Our integration maps MLflow concepts to PROV-O concepts:
MLflow Concept
PROV-O Equivalent
Example
MLflow Run
prov:Activity
Training job run ID f4a22
MLflow Artifact (model)
prov:Entity
model_v1.pth
Dataset (input)
prov:Entity
dataset.csv
Metrics (loss, accuracy)
prov:Entity
metrics.json
MLflow User/System
prov:Agent
Engineer triggering the run
⚙️ Step 1: Setup
We need a combination of MLflow (for tracking) and rdflib (for provenance graph generation).
pip install mlflow torch rdflib prov
mlflow → tracks experiments, models, metrics, and artifacts.
torch → used for building the PyTorch model.
rdflib → builds and serializes RDF/PROV-O graphs.
prov → utilities for working with W3C PROV specifications.
🧑💻 Step 2: PyTorch Training with MLflow Logging
We start with a simple PyTorch script that trains a small neural network while logging to MLflow.
At this point, MLflow is recording metrics (loss), params (lr), and the trained model artifact. But it doesn’t capture semantic provenance — for example, which dataset was used, who ran this job, and how results are connected.
🔗 Step 3: Provenance Tracker for MLflow
Here’s where PROV-O comes in. We build a Provenance Tracker that:
This query returns dataset.csv as the dataset that trained model_f4a22.pth.
The SPARQL queries can be run using the following Python script:
import rdflib# Create a Graph objectg = rdflib.Graph()# Parse the TTL file into the graphg.parse("prov_70d8b46c6451416d92a0ae7cac4c8602.ttl", format='turtle')# Define your SPARQL querysparql_query ="""SELECT ?dataset WHERE { ex:model_70d8b46c6451416d92a0ae7cac4c8602.pth prov:wasGeneratedBy ?activity . ?activity prov:used ?dataset .}"""# Execute the queryresults = g.query(sparql_query)# Process the resultsfor row in results:print(row)
👉 Returns datasets that were reused in multiple model generations.
⚡ These queries assume you have prov:used, prov:generated, prov:wasAttributedTo, and timestamps (prov:endedAtTime or prov:generatedAtTime) in your TTL logs.
✅ Why This Matters
By extending MLflow with PROV-O, AI engineers gain:
Reproducibility → Every model is linked to the exact data and parameters that generated it.
Auditability → Regulators and compliance teams can trace how outputs were produced.
Transparency → Business stakeholders can understand lineage without relying on tribal knowledge.
Interoperability → Since PROV-O is a W3C standard, provenance metadata can be integrated into external governance, data catalog, and knowledge graph systems.
Practical Guide for AI Engineers with Supporting Tools
Artificial Intelligence (AI) is no longer a research curiosity—it powers critical systems in healthcare, finance, transportation, and defense. But as AI adoption grows, so do the risks: bias, security vulnerabilities, lack of transparency, and unintended consequences.
To help organizations manage these challenges, the U.S. National Institute of Standards and Technology (NIST) introduced the AI Risk Management Framework (AI RMF 1.0) in January 2023.
For AI engineers, this framework is more than high-level governance—it can be operationalized with existing open-source libraries, MLOps pipelines, and monitoring tools. Let’s break it down.
What is the NIST AI RMF?
The AI RMF is a voluntary, flexible, and sector-agnostic framework designed to help organizations manage risks across the AI lifecycle.
Its ultimate goal is to foster trustworthy AI systems by emphasizing principles like fairness, robustness, explainability, privacy, and accountability.
Think of it as the AI-equivalent of DevSecOps best practices—a structured way to integrate risk thinking into design, development, deployment, and monitoring. Instead of retrofitting ethical or legal concerns at the end, engineers can bake them directly into code, pipelines, and testing.
The Core Pillars of AI RMF and Supporting Tools
NIST organizes the framework around four core functions, known as the AI RMF Core. For engineers, these map nicely onto the ML lifecycle.
1. Govern – Organizational Structures & Accountability
What it means: Governance is about who owns risk and how it is tracked. Without clear accountability, even the best fairness metrics or privacy protections won’t scale. This function ensures leadership commitment, defined responsibilities, and enforceable processes.
How engineers can implement it:
Standardize documentation for datasets and models.
Track lineage and provenance of data and experiments.
Build reproducible ML pipelines so decisions can be audited later.
Supporting Tools:
Model Cards (Google) → lightweight docs describing model purpose, limitations, and ethical considerations.
Datasheets for Datasets (MIT/Google) → dataset documentation to capture origin, bias, and quality.
What it means: Before writing a line of model code, engineers need to understand context, stakeholders, and risks. Mapping ensures the AI system is aligned with real-world use cases and surfaces risks early.
How engineers can implement it:
Identify who the AI system impacts (users, communities, regulators).
Document the intended use vs. possible misuse.
Anticipate risks (bias, adversarial threats, performance in edge cases).
Supporting Tools:
NIST Trustworthy AI Playbook → companion guide with risk templates and examples.
Data Provenance Tools:
Pachyderm → versioned data pipelines.
DVC → Git-like data and model versioning.
LakeFS → Git-style object store for ML data.
Risk Taxonomy Checklists → resources from Partnership on AI and OECD for structured risk mapping.
3. Measure – Quantifying and Testing Risks
What it means: Mapping risks isn’t enough—you need to quantify them with metrics. This includes fairness, robustness, explainability, privacy leakage, and resilience to adversarial attacks.
How engineers can implement it:
Integrate fairness and bias checks into CI/CD pipelines.
Run explainability tests to ensure interpretability across stakeholders.
Stress-test robustness with adversarial attacks and edge cases.
Supporting Tools:
Fairness & Bias:
IBM AIF360 → 70+ fairness metrics and mitigation strategies.
Microsoft Fairlearn → fairness dashboards and post-processing.
Explainability:
SHAP, LIME, Captum (PyTorch) → feature attribution and local/global explainability.
Evidently AI → interpretability reports integrated with drift monitoring.
Robustness & Security:
Adversarial Robustness Toolbox (ART) → adversarial testing, poisoning, and defense.
Foolbox → adversarial attack generation for benchmarking model resilience.
4. Manage – Continuous Monitoring & Mitigation
What it means: AI risks don’t stop at deployment—they evolve as data shifts, adversaries adapt, and systems scale. Managing risk means establishing feedback loops, monitoring dashboards, and incident response plans.
How engineers can implement it:
Treat models as living systems that require continuous health checks.
Monitor for data drift, bias drift, and performance decay.
Set up incident management protocols for when AI fails.
Supporting Tools:
MLOps Platforms: Kubeflow, Seldon, MLflow for deployment and lifecycle tracking.
Continuous Monitoring:
Neptune.ai → experiment tracking with risk-aware metrics.
Fair with Harm Mitigation → Fairlearn, AIF360, Evidently AI bias dashboards.
For engineers, these aren’t abstract principles—they map directly to unit tests, pipelines, and monitoring dashboards you can implement today.
Why It Matters for Engineers
Traditionally, “risk” in engineering meant downtime or performance degradation. But in AI, risk is multi-dimensional:
A biased recommendation engine → unfair economic impact.
A misclassified medical image → patient safety risks.
An adversarial attack on a financial model → systemic security threat.
The AI RMF helps engineers broaden their definition of risk and integrate safeguards across the lifecycle.
By adopting the framework with supporting tools, engineers can:
Automate fairness, robustness, and privacy checks in CI/CD.
Log provenance for datasets and models.
Build dashboards for continuous risk monitoring.
Collaborate with legal and policy teams using standardized documentation.
Getting Started (Actionable Steps)
Integrate Provenance Tracking → Use DVC or Pachyderm in your ML pipeline.
Automate Fairness & Robustness Tests → Add Fairlearn and ART checks into CI/CD.
Adopt Transparency Practices → Publish Model Cards for all deployed models.
Monitor in Production → Deploy Evidently AI or WhyLabs for drift & bias detection.
Collaborate Cross-Functionally → Align engineering practices with governance and compliance teams.
Final Thoughts
The NIST AI RMF is not a compliance checklist—it’s a living guide to building trustworthy AI. For engineers, it bridges the gap between technical implementation and organizational responsibility.
By embedding Govern, Map, Measure, Manage into your workflow—and leveraging open-source tools like AIF360, Fairlearn, ART, MLflow, and Evidently AI—you don’t just ship models, you ship trustworthy models.
As regulation around AI tightens globally (EU AI Act, U.S. AI Executive Orders, ISO/IEC standards), frameworks like NIST’s AI RMF will help engineers stay ahead of the curve.
👉 Takeaway for AI Engineers: Use the NIST AI RMF as your north star, and operationalize it with today’s open-source and enterprise tools. Trustworthy AI isn’t just theory—it’s code, pipelines, and monitoring.
In Part 2, we built a ProvenanceTracker that generates signed, schema-versioned lineage logs for datasets, models, and inferences. That ensures trust at the data level — but provenance becomes truly valuable when we can query and reason about it.
In this post, we’ll import the signed logs into Neo4j, the leading graph database, and show how to query provenance directly using Cypher.
An Inference must be traceable back to the model and dataset(s).
Representing this as a graph gives us a natural way to answer questions like:
“Which datasets were used to train this model?”
“Which inferences came from this model version?”
“What is the complete lineage of an inference?”
Step 1. Provenance Importer with Signature Verification
The importer reads signed JSONL logs, verifies signatures, and inserts data into Neo4j with constraints.
# ProvenanceImporter.pyimport jsonimport base64from typing import Dict, Anyfrom cryptography.hazmat.primitives import hashesfrom cryptography.hazmat.primitives.asymmetric import paddingfrom cryptography.hazmat.primitives.serialization import load_pem_public_keyfrom neo4j import GraphDatabaseEXPECTED_SCHEMA="1.1"classProvenanceImporter:def__init__(self, uri, user, password, public_key_path: str):self.driver = GraphDatabase.driver(uri, auth=(user, password))# Load public key for verifying signatureswithopen(public_key_path, "rb") as f:self.public_key = load_pem_public_key(f.read())defclose(self):self.driver.close()def_verify_signature(self, signed_data: str, signature_b64: str) -> bool:try: signature = base64.b64decode(signature_b64)self.public_key.verify( signature, signed_data.encode("utf-8"), padding.PSS(mgf=padding.MGF1(hashes.SHA256()),salt_length=padding.PSS.MAX_LENGTH, ), hashes.SHA256(), )returnTrueexceptException:returnFalsedef_validate_jsonl(self, jsonl_path: str):""" Validate schema + signatures before import. Returns list of verified payloads (dicts). """ valid_records = []withopen(jsonl_path, "r") as f:for line_no, line inenumerate(f, start=1):try: envelope = json.loads(line.strip())except json.JSONDecodeError:raiseValueError(f"Line {line_no}: invalid JSON") schema = envelope.get("schema_version") signed_data = envelope.get("signed_data") signature = envelope.get("signature")if schema !=EXPECTED_SCHEMA:raiseValueError(f"Line {line_no}: schema version mismatch ({schema})")ifnot signed_data ornot signature:raiseValueError(f"Line {line_no}: missing signed_data/signature")ifnotself._verify_signature(signed_data, signature):raiseValueError(f"Line {line_no}: signature verification failed")# Verified, safe to parse valid_records.append(json.loads(signed_data))return valid_recordsdefimport_from_jsonl(self, jsonl_path: str):# Validate before importingprint("🔍 Validating provenance log file...") valid_records =self._validate_jsonl(jsonl_path)print(f"✅ Validation successful: {len(valid_records)} records")withself.driver.session() as session:self._ensure_constraints(session)for record in valid_records:self._process_record(session, record)def_process_record(self, session, record: Dict[str, Any]):if record["type"] =="dataset": session.run(""" MERGE (d:Dataset {hash: $hash}) SET d.path = $path, d.description = $desc, d.timestamp = $ts """,hash=record["hash"],path=record["path"],desc=record.get("description", ""),ts=record["timestamp"], )elif record["type"] =="model": session.run(""" MERGE (m:Model {name: $name, commit: $commit}) SET m.hyperparameters = $hyperparams, m.environment = $env, m.timestamp = $ts """,name=record["model_name"],commit=record.get("git_commit", "N/A"),hyperparams=json.dumps(record.get("hyperparameters", {})),env=json.dumps(record.get("environment", {})),ts=record["timestamp"], )# Multiple dataset linksfor d_hash in record.get("dataset_hashes", []): session.run(""" MATCH (d:Dataset {hash: $hash}) MATCH (m:Model {name: $name}) MERGE (d)-[:USED_IN]->(m) """,hash=d_hash,name=record["model_name"], )elif record["type"] =="inference": session.run(""" MERGE (i:Inference {id: $id}) SET i.input = $input, i.output = $output, i.timestamp = $ts WITH i MATCH (m:Model {name: $name}) MERGE (m)-[:GENERATED]->(i) """,id=record.get("id"),name=record["model_name"],input=json.dumps(record.get("input", {})),output=json.dumps(record.get("output", {})),ts=record["timestamp"], )def_ensure_constraints(self, session):"""Create uniqueness constraints (idempotent).""" session.run("CREATE CONSTRAINT IF NOT EXISTS FOR (d:Dataset) REQUIRE d.hash IS UNIQUE") session.run("CREATE CONSTRAINT IF NOT EXISTS FOR (m:Model) REQUIRE (m.name, m.commit) IS UNIQUE") session.run("CREATE CONSTRAINT IF NOT EXISTS FOR (i:Inference) REQUIRE i.id IS UNIQUE")# ---------------------------# Example usage# ---------------------------if__name__=="__main__": importer = ProvenanceImporter("bolt://localhost:7687", "neo4j", "password@1234", "public_key.pem" )try: importer.import_from_jsonl("provenance_logs.jsonl")print("✅ Imported signed provenance logs into Neo4j with constraints")exceptExceptionas e:print(f"❌ Import aborted: {e}")finally: importer.close()
Step 2. Running Neo4j and Importer
Start Neo4j via Docker: docker run --publish=7474:7474 --publish=7687:7687 neo4j:latest
Access the Neo4j Browser at http://localhost:7474 Default user/pass: neo4j/neo4j (change the password after first login).
Run the importer: python ProvenanceImporter.py
Step 3. Querying Provenance with Cypher
Fig: Schema Diagram
3.1 List all datasets
MATCH (d:Dataset)RETURN d.hash AS hash, d.path AS path, d.description AS description, d.timestamp AS logged_atORDER BY logged_at DESC;
3.2 List all models and their hyperparameters
MATCH (m:Model)RETURN m.name AS model, m.commit AS git_commit, m.hyperparameters AS hyperparams, m.environment AS env, m.timestamp AS logged_atORDER BY logged_at DESC;
3.3 Show which datasets were used for each model
MATCH (d:Dataset)-[:USED_IN]->(m:Model)RETURN d.hash AS dataset_hash, d.path AS dataset_path, m.name AS model, m.commit AS commitORDER BY model;
3.4 List all inferences with input/output
MATCH (m:Model)-[:GENERATED]->(i:Inference)RETURN i.id AS inference_id, m.name AS model, i.input AS input_data, i.output AS output_data, i.timestamp AS tsORDER BY ts DESC;
3.5 Full provenance lineage (dataset → model → inference)
MATCH (d:Dataset)-[:USED_IN]->(m:Model)-[:GENERATED]->(i:Inference)RETURN d.hash AS dataset_hash, m.name AS model, i.id AS inference_id, i.timestamp AS tsORDER BY ts DESC;
3.6 Visualize provenance graph
MATCH (d:Dataset)-[:USED_IN]->(m:Model)-[:GENERATED]->(i:Inference)RETURN d, m, i;
👉 Run this in Neo4j Browser and click the graph view (circle-node visualization). You’ll see the chain of custody: Datasets → Models → Inferences.
3.7 Find models trained on multiple datasets
MATCH (m:Model)<-[:USED_IN]-(d:Dataset)WITH m, collect(d.hash) AS datasetsWHERE size(datasets) >1RETURN m.name AS model, datasets, size(datasets) AS dataset_count;
3.8 Check if all models have dataset provenance
MATCH (m:Model)WHERENOT (m)<-[:USED_IN]-(:Dataset)RETURN m.name AS model_without_provenance;
No changes, no records
⚡ With these queries, you can:
Audit which dataset versions were used
Trace from inference results back to datasets
Verify reproducibility and compliance
What We Achieved
By combining signed JSONL provenance logs with Neo4j:
Schema constraints ensure data integrity.
Every record is tamper-resistant (signatures verified before import).
Relationships are explicit (USED_IN, GENERATED).
Provenance queries are expressive (thanks to Cypher).
✅ Takeaway: With Neo4j as the provenance store, AI engineers can query, audit, and explain the complete lineage of any model or inference — a vital step toward trustworthy and compliant AI systems.