In modern AI pipelines, provenance — the lineage of datasets, models, and inferences — is becoming as important as accuracy metrics. Regulators, auditors, and even downstream consumers increasingly demand answers to questions like:
Which dataset was this model trained on?
What code commit produced this artifact?
How do we know logs weren’t tampered with after training?
To answer the above-raised questions, let’s walk through a Python-based provenance tracker that logs lineage events, cryptographically signs them, and maintains schema versioning for forward compatibility.
1. The Provenance Tracker: Key Features
The ProvenanceTracker implements three important ideas:
Multiple dataset support
Models often train on more than one dataset (train + validation + test).
This tracker keeps a list of dataset hashes (dataset_hashes) and auto-links them to model logs.
Signed JSONL envelopes
Each log entry is wrapped in an envelope: { "schema_version": "1.1", "signed_data": "{…}", "signature": "" }
signed_data is serialized with stable JSON (sort_keys=True).
A digital signature (RSA + PSS padding + SHA-256) is generated using a private key.
Schema versioning
schema_version = "1.1" is embedded in every record.
2. The Provenance Tracker: Source Code
Before we get to the provenance tracker code, let’s see a companion script generate_keys.pythat creates the RSA keypair (private_key.pem, public_key.pem). This is used by the ProvenanceTracker.py to sign the JSONL logs.
# generate_keys.pyfrom cryptography.hazmat.primitives.asymmetric import rsafrom cryptography.hazmat.primitives import serialization# Generate RSA private key (2048 bits)private_key = rsa.generate_private_key(public_exponent=65537,key_size=2048,)# Save private key (PEM)withopen("private_key.pem", "wb") as f: f.write( private_key.private_bytes(encoding=serialization.Encoding.PEM,format=serialization.PrivateFormat.PKCS8,encryption_algorithm=serialization.NoEncryption(), ) )# Save public key (PEM)public_key = private_key.public_key()withopen("public_key.pem", "wb") as f: f.write( public_key.public_bytes(encoding=serialization.Encoding.PEM,format=serialization.PublicFormat.SubjectPublicKeyInfo, ) )print("✅ RSA keypair generated: private_key.pem & public_key.pem")
Run once to create your keypair:
python generate_keys.py
Here’s a secure ProvenanceTracker (schema version 1.1) that:
This creates a strong lineage link: Dataset(s) → Model
3.3 Inferences
Every inference is logged with a deterministic ID, computed as a SHA-1 hash of the input payload. This ensures repeat queries generate the same inference ID (helpful for deduplication).
An AI engineer could extend this design in several directions:
Neo4j Importer: Build a provenance graph to visualize dataset → model → inference lineage.
Metrics integration: Log evaluation metrics (AUC, F1) into the model record.
MLOps pipelines: Integrate into training jobs so every experiment auto-generates signed lineage logs.
Cloud KMS keys: Replace PEM private key with keys from AWS KMS, GCP KMS, or HashiCorp Vault.
Verification service: Deploy a microservice that validates provenance logs on ingestion.
7. Why This Matters for You
As AI systems leave the lab and enter regulated domains (finance, healthcare, insurance), being able to say:
“This prediction came from Model X at commit Y, trained on Dataset Z, verified cryptographically.”
…will be non-negotiable.
Implementing provenance today sets you ahead of compliance requirements tomorrow.
This ProvenanceTracker is a blueprint for trustworthy AI engineering — versioned, signed, and reproducible lineage for every dataset, model, and inference in your pipeline.
Note: The Customer churn dataset can be downloaded from Kaggle and can be renamed and placed in the data directory.
Imagine debugging a complex AI pipeline without knowing which version of the dataset was used, how the features were preprocessed, or which checkpoint your model came from.
It feels like trying to fix a car engine blindfolded.
This is where provenance comes in. In everyday life, provenance means “the origin and history of an object”—like how art collectors care about where a painting was created, who owned it, and how it changed hands.
In AI, provenance plays the same role: it provides the paper trail of data, models, and inference processes. For engineers, it’s not just a compliance buzzword—it’s the difference between flying blind and having full visibility into your system.
2. What Do We Mean by Provenance in AI?
At its core, provenance answers two questions:
Where did this come from?
What happened to it along the way?
Breaking it down:
Data Provenance – Where the dataset originated (source system, sensor, scraper), how it was cleaned, annotated, or transformed.
Model Provenance – Which algorithm, architecture, hyperparameters, code commits, and training checkpoints were used.
Inference Provenance – Which input went into the system, which version of the model handled it, and what external knowledge (e.g., retrieved documents for LLMs) influenced the output.
Think of it like Git for AI systems, but not just code—it’s Git for data, models, and decisions.
3. Why Engineers Should Care About Provenance
Let’s be honest—engineers already juggle versioning, monitoring, and debugging. Why add another layer? The answer is: because provenance directly impacts the things engineers care most about such as:
🔄 Reproducibility
Ever had a model perform brilliantly during training but fail miserably in production? Without provenance, you won’t know if the issue was due to different data, missing preprocessing, or a silent dependency update.
🛠 Debugging Failures
When a fraud detection model misses a case, or an LLM hallucinates, provenance lets you retrace the steps:
Was the input preprocessed correctly?
Did the model drift due to newer data?
Was the wrong model version deployed?
✅ Trust and Compliance
In regulated industries, provenance is not optional. Imagine telling a regulator:
“We don’t know which dataset our AI was trained on, but trust us—it works.”
That’s a career-ending statement. Provenance provides the audit trail to show decision accountability.
👩💻 Team Collaboration
Large AI teams often face the “who changed what?” problem. Provenance provides a shared source of truth, just like version control did for software engineering.
4. Best Practices: How to Build Provenance into Your AI Stack
Here’s how engineers can start today:
1. Data Lineage Tracking
Store dataset hashes, schema versions, and preprocessing scripts.
Tools: Pachyderm, Delta Lake, Weights & Biases.
2. Model Lineage
Version every model artifact.
Log hyperparameters, training environment (Docker image, dependencies), and code commit hash.
Tools: MLflow, DVC, Hugging Face Hub.
3. Inference Logging
Record input queries, model version, and outputs.
For LLMs: capture prompt templates and retrieved context documents (this is sometimes called Retrieval Provenance).
4. Cryptographic Provenance (Next Frontier)
Use hashing and digital signatures to verify datasets and models.
Standards like W3C PROV-O and NIST AI RMF are moving toward cryptographic provenance.
5. Automate It
Don’t rely on engineers remembering to log everything. Instead:
Make provenance tracking a default part of pipelines (Airflow, Kubeflow).
Integrate it into CI/CD for ML (MLOps pipelines).
6. Open-Source Tools for AI Provenance & Metadata Tracking
Tool / Platform
Type
Description
MLflow
Open-source
Experiment tracking, model registry, lifecycle metadata
DVC
Open-source
Data/model versioning with Git integration
AiiDA
Open-source
Provenance graph for end-to-end workflows (scientific)
OpenMetadata + Marquez
Open-source
Data lineage with UI and API; supports column-level tracking
Tribuo
Open-source
Java ML library with built-in provenance
Atlas
Open-source
Transparency and verifiable ML pipelines
PROV-AGENT
Open-source
Provenance tracking for AI agent workflows
ProML
Open-source
Blockchain-backed ML provenance platform
Vamsa
Open-source
Automated feature/data usage provenance in Python scripts
Collective Knowledge
Open-source
Reproducible experiment packaging, FAIR workflows
Neptune.ai
Commercial
Collaboration-focused experiment tracking with lineage
Ravi runs a small auto parts shop in Navi Mumbai. His day starts at 8 AM, but even before he lifts the shutter, his phone is already buzzing. Customers want to know if a specific part is in stock. A supplier has sent an invoice that needs checking. A potential buyer has emailed asking for a quote — marked urgent.
By the time Ravi responds to everyone, he’s drained — and the shop hasn’t even opened.
For many small business owners like him, this is daily life: endless tasks, limited hands, tight margins. Hiring more staff isn’t feasible. Outsourcing feels expensive. And AI? That’s something only massive corporations with Silicon Valley budgets could afford — or so Ravi thought.
What if he could have his own digital assistant — one that never sleeps, never complains, and works at a fraction of the cost?
This is where Large Language Models (LLMs) come in. Once the playground of tech giants, LLMs are now accessible, affordable, and practical for small and medium enterprises (SMEs). Even better: they don’t always need the cloud.
This is Ravi’s story — and the story of thousands of SMEs discovering how AI can help them grow without burning holes in their pockets.
2. Why SMEs Need LLMs
Ravi isn’t alone.
Meera, who runs a boutique travel agency in Jaipur, spends hours daily answering the same visa questions on WhatsApp.
Arjun, who owns a logistics firm in Pune, is buried under compliance paperwork.
Neha, who manages a clothing boutique in Delhi, struggles to keep up with customer queries across Instagram, WhatsApp, and email.
Different businesses. Same problem: limited people, unlimited expectations.
Customers today demand instant replies, 24/7 support, and professional service. SMEs can’t afford large teams or call centers, leading to lost sales and unhappy customers.
LLMs flip this equation. They act as digital force multipliers by:
Handling FAQs instantly
Drafting emails and replies
Translating into local languages
Summarizing lengthy documents
Helping staff find knowledge quickly
It’s not about replacing people. It’s about amplifying small teams so they can focus on growth, not grunt work.
3. Breaking the Myth: AI Isn’t Just for Big Companies
When Ravi first heard of AI chatbots, he imagined giant servers, complicated code, and lakhs of rupees in cloud bills. “AI is for Tatas and Birlas, not a six-person shop like mine,” he thought.
But that’s a myth.
Today, open-source LLMs like LLaMA, Qwen, Phi, and Mistral are lightweight and efficient. With the right setup, they can run on a mid-range workstation or even a laptop. No massive infrastructure required.
Even better, local deployment means data stays private. Ravi’s customer information never leaves his shop — unlike cloud services that often raise data concerns.
AI is no longer just for big players. SMEs can play too — and win.
4. Practical Use Cases for SMEs
a) Customer Support Chatbot for FAQs
Every day Ravi’s shop gets the same questions: “Do you deliver outside Navi Mumbai?” “What’s the warranty on this clutch plate?” “Can I return a faulty part?”
Earlier, Ravi or his assistants had to stop mid-task to reply — sometimes late at night.
Now, an LLM-powered chatbot (trained on his product catalog and policies) answers instantly, politely, and accurately. Ravi only steps in when a query is complex, like bulk orders. His team saves energy for meaningful interactions.
b) Writing Product Descriptions & Marketing Content
Ravi always struggled with writing product listings. Manufacturer descriptions were too technical, and leaving blanks made his catalog look unprofessional.
With LLMs, he simply uploads product specs, and in seconds gets customer-friendly text:
Before: “Voltage: 220V, RPM: 1000, Plastic body.”
After: “A lightweight 220V drill machine designed for everyday use. Perfect for DIY projects, with a sturdy body and reliable performance.”
The same tool drafts Facebook posts and promotional SMS messages, helping him market like a pro without hiring an agency.
c) Translating Offers into Local Languages
One day a customer said, “Bhaiya, sab English mein likha hai. Hindi mein batao na.”
That’s when Ravi realized half his customers weren’t comfortable with English. With an LLM, he translated offers into Hindi and Marathi, making messages inclusive and relatable.
Result? Customers felt understood. Competitors still sent everything in English.
Meera, the travel agent, does the same — sending brochures in Hindi, Gujarati, and Bengali to expand her customer base.
d) Summarizing Compliance & Legal Documents
Arjun, the logistics owner, used to spend evenings wrestling with GST notices and government circulars. Now he uploads PDFs to an LLM and asks simple questions like:
“What’s the penalty if I miss the deadline?”
“Which rules apply for turnover under ₹5 crore?”
The AI explains in plain language, cutting dependency on costly consultants. Ravi uses the same approach with supplier contracts, finally understanding terms before signing.
e) Training New Employees with Company Knowledge
Every new hire meant hours of Ravi’s time explaining policies:
Fast-moving products
Discount rules
Return process
Now, Ravi loads this knowledge into an LLM assistant. New employees ask the AI instead of interrupting him 20 times a day.
Onboarding is faster, consistent, and less stressful. Meera also uses this to train interns at her travel agency.
5. The Road Ahead for Ravi and SMEs
Ravi’s journey is just beginning. His auto parts shop still has the same tight space, same six people, same crowded Navi Mumbai street. But with AI, he’s no longer drowning in repetitive tasks. He spends more time negotiating with suppliers, building customer relationships, and planning how to expand.
For SMEs everywhere, the message is clear: AI is no longer a luxury — it’s a necessity.
The road ahead won’t be without challenges:
Choosing the right tools
Training staff to use them
Balancing automation with human touch
But SMEs that embrace AI early will stand out — more efficient, more responsive, and more competitive.
And for Ravi, the tired shopkeeper who once thought AI was out of reach, the future suddenly feels a lot more manageable — and exciting.
If you’ve ever built a chatbot that confidently answered the wrong question, you know the pain of poor intent detection. Imagine a user typing:
“Block my debit card immediately.”
If your chatbot treats that as a generic banking query instead of an urgent fraud request, the experience goes from frustrating to dangerous.
This is where intent classification comes in. Whether you’re building an Dummy Bank banking assistant, a customer service bot, or an internal support tool, correctly classifying user input before handing it off to a Large Language Model (LLM) is key to delivering fast, accurate, and safe responses.
In this guide, we’ll break down how to:
Detect user intent using three practical approaches — Fine-tuned models, Zero-shot LLMs, and Few-shot LLMs.
Route each intent to the right handler function for execution.
Apply these methods to a banking domain example that developers can adapt for their own projects.
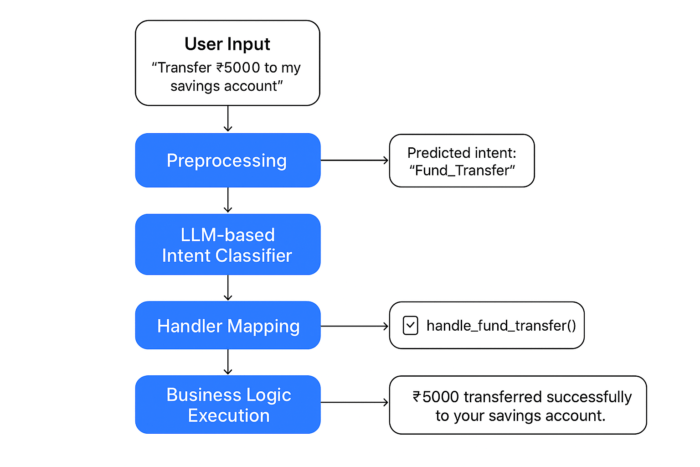
2. Chatbot Intent Classification Pipeline
Here’s the high-level workflow you’ll implement:
1. Input Reception – The chatbot receives the raw user message. 2. Preprocessing – Normalize text (lowercasing, punctuation handling, tokenization). 3. Intent Classification – Use ML or LLM to predict the most likely intent (e.g., check_balance, block_card). 4. Handler Mapping – Map the predicted intent to a specific function in your codebase. 5. Response Generation – Call the handler, optionally using an LLM to format or elaborate the output.
Below is a simplified diagram of the pipeline:
By the end of this article, you’ll not only understand the theory but also have ready-to-run code for all three approaches, along with tips for choosing the right one for your use case.
2. Why Intent Classification is Important for Chatbots
Banking customers expect fast and accurate responses. A chatbot without intent classification would behave like a generic Q&A bot—it might give unrelated or vague answers.
With intent classification, the chatbot can:
Identify the exact customer need (e.g., “Check account balance”)
Route the request to the right handler
Provide accurate, domain-specific responses
Example:
Query: “What’s my savings account balance?”
Without intent classification → Might return a random banking FAQ answer
With intent classification → Identifies as “Check_Balance” and fetches live balance
3. Flow of Intent Classification + Handler in LLM-Based Chatbot
Let’s understand the flow of pipeline step by step:
3.1 User Input
Example:“Transfer ₹5000 to my savings account”
What to consider:
Input may come from different channels:web chat, mobile app, voice → convert ASR result to text for voice.
Record metadata (user_id, session_id, channel, timestamp) for auditing and debugging.
Following is the example message envelope (JSON):
{"user_id": "user-123","session_id": "sess-456","channel": "mobile","text": "Transfer ₹5000 to my savings account","timestamp": "2025-08-12T09:10:00+05:30"}
Mask or redact PII(Personally Identifiable Information) for logs (partial redaction), but keep full data for the handler (in secure memory).
Language detection / transliteration (if supporting multi-lingual inputs).
Example amount normalization:
defparse_amount(text):# very small heuristic example match = re.search(r'₹\s?([\d,]+)', text)if match:returnfloat(match.group(1).replace(',', ''))returnNone
If preprocessing discovers ambiguity (e.g., no amount present), mark for clarification.
3.3 LLM-based Intent Classification
You use an LLM (zero-shot, few-shot, or fine-tuned) to predict intent. Important production details:
Return bothpredicted_intent and confidence_score.
Thresholds: If confidence < threshold (e.g., 0.6), ask a clarifying question or fallback to a smaller model / human.
Entity hints: LLM can also return entities (amount, target_account, account_type) to speed up pipeline.
To train or evaluate an intent classification system for a banking chatbot, you will need a well-structured dataset that captures the variety of ways users might express their requests. Below is a sample dataset for training/testing your banking chatbot intent classifier.
Intent Name
Example Queries
Check_Balance
“What is my account balance?”, “Show my savings account balance”, “Check my current balance”
Fund_Transfer
“Transfer ₹5000 to my savings account”, “Send ₹2000 to John”, “Make a transfer to account 123456789”
Open_Account
“How can I open a savings account?”, “Start new account application”, “I want to open an account”
Loan_Enquiry
“Tell me about home loan interest rates”, “Apply for personal loan”, “Loan eligibility for ₹10 lakh”
Card_Block
“Block my debit card”, “My ATM card is lost”, “Stop transactions from my credit card”
Branch_Location
“Nearest Dummy Bank branch”, “Where is the closest Dummy Bank ATM?”, “Find a branch near me”
5. Intent Handlers for Banking Chatbot
Once an intent is correctly identified by the classifier, the chatbot needs to decide what to do next. This is where intent handlers come into play. An intent handler is a function or module responsible for executing the specific action linked to an intent. In a banking chatbot, each intent can have a dedicated handler that connects to backend services (like Dummy Bank’s core banking system), retrieves or updates data, and formats the response for the user.
Example handlers:
handle_check_balance() – Connects to the user’s account system, fetches the latest balance, and presents it in a friendly message.
handle_fund_transfer() – Validates account details, initiates the transfer, confirms the transaction status, and logs it for auditing.
handle_open_account() – Guides the user through the required KYC steps, generates a reference number, and schedules a branch visit if needed.
handle_card_block() – Immediately blocks the reported card, sends confirmation via SMS/email, and prompts the user for reissue options.
handle_branch_location() – Uses a geolocation API to find the nearest branch or ATM based on the user’s location.
In well-structured chatbots, these handlers are modular and reusable. They can also be enriched with context awareness (e.g., remembering the user’s last transaction) and security layers (e.g., OTP verification before fund transfer). This separation of intent detection and intent handling ensures that the chatbot remains scalable, secure, and easy to maintain.
Following is the sample simulated code above mentioned handlers:
defhandle_check_balance(user_id):# Simulated balance fetchreturnf"Your account balance is ₹25,340."defhandle_fund_transfer(user_id, amount, target_account):# Simulated transferreturnf"₹{amount} has been transferred to account {target_account}."defhandle_open_account():return"To open a savings account, please visit your nearest Dummy Bank branch or apply online at dummy.bank.co.in."defhandle_loan_enquiry(loan_type="home"):returnf"The current {loan_type} loan interest rate is 8.25% p.a. You can apply via the Dummy Bank website."defhandle_card_block(card_type="debit"):returnf"Your {card_type} card has been blocked. A replacement will be sent to your registered address."defhandle_branch_location(pincode):returnf"The nearest Dummy Bank branch to pincode {pincode} is at Main Market Road, Sector 15."
6. Training the Intent Classifier
Training an intent classifier involves teaching a model to correctly identify a user’s goal from their query. This process starts with collecting representative training data for each intent category, followed by preprocessing the text for tokenization. The model is then trained on these labeled examples, learning patterns and keywords associated with each intent. Once trained, the classifier can quickly and accurately predict intents for new, unseen queries, enabling downstream applications like chatbots and virtual assistants to respond appropriately. Regular retraining with fresh data helps maintain accuracy as user behavior and language evolve.
6.1 Fine-tune a smaller model like distilbert-base-uncased for intent classification
Fine-tuning a lightweight model such as distilbert-base-uncased is an efficient way to build a high-performance intent classifier without the computational overhead of large LLMs. DistilBERT retains much of BERT’s language understanding capability while being faster and more resource-friendly, making it ideal for deployment in production environments with limited hardware. By training it on domain-specific data—such as banking-related queries for Dummy Bank—it can achieve high accuracy in recognizing intents like Check_Balance, Fund_Transfer, or Card_Block. This approach combines speed, cost-effectiveness, and adaptability.
Example code:
import pandas as pdfrom sklearn.model_selection import train_test_splitfrom datasets import Datasetfrom transformers import DistilBertTokenizerFast, DistilBertForSequenceClassification, Trainer, TrainingArgumentsimport torch# ---------------------------# 1. Example Dataset# ---------------------------data = [# Check_Balance ("What is my current account balance?", "Check_Balance"), ("Show me my savings balance", "Check_Balance"), ("How much money is in my account?", "Check_Balance"),# Fund_Transfer ("Transfer ₹5000 to my brother's account", "Fund_Transfer"), ("Send 2000 rupees to account 1234567890", "Fund_Transfer"), ("Make a payment to Ramesh", "Fund_Transfer"),# Open_Account ("I want to open a new savings account", "Open_Account"), ("How can I open a current account?", "Open_Account"), ("Open an account for me", "Open_Account"),# Loan_Enquiry ("Tell me about home loan interest rates", "Loan_Enquiry"), ("What is the EMI for a 5 lakh personal loan?", "Loan_Enquiry"), ("How can I apply for a car loan?", "Loan_Enquiry"),# Card_Block ("Block my debit card immediately", "Card_Block"), ("I lost my credit card, please block it", "Card_Block"), ("Block my ATM card", "Card_Block"),# Branch_Location ("Where is the nearest Dummy Bank branch?", "Branch_Location"), ("Find me a branch near Andheri", "Branch_Location"), ("Locate the closest ATM", "Branch_Location"),]df = pd.DataFrame(data, columns=["text", "label"])# ---------------------------# 2. Encode Labels# ---------------------------label_list = df["label"].unique().tolist()label2id = {label: idx for idx, label inenumerate(label_list)}id2label = {idx: label for label, idx in label2id.items()}df["label_id"] = df["label"].map(label2id)# ---------------------------# 3. Train-Test Split# ---------------------------train_texts, val_texts, train_labels, val_labels = train_test_split( df["text"], df["label_id"], test_size=0.2, random_state=42)train_df = pd.DataFrame({"text": train_texts, "label": train_labels})val_df = pd.DataFrame({"text": val_texts, "label": val_labels})# ---------------------------# 4. Convert to Hugging Face Dataset# ---------------------------train_dataset = Dataset.from_pandas(train_df)val_dataset = Dataset.from_pandas(val_df)# ---------------------------# 5. Tokenization# ---------------------------tokenizer = DistilBertTokenizerFast.from_pretrained("distilbert-base-uncased")deftokenize(batch):return tokenizer(batch["text"], padding=True, truncation=True, max_length=64)train_dataset = train_dataset.map(tokenize, batched=True)val_dataset = val_dataset.map(tokenize, batched=True)# ---------------------------# 6. Load Model# ---------------------------model = DistilBertForSequenceClassification.from_pretrained("distilbert-base-uncased",num_labels=len(label_list),id2label=id2label,label2id=label2id)# ---------------------------# 7. Training Arguments# ---------------------------training_args = TrainingArguments(output_dir="./intent_classifier_model",evaluation_strategy="epoch",save_strategy="epoch",learning_rate=5e-5,per_device_train_batch_size=8,per_device_eval_batch_size=8,num_train_epochs=5,weight_decay=0.01,logging_dir="./logs",logging_steps=10,load_best_model_at_end=True)# ---------------------------# 8. Trainer# ---------------------------defcompute_metrics(eval_pred):from sklearn.metrics import accuracy_score, f1_score logits, labels = eval_pred preds = logits.argmax(axis=-1)return {"accuracy": accuracy_score(labels, preds),"f1": f1_score(labels, preds, average="weighted") }trainer = Trainer(model=model,args=training_args,train_dataset=train_dataset,eval_dataset=val_dataset,tokenizer=tokenizer,compute_metrics=compute_metrics)# ---------------------------# 9. Train# ---------------------------trainer.train()# ---------------------------# 10. Test Prediction# ---------------------------test_queries = ["Please transfer 1000 rupees to my son's account","Find me the nearest dummy bank branch in Pune","I lost my ATM card","Show me my account balance"]tokens = tokenizer(test_queries, padding=True, truncation=True, return_tensors="pt")outputs = model(**tokens)predictions = torch.argmax(outputs.logits, dim=-1)for query, pred_id inzip(test_queries, predictions):print(f"Query: {query} -> Intent: {id2label[pred_id.item()]}")
Expected output:
Query: Please transfer 1000 rupees to my son's account -> Intent: Fund_TransferQuery: Find me the nearest Dummy bank branch in Pune -> Intent: Branch_LocationQuery: I lost my ATM card -> Intent: Card_BlockQuery: Show me my account balance -> Intent: Check_Balance
6.2 LLM-based Intent Classification (Zero-shot classification) using Hugging Face pipeline
Zero-shot intent classification leverages the language understanding power of large language models to identify user intents without any task-specific training data. Using Hugging Face’s pipeline API, we can provide the model with a query and a list of possible intent labels, and it will determine the most likely match based on its vast pre-trained knowledge. This approach is especially useful for quickly deploying chatbots in domains like banking, where intents (e.g., Check_Balance, Fund_Transfer, Card_Block) can be recognized instantly, even if no historical data is available for those categories.
Example Code:
from transformers import pipeline# Banking intentsintents = ["Check_Balance","Fund_Transfer","Open_Account","Loan_Enquiry","Card_Block","Branch_Location"]classifier = pipeline("zero-shot-classification", model="facebook/bart-large-mnli")query ="Transfer ₹5000 to my savings account"result = classifier(query, candidate_labels=intents)predicted_intent = result['labels'][0]print("Predicted Intent:", predicted_intent)
Sample Output
Predicted Intent: Fund_Transfer
6.3 LLM-based Intent Classification (Few-shot classification) using Hugging Face pipeline
Few-shot classification leverages the power of Large Language Models to accurately predict intents with only a handful of labeled examples per category. Instead of training a model from scratch, we simply provide the LLM with sample queries for each intent along with the user’s new query. Using the Hugging Face pipeline, the LLM applies its vast language understanding to match the query to the closest intent, even if the wording is unfamiliar. This approach is fast to implement, requires minimal data, and works particularly well for domains like banking where intent categories are clearly defined.
Example Code:
from transformers import pipeline# Banking intentsintents = ["Check_Balance","Fund_Transfer","Open_Account","Loan_Enquiry","Card_Block","Branch_Location"]# Few-shot examples for better classificationexamples = [ ("Show me my account balance", "Check_Balance"), ("Please transfer ₹2000 to Ramesh's account", "Fund_Transfer"), ("I want to apply for a home loan", "Loan_Enquiry"), ("I lost my debit card, please block it", "Card_Block"), ("Where is the nearest Dummy bank branch in Delhi?", "Branch_Location"),]# Create the few-shot promptdefbuild_few_shot_prompt(query): prompt ="Classify the following customer queries into one of these intents:\n" prompt +=", ".join(intents) +"\n\n" prompt +="Examples:\n"for ex_query, ex_intent in examples: prompt +=f"Query: {ex_query}\nIntent: {ex_intent}\n\n" prompt +=f"Query: {query}\nIntent:"return promptquery ="Transfer ₹5000 to my savings account"prompt = build_few_shot_prompt(query)# Using a text-generation pipeline (could be GPT-like model)generator = pipeline("text-generation", model="meta-llama/Llama-2-7b-chat-hf", device_map="auto")response = generator(prompt, max_new_tokens=10, temperature=0.0)predicted_intent = response[0]['generated_text'].split("Intent:")[-1].strip()print("Predicted Intent:", predicted_intent)
6.4 Comparision of LLM-based Intent Classification (Zero-shot vs. Few-shot classification)
Zero-Shot
Few-Shot
No examples given; model must guess purely from intent names.
Provides a few labeled examples so the model learns the style and meaning of intents before predicting.
Works okay for common phrasing but may fail on domain-specific terms.
More accurate for banking-specific terms (e.g., RD account, cheque book).
Simpler but less controlled.
Slightly more work to prepare, but boosts accuracy.
6.5 Comparision of Fine-Tuning a Smaller Model for Intent Classification and LLM-Based Intent Classification
Feature / Criteria
LLM-Based Intent Classification
Fine-Tuned Smaller Model (e.g., DistilBERT)
Training Data Requirement
Can work zero-shot (no training data needed for new intents).
Requires labeled training data for all intents.
Flexibility
Handles multiple phrasings and unseen variations well.
Performs best on phrasings seen during training; less robust to unexpected inputs.
Domain Adaptability
Adapts quickly to new banking terms without retraining.
Needs retraining to add or modify intents.
Inference Speed
Slower (especially large models like GPT or LLaMA) — may need GPU.
Fast (can run on CPU), ideal for real-time responses.
Hosting Cost
High — requires GPU or expensive API usage.
Low — can run on inexpensive servers or on-premise hardware.
Privacy & Compliance
Often cloud-hosted → possible compliance issues unless using on-prem LLM.
Easy on-prem deployment, ensuring customer data never leaves the bank’s network.
Accuracy for Fixed Intents
May misclassify if intent phrasing is too vague or similar to others.
Very high accuracy for trained intents (e.g., Check_Balance, Card_Block).
Hallucination Risk
Higher — might output unrelated intents or responses.
Lower — restricted to predefined set of intents.
Maintenance
Easy to add new intents without retraining.
Adding new intents requires retraining the model.
8. Conclusion
In the fast-paced world of digital banking, a chatbot’s ability to accurately identify customer intent is the foundation for delivering seamless, human-like support. Our exploration of intent classification — from fine-tuning smaller models to leveraging powerful LLMs — shows that there’s no one-size-fits-all solution.
Fine-tuned smaller models like DistilBERT excel in speed, cost-efficiency, and privacy, making them a strong choice for banks that deal with fixed sets of intents and require on-premises deployment. LLM-based approaches, on the other hand, offer unmatched flexibility, adaptability to new domains, and zero-shot capabilities — perfect for scenarios where customer queries evolve quickly or domain-specific terms frequently emerge.
Ultimately, the best approach depends on your priorities:
If cost, privacy, and speed are paramount, go for a fine-tuned smaller model.
If adaptability, reduced training overhead, and rapid intent expansion are more important, LLM-based classification is the way forward.
By choosing the right intent classification strategy, banks can ensure their chatbots not only respond faster but also understand customers better — building trust, improving satisfaction, and making every digital interaction as smooth as talking to a trusted branch representative.
Retrieval-Augmented Generation (RAG) is one of the most effective techniques for making large language models (LLMs) answer accurately using external knowledge. The idea is straightforward:
Retrieve relevant documents from your knowledge base.
Augment your LLM prompt with those documents.
Generate an answer using the LLM.
Sounds simple, right? The problem is:
Even the best vector search algorithms sometimes return documents that are only loosely related to the query — or miss subtle but highly relevant matches.
This is where Reranking enters the scene — the “quality filter” for your retrieved documents.
What is Reranking in RAG?
Reranking is a second-stage filtering process that reorders retrieved documents by actual relevance to the user query, often using a more sophisticated model than the one used for the initial retrieval.
Think of it as precision tuning:
Stage 1 (vector retrieval) → Fast and broad: retrieve 30–100 potentially relevant docs.
Stage 2 (reranking) → Slow but sharp: deeply score these docs for true relevance.
This two-stage approach mirrors real-world search engines like Google, which first retrieve a broad set of results (recall-focused) and then apply a more precise ranking model (precision-focused).
This is especially important because standard retrieval models (like BM25, dense embeddings) often prioritize speed over deep contextual matching. Reranking uses more advanced models (like cross-encoders) that compare the query and each document together for higher precision.
Why Reranking Matters in RAG
Without reranking, your RAG model might answer from a less relevant document simply because it was retrieved higher by the retriever’s default scoring.
Example: Imagine a customer of the State Bank of India (SBI) asks: “What is the minimum balance required for an SBI savings account in a metro city?”
Without Reranking:
Retriever might pull in documents about fixed deposit interest rates, ATM withdrawal limits, and minimum balance rules for rural branches.
The first retrieved document might mention “minimum balance” but for rural accounts, not metro city accounts.
With Reranking:
The reranker analyzes the exact query and re-scores documents so that the top-ranked one specifically contains:
Metro city rules
SBI’s updated minimum balance criteria
Correct fee details if balance is below the limit
This ensures the generator receives the right context and produces a correct answer.
Common Reranking Techniques
Here are the most common approaches used in production RAG systems:
1. Cross-Encoder Models
Takes the query and document together as input.
Outputs a single relevance score.
Pros: Very accurate.
Cons: Slower, since each document is scored independently.
Python Example
from sentence_transformers import CrossEncoder# Load a cross-encoder modelmodel = CrossEncoder('cross-encoder/ms-marco-MiniLM-L-6-v2')# Example queryquery ="What is the minimum balance required for an SBI savings account in a metro city?"# Retrieved documentsdocuments = ["SBI savings account in metro cities requires a minimum balance of Rs. 3,000 to avoid penalties.","SBI fixed deposit interest rates vary between 3% and 6% depending on tenure.","In rural areas, SBI savings accounts require a minimum balance of Rs. 1,000."]# Prepare pairs for scoringpairs = [(query, doc) for doc in documents]# Score each document for relevancescores = model.predict(pairs)# Sort by score (descending)reranked_docs = [doc for _, doc insorted(zip(scores, documents), reverse=True)]print("Reranked Documents:")for doc in reranked_docs:print(doc)
from sentence_transformers import SentenceTransformer, CrossEncoder, utilimport torch# Step 1: Create SBI corpuscorpus = ["The minimum balance required for SBI savings account is ₹1000 in metro cities.","SBI provides 7.5% interest rate for senior citizen fixed deposits.","You can link your Aadhaar to your SBI account through the YONO app.","SBI charges ₹20 per transaction for ATM withdrawals beyond the free limit.","The SBI home loan interest rate starts from 8.5% per annum.","SBI credit cards offer reward points on every transaction."]# Step 2: Load Bi-Encoder and Cross-Encoderbi_encoder = SentenceTransformer('multi-qa-MiniLM-L6-cos-v1') # For retrievalcross_encoder = CrossEncoder('cross-encoder/ms-marco-MiniLM-L-6-v2') # For reranking# Step 3: Encode corpus for Bi-Encoder retrievalcorpus_embeddings = bi_encoder.encode(corpus, convert_to_tensor=True)# Step 4: User queryquery ="What is the interest rate for senior citizen FD in SBI?"query_embedding = bi_encoder.encode(query, convert_to_tensor=True)# Step 5: Retrieve top N candidates using Bi-Encodertop_k =3bi_encoder_hits = util.semantic_search(query_embedding, corpus_embeddings, top_k=top_k)[0]# Step 6: Prepare for Cross-Encoder rerankingcross_inp = [(query, corpus[hit['corpus_id']]) for hit in bi_encoder_hits]cross_scores = cross_encoder.predict(cross_inp)# Step 7: Combine results and sort by Cross-Encoder scorereranked_results =sorted(zip(cross_inp, cross_scores),key=lambda x: x[1],reverse=True)# Step 8: Print resultsprint(f"Query: {query}\n")print("Top Results after Reranking:")for (q, passage), score in reranked_results:print(f"Score: {score:.4f} | {passage}")
Uses large language models (e.g., GPT, LLaMA) to rate document relevance.
Can understand nuanced and multi-step queries.
Higher cost, but sometimes worth it for complex domains.
Python Example
from transformers import AutoModelForCausalLM, AutoTokenizerimport torch# 1. SBI Corpuscorpus = ["The minimum balance required for SBI savings account in metro cities is ₹3000.","SBI offers a 3.5% interest rate for savings accounts up to ₹1 lakh.","SBI home loan interest rate starts from 8.5% per annum.","SBI fixed deposit for senior citizens offers 7.5% per annum interest."]# 2. Simulated Retrieval Outputretrieved_docs = [ corpus[1], # savings account interest corpus[3], # senior citizen FD corpus[0] # minimum balance]query ="What interest rate does SBI offer for fixed deposits for senior citizens?"# 3. Load Phi-3-Mini-Instruct Model from Hugging Face# Supports chat-style prompts with system, user, and assistant rolesmodel_name ="microsoft/phi-3-mini-128k-instruct"tokenizer = AutoTokenizer.from_pretrained(model_name)model = AutoModelForCausalLM.from_pretrained( model_name,device_map="auto",torch_dtype="auto",trust_remote_code=True)# 4. Build prompt for rerankingprompt_prefix ="<|system|>You are an assistant that ranks documents by relevance.<|end|>\n"prompt_prefix +=f"<|user|>Query: {query}\nDocuments:\n"for idx, doc inenumerate(retrieved_docs): prompt_prefix +=f"{idx}: {doc}\n"prompt_prefix +="<|assistant|>Provide ranking as list of indexes [most relevant first], plus brief explanation."# 5. Tokenize and generateinputs = tokenizer(prompt_prefix, return_tensors="pt").to(model.device)outputs = model.generate(**inputs,max_new_tokens=100,temperature=0.0)response = tokenizer.decode(outputs[0], skip_special_tokens=True)print("=== Reranking Response ===")print(response)
Sample Output:
=== RerankingResponse===[1, 2, 0]Themostrelevantdocumentisindex1:"SBI fixed deposit for senior citizens offers 7.5% per annum interest."ItdirectlyanswersthequeryaboutFDinterestforseniorcitizens.Nextisindex2:"The minimum balance required for SBI savings account in metro cities is ₹3000."Whilenotaboutfixeddeposits,itmentionsaccount-relatedterms.Index0:"SBI offers a 3.5% interest rate for savings accounts up to ₹1 lakh."Thisisleastrelevantbecauseittalksaboutsavingsaccountrates,notfixeddepositrates.
Best Practices for Reranking in RAG
Limit the candidate pool — Avoid reranking all retrieved results; rerank only the top N (e.g., 50).
Use domain-specific fine-tuning — Fine-tune reranker models on your domain data for better accuracy.
Cache results — For frequent queries, store reranked results to save computation.
Balance speed vs accuracy — In real-time applications, choose models that meet your latency requirements.
Continuously evaluate — Track metrics like MRR (Mean Reciprocal Rank) and nDCG to measure impact.
Conclusion
Reranking acts as a precision filter for RAG pipelines. By ensuring that the right documents make it to the generation stage, you can drastically reduce irrelevant or partially correct answers.
For any production-grade RAG system — whether it’s for banking FAQs, legal document search, or technical support — reranking can be the key differentiator in delivering high-quality, trustworthy AI answers.
If you’ve interacted with ChatGPT or built your own conversational AI, you might have wondered — how exactly does the AI know which parts of a message are from the user, which are from the system, and which are from the assistant?
Behind the scenes, OpenAI uses a simple but powerful markup format called ChatML (Chat Markup Language) to structure conversations. While it originated with OpenAI’s models, similar role-based message formatting is now used or adapted by other large language models as well — for example, Anthropic Claude, Qwen, Mistral, and various open-source chat models have implemented ChatML-compatible or inspired prompt formats to maintain clear conversation context.
In this article, we’ll explore what ChatML is, how it works, and why it matters for building smarter AI systems.
What is ChatML?
ChatML is a lightweight, plain-text markup format designed to give large language models a clear, structured way to understand conversation history.
Instead of sending raw text, developers wrap messages with special tokens that identify the role of the speaker (system, user, assistant, or tool) and the message content.
For example:
<|im_start|>system
You are a helpful assistant.
<|im_end|><|im_start|>user
What's the capital of France?
<|im_end|><|im_start|>assistantCode language:HTML, XML(xml)
Here’s what’s happening:
system → Sets rules, instructions, or context for the AI.
user → Represents a message from the end-user.
assistant → Represents the AI’s reply.
<|im_start|> & <|im_end|> → Special tokens to mark message boundaries.
Why Does ChatML Exist?
In early LLM implementations, prompts were often long strings with no strict structure. This made them fragile — minor wording changes could break expected behavior.
ChatML solves this by:
Separating roles clearly → The model knows who said what.
Making multi-turn conversations stable → No guessing where one message ends and another begins.
Supporting system-level control → Developers can enforce guidelines (e.g., tone, style, or restrictions).
Roles in ChatML
Role
Purpose
system
Defines the AI’s personality, constraints, and instructions.
user
The actual human input.
assistant
The AI’s output in the conversation.
tool
For calling or simulating API/tool outputs (in some implementations).
Building a ChatML Prompt in Python
Here’s a quick helper function to convert a list of messages into ChatML format:
defto_chatml(messages): chatml =""for m in messages: chatml +=f"< |im_start|>{m['role']}\n{m['content']}<|im_end|>\n" chatml +="<|im_start|>assistant\n"# Leave open for AI's replyreturn chatmlmessages = [ {"role": "system", "content": "You are a helpful assistant."}, {"role": "user", "content": "Tell me a joke."}]print(to_chatml(messages))
This produces a properly formatted ChatML string ready for the model.
Advantages of Using ChatML
Consistency – Prevents prompt breakage due to formatting errors.
Flexibility – Works for single-turn and multi-turn conversations.
Control – Gives developers fine-grained control over model behavior.
Scalability – Easy to extend for new roles or system instructions.
When to Use ChatML
Custom LLM Applications – If you’re building a chatbot with models like GPT-3.5, GPT-4, or Qwen.
Multi-Turn Conversations – Where keeping track of roles is important.
Prompt Engineering – For reliable, repeatable outputs.
ChatML Beyond OpenAI: How Other LLMs Use It
Although ChatML began as an OpenAI-specific format, its structure has proven so practical that many other large language models have adopted either direct compatibility or ChatML-inspired variations.
Here’s how some popular LLMs approach it:
1. Qwen (Alibaba Cloud)
Qwen models (including Qwen2 and Qwen2.5) support ChatML-style formatting directly. They use the same <|im_start|> and <|im_end|> tokens with roles like system, user, and assistant. This makes it easy for developers to swap prompts between OpenAI models and Qwen without heavy modifications.
2. Anthropic Claude
Claude doesn’t use ChatML syntax literally, but it follows the same role-based conversation pattern — separating system instructions, user messages, and assistant replies. Developers often wrap Claude prompts in ChatML-like structures for internal consistency in multi-model applications.
3. Mistral / Mixtral
Some Mistral-based chat models on Hugging Face have fine-tunes that understand ChatML, especially in the open-source community. This helps standardize multi-turn conversations without reinventing formatting rules.
4. Open-Source Fine-Tunes
Many open-source LLaMA 2/3 fine-tunes — such as Vicuna, Alpaca, and WizardLM — adopt ChatML or similar message separation schemes. Even if the tokens differ, the concept of “role + message boundary” comes directly from ChatML’s influence.
ChatML Compatibility Across LLMs
LLM / Model Family
ChatML Support
Notes on Usage
OpenAI GPT-3.5 / GPT-4
✅ Full support
Native format, uses <|im_start|> / <|im_end|> tokens with roles (system, user, assistant).
Qwen / Qwen2 / Qwen2.5
✅ Full support
ChatML-compatible; directly understands OpenAI-style role markup.
Anthropic Claude
⚠️ Partial / Adapted
Doesn’t use ChatML tokens but follows the same role/message separation; can be adapted easily.
Mistral / Mixtral Chat Models
⚠️ Partial / Fine-tune dependent
Some fine-tunes understand ChatML, others require a different role separator format.
LLaMA-based Fine-Tunes (Vicuna, WizardLM, etc.)
⚠️ Partial / Inspired
Often trained with similar role-based prompts but token formats may differ.
Gemini (Google)
❌ No native support
Uses its own structured prompt format, but conceptually similar in role separation.
Falcon Chat Models
⚠️ Partial / Inspired
Many fine-tunes replicate ChatML-style conversations for compatibility.
Why This Matters for Developers
By understanding ChatML’s role-based design, you can:
Switch between models with minimal prompt changes.
Standardize multi-model pipelines using one consistent conversation format.
Avoid prompt fragility when moving from prototyping to production.
In short, ChatML isn’t just an OpenAI thing anymore — it’s becoming a de facto standard for structuring chatbot conversations across the LLM ecosystem.
Summary
ChatML might look like a simple markup, but it plays a huge role in making conversations with AI structured, predictable, and controllable. If you’re building an app that needs to work across multiple LLMs, it’s smart to create a prompt formatting layer in your code. This layer can output true ChatML for models that support it and convert it to a role-based equivalent for those that don’t.
Before understanding what face search is, what the use cases are, and why performing face search fast isso crucial, let us understand the following two key terms used in this domain:
Face Verification: This is a one-to-one comparison of faces to confirm the individual’s identity by comparing his/her face against a face or face template stored in the identity card or captured directly by the camera by clicking the image on the card. An example is when an organisation authenticates the user by comparing the image stored in the offline eKYC XML of Aadhaar with the face captured through a camera. This face capture can happen through cameras mounted at the entry point or may be captured by any web application using a computer camera. Other use cases may be, for example, online banking or passport checks. In the case of face verification, comparison of the faces is one-to-one.
Face Recognition: The purpose of face recognition is to identify/recognise the person from a database of faces by performing a one-to-many comparison.
Face images are not directly compared; rather, there are many deep learning-based models to transform these faces into embeddings. These embeddings are nothing but a vector, which is a mathematical representation of the face in the embedding space, learnt by the model. By simply calculating the distance metric, such as cosine similarity, and comparing it with a certain threshold, we can tell if the two faces belong to the same person or not. There are other distance metrics such as Dot Product, Squared Euclidean, Manhattan, Hamming, etc.
There are many use cases where there could be millions, even billions, of images in the database for comparison. One-to-many comparisons against this huge number of images are unimaginable in real-time use cases.
In this article and accompanying code, I have used Facebook AI Similarity Search (Faiss), a library that helps in quickly searching across multimedia documents that are similar to each other. The first step is data ingestion, where multimedia documents (a face image in this case) are transformed into vector embeddings and then saved in the database. Once queried, this database returns the k-nearest neighbours of the queried face, that is, k faces that are most similar to the queried face images. Other competing vector databases provide similar functionality. Read more about Faiss in the article “Faiss: A library for efficient similarity search“.
2. Data Ingestion
I used Labelled Faces in the Wild (LFW) dataset, which has over 13,000 images of faces collected from the web. The face images are stored in a directory with the same name as the person whose face images they belong to. All these directories are located in a directory named lfw-deepfunneled. The following is the code snippet to
Load the face images from the directory.
Transform the loaded face images to face embeddings.
To perform both operations, I used the face-recognition library. This Python library is built using dlib’s state-of-the-art face recognition. The loading step additionally detects the face region in the original face image, crops it, and then returns. The transformation step transforms the cropped face into a vector embedding. Following is the code snippet for the same. representations is the list of the list of key, value pairs. The key is the file name, and the value is the corresponding vector embedding. embeddings is the list that stores all the vector embeddings.
The next step is to initialise the Faiss database and then store the vector embedding in it. Then, serialise the database on the disc. Finally, serialise the representations list on the disc. The intent is that when the face search module starts, it loads the serialised index and list in memory. Following is the code snippet:
# Initialize vector store and save the embbeddings print("Storing embeddings in faiss.") index = faiss.IndexFlatL2(128) index.add(np.array(embeddings, dtype ="f"))# Save the indexfaiss.write_index(index, "face_index.bin")# Save the representationswithopen('face_representations.txt', 'wb') asfp: pickle.dump(representations, fp)print("Done")
3. Face Search
The following are the steps for face search:
Load the database; load the representations list.
Create a search interface (web interface using streamlit in this case)
Upload the query face image, crop the face, and transform it into a vector embedding
Pass the query vector embedding to the Faiss database
Faiss database returns the k nearest neighbours from the database.
Perform 1 to k comparisons (similarity check) of the query face with k face embeddings returned from the database.
Based on the comparison of this similarity value with a certain threshold, it is decided whether the person is found or not. If found, then show the face images found.
Following is the code snippet:
is_dataset_loaded =False# Load the face embedding from the saved face_representations.txt file defget_data(): with st.spinner("Wait for the dataset to load...", show_time=True): representations =Nonewithopen ('face_representations.txt', 'rb') as fp: representations = pickle.load(fp)print(representations)# Load the index face_index = faiss.read_index("face_index.bin")return representations, face_index# Load the face embedding at the startup and store in sessionif st.button('Rerun'): st.session_state.representations, st.session_state.index = get_data()if'index'notin st.session_state: st.session_state.representations, st.session_state.index = get_data()index = st.session_state.indexrepresentations = st.session_state.representations# Search web interfacewith st.form("search-form"): uploaded_face_image = st.file_uploader("Choose face image for search", key="search_face_image_uploader")if uploaded_face_image isnotNone: tic = time.time() st.text("Saving the query image...")print("Saving the query image in the directory: "+"query-images") random_query_image_name = uuid.uuid4().hex query_image_full_path ="query-images/"+ random_query_image_name +".jpg"withopen(query_image_full_path, "wb") as binary_file: binary_file.write(uploaded_face_image.getvalue()) st.image(uploaded_face_image, caption="Image uploaded for search") query_image = face_recognition.load_image_file(query_image_full_path) query_image_embedding = face_recognition.face_encodings(query_image)iflen(query_image_embedding) >0: query_image_embedding = query_image_embedding[0] query_image_embedding = np.expand_dims(query_image_embedding, axis=0)# Search st.text("Searching the images...") k =1 distances, neighbours = index.search(query_image_embedding, k)#print(neighbours)#print(distances) i =0 is_image_found =Falsefor distance in distances[0]:if distance <0.3: st.text("Found the image.") st.text("Similarity: "+str(distance)) image_file_name = representations[neighbours[0][i]][0] image_path ="lfw-deepfunneled/"+ image_file_name[:-9] +"/"+ image_file_name st.image(image_path) is_image_found =True i = i +1if is_image_found ==False: st.text("Cound not found the image.") toc = time.time() st.text("Total time taken: "+str(toc - tic) +" seconds") st.form_submit_button('Submit')
I have created this teaching chatbot that can answer questions from class IX, subject SST, on the topic “Democratic politics“. I have used RAG (Retrieval-Augmented Generation), Llama Model as LLM (Large Language Model), Qdrant as a vector database, Langchain, and Streamlit.
Before running the following line, Qdrant should be running and available on localhost. If it’s running on a different machine, make appropriate URL changes to the code. python data_ingestion.py After running this, http://localhost:6333/dashboard#/collections should appear like figure 1.
Run the web application for the chatbot by running the following command. The web application is powered by Streamlit. streamlit run app.py The interface of the chatbot appears as in Figure 2.
Figure 1: Screenshot of the Qdrant dashboard after running the data_ingestion.py
Figure 2: Screenshot of the chatbot web application
3. Data Ingestion
Data: PDF files have been downloaded from the NCERT website for Class IX, subject SST, from the topic “Democratic politics”. These files are stored in the directory ix-sst-ncert-democratic-politics. The following are the steps for data ingestion:
PDF files are loaded from the directory.
Text contents are extracted from the PDF.
Text content is divided into chunks of text.
These chunks are transformed into vector embeddings.
These vector embeddings are stored in the Qdrant vector database.
This data is stored in Qdrant with the collection name “ix-sst-ncert-democratic-politics“.
The following is the code snippet for data_ingestion.py.
################################################################ Data ingestion pipeline # 1. Taking the input pdf file# 2. Extracting the content# 3. Divide into chunks# 4. Use embeddings model to convet to the embedding vector# 5. Store the embedding vectors to the qdrant (vector database)################################################################import osfrom langchain_community.document_loaders import PDFMinerLoaderfrom langchain.text_splitter import CharacterTextSplitterfrom qdrant_client import QdrantClientpath ="ix-sst-ncert-democratic-politics"filenames =next(os.walk(path))[2]for i, file_name inenumerate(filenames):print(f"Data ingestion for the chapter: {i}")# 1. Load the pdf document and extract text from it loader = PDFMinerLoader(path +"/"+ file_name) pdf_content = loader.load()print(pdf_content)# 2. Split the text into small chunksCHUNK_SIZE=1000# chunk size not greater than 1000 charsCHUNK_OVERLAP=30# a bit of overlap is required for continued context text_splitter = CharacterTextSplitter(chunk_size=CHUNK_SIZE, chunk_overlap=CHUNK_OVERLAP) docs = text_splitter.split_documents(pdf_content)# Make a list of split docs documents = []for doc in docs: documents.append(doc.page_content)# 3. Create vectordatabase(qdrant) client qdrant_client = QdrantClient(url="http://localhost:6333")# 4. Add document chunks in vectordb qdrant_client.add(collection_name="ix-sst-ncert-democratic-politics",documents=documents,#metadata=metadata,#ids=ids )# 5. Make a query from the vectordb(qdrant) search_results = qdrant_client.query(collection_name="ix-sst-ncert-democratic-politics",query_text="What is democracy?" )for search_result in search_results:print(search_result.document, search_result.score)
4. Chatbot Web Application
The web application is powered by Streamlit. Following are the steps:
A connection to the Qdrant vector database is created.
User questions are captured through the web interface.
The question text is transformed into a vector embedding.
This vector embedding is searched in the Qdrant vector database to find the most relevant content similar to the question.
The text returned by the Qdrant acts as the context for the LLM.
I have used Llama LLM. The query, along with context, is sent to the Llama for an answer to be generated.
The answer is displayed on the web interface as the answer from the bot.
Following is the code snippet for app.py.
# Initialize chat historyif"messages"notin st.session_state: st.session_state.messages = []# Display chat messages from history on app rerunfor message in st.session_state.messages:with st.chat_message(message["role"]): st.markdown(message["content"])# React to user inputif query := st.chat_input("What is up?"):# Display user message in chat message container st.chat_message("user").markdown(query)# Add user message to chat history st.session_state.messages.append({"role": "user", "content": query})# Connect with vector db for getting the context search_results = qdrant_client.query(collection_name="ix-sst-ncert-democratic-politics",query_text=query ) context ="" no_of_docs =2 count =1for search_result in search_results:if search_result.score >=0.8:#print(f"Retrieved document: {search_result.document}, Similarity score: {search_result.score}") context = context + search_result.documentif count >= no_of_docs:break count = count +1# Using LLM for forming the answer template ="""Instruction: {instruction} Context: {context} Query: {query} """ prompt = ChatPromptTemplate.from_template(template) model = OllamaLLM(model="llama3.2") # Using llama3.2 as llm model chain = prompt | model bot_response = chain.invoke({"instruction": "Answer the question based on the context below. If you cannot answer the question with the given context, answer with \"I don't know.\"", "context": context,"query": query })print(f'\nBot: {bot_response}')#response = f"Echo: {prompt}"# Display assistant response in chat message containerwith st.chat_message("assistant"): st.markdown(bot_response)# Add assistant response to chat history st.session_state.messages.append({"role": "assistant", "content": bot_response})
An ability is emergent if it is not present in smaller models but is present in larger models. [1]
Scaling up language models has been shown to improve predictably the performance and sample efficiency on a wide range of downstream tasks. Emergent abilities cannot be predicted simply by extrapolating the performance of smaller models. This raises the question of whether additional scaling could potentially further expand the range of capabilities of language models. [1]
Today’s language models have been scaled primarily along three factors:
amount of computation,
number of model parameters, and
training data size
The following table lists the emergent abilities of large language models and the scale at which abilities emerge. [1]
Tasks that language models cannot currently do are prime candidates for future emergence; for instance, there are dozens of tasks in BIG-Bench[3] for which even the largest GPT-3 and PaLM models do not achieve above-random performance. [1] Similar to emergent abilities, emergent risks could also emerge, such as w.r.t. truthfulness, bias, and toxicity in LLMs, backdoor vulnerabilities, inadvertent deception, or harmful content synthesis.
But Rylan Schaeffer et al., in their paper [3], claim that the sudden appearance of emergent abilities is just a consequence of the way researchers measure the LLM’s performance. The article “How Quickly Do Large Language Models Learn Unexpected Skills?” by Stephen Ornes [4] beautifully summarises the two papers.
Prompt engineering is the practice of designing and refining the text (prompt) that we pass to a Generative AI (GenAI) model. The prompt acts as an instruction or query, and the model generates responses based on it. Prompts can be questions, statements, or detailed instructions.
Prompt engineering serves three purposes:
Enhancing output quality – refining how the model responds.
Evaluating model behavior – testing the output against requirements.
Ensuring safety – reducing harmful or biased responses.
There is no single “perfect” prompt. Instead, prompt design is an iterative process involving optimization and experimentation.
Figure 1: A basic example of the prompt
2. Controlling Model Output by Adjusting Model Parameters
The behavior of large language models (LLMs) can be fine-tuned using parameters such as temperature, top_p, and top_k. For these to take effect, do_sample=True must be set, allowing the model to sample tokens instead of always choosing the most likely one.
Temperature controls randomness.
temperature=0: deterministic output (always the same response).
Higher values → more diverse responses.
Example: 0.2 = focused, coherent; 0.8 = more creative.
Top_p (nucleus sampling) restricts token choices to the smallest set whose cumulative probability ≥ p.
top_p=1: consider all tokens.
Lower values → more focused output.
Top_k limits the selection to the k most likely tokens.
By tuning these, one can strike a balance between deterministic/focused and creative/diverse outputs.
3. Instruction-Based Prompting
Instruction-based prompting is one of the most fundamental and widely used approaches in working with large language models (LLMs). It involves providing the model with explicit, structured, and unambiguous instructions that guide how the response should be generated.
At its core, an instruction-based prompt consists of two essential components:
Instruction – what the model is supposed to do (e.g., “Summarize the text in one sentence.”).
Data – the input on which the instruction operates (e.g., the paragraph to be summarized).
A simple example:
Prompt
Instruction:Summarize the following text in one sentence.Data:Artificial Intelligence is revolutionizing industries such as healthcare, finance, and education by automating tasks and enabling data-driven decision-making.
Output
AI is transforming industries by automating tasks and enabling smarter decisions.
The following diagram depicts a basic instruction prompt. Please note the instructions and data in the prompt.
Figure 2: Instruction Prompt
3.1 Adding Output Indicators
Sometimes instructions alone are not enough. To make the response more constrained and predictable, we can add output indicators – predefined answer formats or expected categories.
For example:
Prompt
Instruction:Classify the sentiment of the following review.Data:“The product is amazing and works perfectly.”Output options: Positive | Negative
Output
Positive
The following diagram depicts the instruction prompt with an output indicator.
Figure 3: Instruction prompt with output indicators
3.2 Task-Specific Prompt Formats
Different NLP tasks require slightly different instruction structures. For example:
Summarization: “Summarize the following paragraph in 2–3 sentences.”
Classification: “Classify the following text as spam or not spam.”
Named Entity Recognition (NER): “Extract all names of organizations mentioned in the following text and list them as a JSON array.”
These formats not only help the model but also make evaluation easier for humans.
The following diagram illustrates example formats for summarization, classification, and named-entity recognition.
Figure 4: Prompt format for summarization, classification, and NER task
3.3 Prompting Techniques for Better Results
Instruction-based prompting can be improved using several best practices:
Specificity Be as precise as possible. Instead of “Explain photosynthesis”, say “Explain photosynthesis in 3 simple steps, suitable for a 10-year-old student.”
Hallucination Control LLMs sometimes generate plausible but false answers (hallucinations). To mitigate this, include safeguards: If you are not sure about the answer, respond with: "I don't know."
Order Matters (Primacy and Recency Effects) LLMs pay more attention to the beginning and end of a prompt. Place the most important instructions either at the start or the end to maximize compliance.
3.4 Beyond the Basics: Modular Prompt Components
While instruction, data, and output indicators are the core building blocks, prompts can be made more modular and adaptive by incorporating additional components such as:
Personalization – “You are a financial advisor…”
Instruction – “Summarize, compare, explain…”
Context – background information that helps the model.
Format – JSON, table, bullet points, plain text.
Audience – “Explain as if to a high school student.”
Tone – formal, casual, persuasive, neutral.
Data – the actual input for the model to process.
This modularity makes prompts flexible. You can add or remove components depending on the use case, and observe how the output changes.
The following is an example that uses the above prompt components. This example demonstrates the modular nature of prompting. We can experiment by adding or removing components to see the effect.
Figure 5: Example of a prompt showing the use of the various components.
3.5 Example: Modular Prompt
Prompt
Personalization:You are a career coach.Instruction:Provide advice on writing a resume.Context:The user is applying for a software engineering role at a mid-sized startup.Format:List your advice as 5 bullet points.Audience:Entry-level job seeker with 1 year of internship experience.Tone:Encouraging and practical.Data:“How should I improve my resume?”
Output
1. Highlight your technical skills (Python, JavaScript, databases).
2. Add details about your internship projects—focus on impact.
3. Tailor your resume to the startup by showing adaptability and problem-solving.
4. Keep the format clean, concise, and one page.
5. Add a short section for personal projects or open-source contributions.
This demonstrates how instruction-based prompting becomes powerful and adaptable when multiple components are layered together.
4. In-Context Learning – Providing examples
Large Language Models (LLMs) do not “learn” in the traditional sense during inference. Instead, they adapt to patterns given in the prompt itself. This ability to condition their behavior on a few examples provided at runtime is called In-Context Learning (ICL).
4.1 The Idea Behind ICL
By showing the model examples of the task and the desired outputs, we “teach” it on the fly. The model does not change its weights; rather, it uses the examples as a temporary pattern guide to align its responses with the given format.
This makes ICL especially powerful when:
We don’t want to fine-tune the model.
Training data for fine-tuning is small or unavailable.
We want flexibility to change tasks quickly.
4.2 Types of In-Context Learning
1. Zero-shot prompting
No examples are provided, only instructions.
Works best when the task is common or well-aligned with the model’s pretraining.
Example:
Instruction:Translate the following English sentence into French.Data:"How are you?"
Output: “Comment ça va ?”
2. One-shot prompting
A single example is given to demonstrate the expected behavior.
Useful when the task requires clarity in format or style.
Example:
User:Translate the following English sentence into French.Example Input: "Good morning" → Example Output: "Bonjour" Task Input: "How are you?"
Output: “Comment ça va ?”
3. Few-shot prompting
Multiple examples are given before the actual task.
Works well when tasks are ambiguous or domain-specific.
Example:
Task:Classify the sentiment of the following reviews as Positive or Negative.Review:"I love this phone, the battery lasts long." → PositiveReview:"The screen cracked within a week." → NegativeReview:"Excellent sound quality and fast processor." → PositiveNow classify: "The camera is blurry and disappointing."
Output: Negative
The following diagram illustrates the examples of in-context learning.
Figure 6: Examples of in-context learning
4.3 Importance of Role Differentiation
When writing few-shot prompts, clearly distinguishing roles (e.g., User: and Assistant: or Q: and A:) helps the model mimic the structure consistently. Without role markers, the model may drift into producing unstructured responses.
For example:
User:What is 2 + 2?Assistant:4User:What is 5 + 3?Assistant:8User:What is 7 + 6?Assistant:
This encourages the model to continue in the same call-and-response pattern.
4.4 Benefits of In-Context Learning
Flexibility – You can “train” the model on a new task instantly without modifying its parameters.
Rapid prototyping – Great for testing new use cases before investing in fine-tuning.
Control – Helps enforce formatting (e.g., JSON, tables, bullet points).
4.5 Limitations of In-Context Learning
Context length constraints – Too many examples may exceed the model’s context window.
Random sampling – Even with examples, the model may ignore instructions if randomness (temperature, top_p) is high.
Inconsistency – The same examples may yield slightly different outputs.
4.6 Advanced Variants of ICL
Instruction + Demonstration Hybrid: Combine explicit task instructions with few-shot examples for stronger guidance.
Chain-of-Thought with ICL: Provide examples that include reasoning steps, so the model learns to “think out loud” before answering.
Style Transfer with ICL: Use few-shot examples to enforce a particular writing style (e.g., Shakespearean, academic, casual).
5. Chain Prompting: Breaking up the Problem
When dealing with complex tasks, asking a large language model (LLM) to solve everything in a single prompt often leads to suboptimal results. The model may lose focus, misinterpret requirements, or generate incomplete answers. Chain prompting is a structured strategy where we break down a large problem into smaller subtasks, design prompts for each subtask, and then link them sequentially, passing outputs from one prompt as inputs to the next. This creates a pipeline of prompts that together achieve the final solution.
This approach mirrors how humans naturally solve complex problems—by breaking them into manageable steps rather than attempting everything at once.
5.1 Key Benefits of Prompt Chaining
Better Performance
By focusing each prompt on a single subtask, the LLM can generate more accurate and high-quality responses.
Reduces cognitive overload for the model.
Transparency
Each intermediate step in the chain is visible and explainable.
Makes it easier for developers and users to trace how the final output was constructed.
Controllability and Reliability
Developers can adjust or fine-tune only the prompts for the weaker subtasks instead of rewriting the entire large prompt.
More control over model behavior.
Debugging
Since outputs are broken into stages, it’s easier to identify where an error occurs and fix it.
Incremental Improvement
You can evaluate the performance of each subtask independently and selectively improve weak links in the chain.
Conversational Assistants
Useful for designing chatbots where conversation naturally involves sequential reasoning (e.g., clarifying intent → retrieving information → generating response).
Personalization
Chains can be designed to collect user preferences at one step and then apply those preferences consistently across subsequent prompts.
5.2 Common Use Cases
Response Validation
Prompt 1: Generate an answer.
Prompt 2: Ask the model (or another model) to evaluate correctness, consistency, or bias in the answer.
Example: LLM generates an explanation of a concept, then another LLM verifies if the explanation is factually correct.
Parallel Prompts
Sometimes, different subtasks can be run simultaneously.
Example: One prompt generates a list of features, another generates customer pain points, and later prompts merge them to design marketing copy.
Creative Writing / Storytelling
Prompt 1: Generate character descriptions.
Prompt 2: Use characters to generate a plot outline.
Prompt 3: Expand the outline into a full story.
Business Use Case – Marketing Flow
Step 1 (Prompt 1): Generate a catchy product name.
Step 2 (Prompt 2): Using the product name + product features, generate a short slogan.
Step 3 (Prompt 3): Using the product name, features, and slogan, generate a full sales pitch.
This modular approach ensures the final pitch is consistent, creative, and logically structured.
5.3 Prompt Chain Example
The following example illustrates the prompt chain that first creates a product name, then uses this name with product features to create a slogan, and finally uses features, product name, and slogan to create the sales pitch.
Figure 7: Example of a prompt chain
Step 1 – Product Naming
Instruction:“Suggest a creative name for a new smartwatch that focuses on health tracking and long battery life.”
Output:“PulseMate”
Step 2 – Slogan Generation
Instruction:“Using the product name ‘PulseMate’ and the features (health tracking, long battery life), create a short catchy slogan.”
Output:“PulseMate – Your Health, Powered All Day.”
Step 3 – Sales Pitch
Instruction:“Using the product name ‘PulseMate,’ its slogan ‘Your Health, Powered All Day,’ and the features (health tracking, long battery life), write a compelling sales pitch for customers.”
Output:“Meet PulseMate, the smartwatch designed to keep up with your lifestyle. Track your health seamlessly while enjoying a battery that lasts for days. PulseMate—Your Health, Powered All Day.”
5.4 Variants of Prompt Chaining
Sequential Chaining – Output of one prompt feeds directly into the next (step-by-step). The above example in Figure 7 demonstrates sequential chaining.
Branching Chaining – One output is used to create multiple different paths of prompts.
Merging Chains – Combine results from different parallel chains into a unified final response.
Iterative Chaining – Loop a prompt multiple times for refinement (e.g., “revise this until it’s concise and clear”).
6. Reasoning with Generative Models
LLMs don’t “reason” like humans. They excel at pattern completion over very large text corpora. With careful prompting, scaffolding, and verification, we can simulate aspects of reasoning and markedly improve reliability.
6.1 System 1 vs. System 2 (Kahneman) — and LLMs
System 1 (fast, intuitive): In LLMs this looks like single-shot answers, low token budget, low/no deliberation. Good for well-trodden tasks (grammar fixes, casual Q&A).
System 2 (slow, deliberate): In LLMs this is multi-step prompting, intermediate reasoning, tool use (calculator/RAG), sampling multiple candidates, and verification. Good for math, logic, policy checks, multi-constraint generation, and anything high-stakes.
In practice: choose System 1 for speed/low risk; escalate to System 2 scaffolds when accuracy, traceability, or multi-constraint synthesis matters.
6.2 Techniques to Induce Deliberation
6.2.1 Chain-of-Thought (CoT): “Think before answering”
Elicit intermediate reasoning steps prior to the final answer.
Zero-shot CoT trigger (minimal):
You are solving a reasoning task.First, think step-by-step in brief bullet points.Then, give the final answer on a new line prefixed with "Answer:".Question:<problem>
Few-shot CoT (when format matters): include 1–3 worked examples showing short, crisp reasoning and a clearly marked Answer line.
Tips
Keep thoughts succinct to reduce cost and drift.
For production UIs, you can ask the model to hide the rationale and output only the final answer + a confidence or citation list (see “Reasoning privacy” below).
When to use: arithmetic/logic puzzles, planning, constraint satisfaction, data transformation with edge cases.
The following figure demonstrates standard prompting vs C-o-T Prompting:
Figure 9: Chain-of-thought example; reasoning process is highlighted – source [3]
The following is an example of zero-shot chain-of-thought.
Figure 10: Example of zero-shot chain-of-thought – source[1]
6.2.2 Self-Consistency: sample multiple rationales and vote
Rather than trusting the first reasoning path, sample k solutions and aggregate.
Template
Task:<problem>Instruction:Generate a short, step-by-step rationale and final answer.Vary your approach each time.[Runthispromptktimeswithtemperature~0.7–1.0]Aggregator:- Extract the final answer from each sample.- Choose the majority answer (tie-break: pick the one supported by the clearest rationale).- Return "Final:" <answer> and "Support count:" <m/n>.
Practical defaults
k = 5–15 (trade accuracy vs. latency/cost)
temperature: 0.7–1.0
top_p: 0.9–1.0
When to use: problems with one correct output but many valid reasoning paths (math, logical deduction, label inference).
The following diagram illustrates the concept of self-consistency.
Figure 11: Example of self-consistency in CoT[4]
6.2.3 Tree of Thoughts (ToT): explore and evaluate branches
Generalizes CoT into a search over alternative “thoughts” (states). You expand multiple partial solutions, score them, prune weak ones, and continue until a budget is reached.
Lightweight ToT pseudo-workflow
state0 = problem descriptionfrontier = [state0]for depth in 1..D: candidates = [] for s in frontier: thoughts = LLM("Propose 2-3 next-step thoughts for: " + s) for t in thoughts: v = LLM("Rate this partial approach 1-5 for promise. Be strict.\nThought: " + t) candidates.append((t, v)) frontier = top_k(candidates, by=v, k=K)best = argmax(frontier, by=v)answer = LLM("Given this best chain of thoughts, produce the final answer:\n" + best)
Tuning knobs
D (max depth), K (beam width), value function (how you score thoughts), and token budget.
Use “look-ahead” prompts: “Simulate next two steps; if dead-end, backtrack.”
When to use: multi-step planning (itineraries, workflows), puzzle solving, coding strategies, complex document transformations.
The following diagram illustrates the various approaches to problem-solving with LLMs. Each rectangular box represents a thought.
Figure 12: Various approaches to problem-solving with LLMs.
6.2.4 Related, practical reasoning scaffolds
ReAct (Reason + Act): Interleave “Thought → Action (tool call/RAG) → Observation” until done. Great for tasks that need tools, search, or databases.
Program-of-Thoughts (PoT): Ask the model to output code (e.g., Python) to compute the answer; execute it; return result. Excellent for math, data wrangling, and reproducibility.
Debate / Critic-Judge: Have model A propose an answer, model B critique it, and a judge (or the same model) select/merge. Pairs well with self-consistency.
Plan-then-Execute: Prompt 1 creates a plan/checklist; Prompt 2 executes step by step; Prompt 3 verifies outputs against the plan.
6.3 Putting it together: a robust System-2 pipeline
Use case: Policy compliance check for marketing copy.
Extract constraints (CoT): “List policy rules relevant to social ads, each with an ID and short paraphrase.”
Assess violations (ReAct/PoT): For each rule, analyze the ad text; return pass|fail with span references.
Self-consistency vote: Sample assessments 7× and majority-vote each rule outcome.
Summarize & justify: Compose a final verdict with a table of rules, decisions, and cited spans.
Verifier pass: A separate prompt re-checks logical consistency and that every failure has evidence.
Guarded output: Enforce schema (JSON) and redact PII (Redacting or identifying personally identifiable information).
This gives you accuracy (deliberation), transparency (artifacts per step), and control (schema + verifier).
6.4 Operational Guidance
6.4.1 Prompt templates
CoT (short)
Solve the problem. First give 3-5 brief reasoning bullets. Then output the final result as: "Answer: <value>".Question:<...>
Self-consistency runner (controller code)
answers = []for i in range(k): ans = call_llm(prompt, temperature=0.8, top_p=0.95) answers.append(extract_final(ans))final = majority_vote(answers)
ReAct skeleton
Thought:I need the latest spec section.Action:search("<query>")Observation:<top snippet>Thought:Summarize the relevant passage and apply the rule....Final Answer: <concise verdict + citation>
ToT node expansion
Propose 3 distinct next-step ideas to advance the solution.For each: give a one-sentence rationale and a 1-5 promise score.Return JSON: [{"idea":..., "rationale":..., "score":...}]
6.5 Evaluation & QA
Once we design and deploy prompts, evaluation and quality assurance (QA) become critical. Unlike traditional software, where behavior is deterministic, LLM outputs are probabilistic and context-dependent. This means even well-designed prompts may fail in certain conditions. A structured evaluation strategy helps measure reliability, accuracy, and efficiency of your prompt-engineering pipeline.
Evaluation can be broadly divided into four dimensions: task accuracy, process metrics, ablations, and cost/latency.
1. Task Accuracy – Measuring End Results
The first dimension is whether the model actually solves the task correctly. Depending on the nature of the application, different metrics apply:
Exact Match (EM): Used for tasks where there is a single correct answer (e.g., classification, math problems, SQL query generation). Checks if the model output matches the ground truth exactly.
F1 Score: Measures overlap between predicted tokens and ground-truth tokens, balancing precision and recall. Common for QA and NER tasks.
pass@k: Especially used in code generation, where we test if any of the top-k sampled outputs are correct (e.g., pass@1, pass@10).
BLEU / ROUGE: Standard metrics for summarization, translation, and text generation tasks, where multiple valid outputs may exist.
Domain-Specific Metrics:
Medical: accuracy of ICD codes, dosage consistency.
Finance: correctness of risk scores, compliance alignment.
Task accuracy answers: Did the model get it right?
2. Process Metrics – Evaluating the Reasoning Path
Sometimes the final answer looks right, but the process is flawed. Evaluating intermediate reasoning steps ensures robustness:
Step Validity Rate: In CoT or ToT prompting, check if each intermediate reasoning step is logically valid.
Verifier Agreement: Use an external verifier model (or human annotators) to check whether the reasoning aligns with domain knowledge.
Citation Coverage: For knowledge-grounded tasks, measure how many claims in the output are backed by explicit references (retrieved documents, database entries).
Hallucination Rate: % of outputs containing unsupported or fabricated facts.
Process metrics answer: Did the model follow a sound reasoning path, not just guess the final answer?
3. Ablation Studies – Quantifying the Effect of Prompting Techniques
Prompt engineering often involves experimenting with different prompting strategies. Ablation studies allow us to isolate what works best by systematically varying one factor at a time.
Single-Shot vs. CoT (Chain-of-Thought): Compare baseline prompts against CoT prompting to measure reasoning improvements.
CoT vs. CoT+SC (Self-Consistency): Test whether sampling multiple reasoning paths and aggregating improves accuracy.
ToT (Tree-of-Thought): Compare CoT vs. ToT to see if deliberate multi-path exploration boosts complex problem-solving.
Role of Examples: Zero-shot vs. one-shot vs. few-shot performance.
This helps quantify the lift (improvement in accuracy or reasoning reliability) due to advanced prompting.
Ablations answer: Which prompting strategy gives the best performance trade-off?
4. Cost & Latency – Operational Constraints
In production, even the most accurate system fails if it’s too slow or expensive. Evaluation must include efficiency metrics:
Tokens per Step: Track how many tokens are consumed per prompt and per reasoning step. Helps understand scaling behavior.
Cache Intermediate Artifacts: Save partial reasoning outputs (e.g., retrieved documents, intermediate JSONs) to avoid recomputation.
Latency per Request: Time taken for one query end-to-end (prompt → LLM → post-processing).
Cost per Query: Estimate $$ spent per API call or GPU inference, especially with multi-step chains (CoT, ToT).
Trade-off Curves: Accuracy vs. cost/latency curves, to decide the optimal configuration for production.
Cost/latency metrics answer: Is the solution practical at scale?
A robust evaluation framework should combine accuracy, process validity, ablations, and cost tracking. Only then can we say our prompt engineering strategy is not just clever in theory, but reliable, efficient, and production-ready.
6.6 Safety & reliability
Ensuring safety and reliability in prompt engineering is one of the most critical aspects when deploying LLM-powered applications in production. Without guardrails, models may generate unsafe, incoherent, or unpredictable responses that can result in privacy leaks, reputational damage, or compliance violations. This section outlines key strategies for strengthening the robustness of generative AI systems.
🔒 Reasoning Privacy
Hidden rationale vs. exposed reasoning:
When using techniques like Chain-of-Thought (CoT) prompting, models produce intermediate reasoning steps. While useful for debugging or internal evaluation, exposing these steps to end users may inadvertently leak sensitive information, such as internal rules, confidential business logic, or hints about training data.
Best practice: Allow the model to perform its reasoning “behind the scenes,” but only expose the concise, final answer in the user-facing product. This keeps user interactions clean, prevents information leakage, and reduces the risk of misuse.
🛡️ Guardrails
Guardrails act as safety filters and structural enforcements that make outputs predictable, secure, and policy-compliant. They operate at two levels:
Structural Guardrails
Constrain model outputs using:
JSON schemas → ensure the output always matches a machine-parseable format.
Frameworks such as Guardrails AI, LMQL, or Guidance provide programmatic ways to enforce these constraints.
⚙️ Determinism Knobs
LLMs are inherently probabilistic, meaning the same prompt may yield different outputs on different runs. For enterprise-grade reliability, determinism can be controlled via:
Lowering Temperature
Reduces randomness in token sampling.
At temperature = 0, the model becomes nearly deterministic, always picking the most probable token.
Self-Consistency with Majority Voting
Instead of accepting a single output, the model generates multiple reasoning paths (using Chain-of-Thought).
A majority vote across outputs ensures stability and reduces the impact of outlier generations.
Example: In a math problem, the model might produce 5 possible solutions; by selecting the most common final answer, reliability improves.
Safety and reliability in prompt engineering require balancing privacy (hidden reasoning), structural/content guardrails (schemas, filters, citations), and deterministic controls (temperature, self-consistency). These practices make LLM-powered systems not only smarter but also trustworthy, compliant, and production-ready.
6.7 When not to use heavy reasoning
While techniques like Chain-of-Thought (CoT), Tree-of-Thought (ToT), or self-consistency sampling can significantly improve reasoning quality in Large Language Models (LLMs), they are not always the right choice. Heavy reasoning often comes at the cost of latency, cost, and computational overhead. In certain contexts, it is better to avoid them altogether and rely on simpler, faster prompting strategies.
Here are situations where heavy reasoning is unnecessary or even counterproductive:
🔹 1. Simple, Well-Known Tasks Where Single-Shot Responses Are Accurate
Not every task requires multiple reasoning steps. If the task has a clear, deterministic answer and can be handled with a single-shot prompt, adding chain-of-thought or multi-step reasoning only adds complexity without benefit.
Examples:
Asking factual questions with unambiguous answers: “What is the capital of France?” → “Paris”
Formatting tasks: Convert 1234 to Roman numerals → MCCXXXIV
Standardized classification: Sentiment analysis of short product reviews → “Positive/Negative”
👉 In such cases, heavy reasoning only increases inference time and may even introduce noise (e.g., overthinking a trivial fact).
🔹 2. Ultra-Tight Latency Budgets
Reasoning methods like CoT or ToT require more tokens because they expand the answer into intermediate steps before concluding. This makes them slower and more expensive.
If the application has strict response time requirements, such as:
Customer support chatbots expected to respond in <1 second.
Voice assistants where delays break the conversational flow.
High-frequency trading AI where every millisecond counts.
👉 In these scenarios, it’s better to stick with direct, single-shot answers or pre-validated responses instead of reasoning chains. Latency constraints make heavy reasoning impractical.
🔹 3. Very Small Models Without Enough Capacity or Context Window
Advanced reasoning prompts assume the model has sufficient capacity (parameters) and context length to simulate multi-step reasoning. Very small models (e.g., <1B parameters, or edge-deployed models with small context windows) often fail to benefit from reasoning prompts because they:
Forget earlier reasoning steps due to short context limits.
Generate incoherent or circular reasoning when asked to “think step by step”.
Struggle to hold multiple candidate reasoning paths in memory (needed for self-consistency or ToT).
Example:
Running CoT on a mobile LLM with 1B parameters may just produce verbose, repetitive text instead of genuine reasoning.
👉 For such models, it is better to use direct, concise prompting and offload complex reasoning to a larger backend model if required.
⚖️ Trade-Offs: Accuracy vs. Efficiency
Scenario
Reasoning Style
Why
Simple, factual Q&A
Single-shot
Faster, cheaper, reliable
Creative writing
CoT / ToT
Requires exploration & coherence
Real-time chatbot
Single-shot / lightweight CoT
Minimize latency
Legal/medical analysis
CoT + self-consistency
Accuracy more important than speed
Edge device app
Single-shot
Small models can’t handle CoT well
Heavy reasoning should be used selectively. It shines in complex, ambiguous, or multi-step reasoning problems, but for simple, latency-sensitive, or resource-constrained scenarios, sticking with direct prompting leads to better user experience and system efficiency.
In real-world deployments, verifying and controlling the output of generative AI models is crucial to ensure safety, robustness, and reliability. LLMs, while powerful, are prone to errors, hallucinations, ethical risks, or unstructured responses that can cause failures in production systems.
Without proper verification, issues such as malformed data, offensive content, or incorrect facts can undermine user trust and lead to business or compliance risks.
7.1 Why Output Verification Matters
Structured Output
Many applications require the output in machine-readable formats (e.g., JSON, XML, CSV).
An unstructured answer can break downstream systems expecting strict schemas.
Valid Output Choices
Even if the model is instructed to choose among fixed options (e.g., “positive” or “negative”), it may generate something outside the list (e.g., “neutral” or “very positive”).
Output validation ensures strict adherence to predefined categories.
Ethical Compliance
Outputs must be free of profanity, bias, harmful stereotypes, or PII (Personally Identifiable Information).
Regulatory compliance (GDPR, HIPAA, etc.) requires strict filtering of sensitive or discriminatory outputs.
Accuracy and Reliability
LLMs can hallucinate — produce factually wrong but confident-sounding information.
Verification steps such as grounding with external knowledge bases or post-checking factual claims can prevent misinformation.
7.2 Methods to Control Output
Apart from tweaking generation parameters like temperature (randomness) and top_p (nucleus sampling), there are three primary strategies for enforcing correct outputs:
Supply the model with examples of desired output in the correct format (e.g., JSON, Markdown tables).
The model uses these as patterns to mimic.
Example Prompt:
{"name": "Alice","sentiment": "positive"}
Now classify the following: Input: “The movie was fantastic!” Output:
Limitations:
Models may still deviate, especially under ambiguous inputs.
Reliability varies across models — some are better at following formatting instructions than others.
7.2.2 Grammar-Based Constrained Sampling
Instead of relying only on examples, grammars and constraints can be enforced at the token generation level. This guarantees that outputs match the expected structure.
Techniques & Tools:
🔹 Guidance
A framework for programmatically controlling LLM outputs.Uses regex, context-free grammars (CFGs), and structured templates.Supports conditionals, loops, and tool calls inside prompt templates.
Advantage: Reduced cost and latency compared to brute-force fine-tuning.
🔹 Guardrails
Python framework to build safe, reliable AI pipelines.
Key features:
Input/Output Guards to catch risks (bias, toxicity, PII leaks).Schema enforcement (ensures outputs comply with JSON, XML, etc.).Ecosystem of reusable validators via Guardrails Hub.
Example: Ensuring LLM output is a safe, validated JSON object representing a chatbot reply.
🔹 LMQL (Language Model Query Language)
Specialized programming language for LLM prompting.
Provides types, templates, and constraints for robust prompting.
Runtime ensures the model adheres to the defined schema during decoding.
Low-level Constrained Decoding Example (llama-cpp-python):
response = llm("Classify the sentiment.",response_format= {"type": "json_object"})
Forces the model to output a valid JSON object instead of free text.
7.2.3 Fine-Tuning for Desired Outputs
How it works:
Retrain or fine-tune the base model on domain-specific datasets that already contain the desired output style.
Example: A customer support LLM fine-tuned only on safe, structured responses in JSON.
Benefits:
Reduces variance and unpredictability.
Makes structured outputs more native to the model (less prompt engineering overhead).
Limitations:
Requires labeled data in the target output format.
Costly and time-consuming compared to prompting or grammar constraints.
7.3 Output Verification Pipeline (Best Practice)
A robust production system often combines multiple techniques:
Prompt-level control → Provide few-shot examples of structured output.
Post-generation validation → Apply validators for ethics, factuality, and compliance.
Fallback mechanism → If verification fails, rerun the model with tighter constraints or route to a human-in-the-loop system.
Output verification transforms LLMs from unpredictable text generators into reliable components of enterprise systems. By combining structured examples, constrained grammar, and fine-tuning, developers can build trustworthy AI applications that are safe, accurate, and production-ready.
References
Book: Oreilly – Hands-On Large Language Models – Language Understanding and Generation by Jay Alammar & Maarten Grootendorst