1. Introduction
Ever needed to add voice recording to your Python app? Maybe you're building a transcription tool, a voice note feature, or just want to capture audio for analysis. Whatever the reason, working with audio in Python turns out to be surprisingly straightforward once you know which libraries to use.
I recently needed to implement audio recording for a project, and after trying several approaches, I found PyAudio to be the most reliable option. It's not perfect – the installation can be a pain, especially on Linux – but it works consistently across platforms and gives you fine-grained control over the recording process.
This guide walks through the complete workflow: checking if your microphone works, recording audio, saving it as a WAV file, and playing it back. I'll show you the actual code I use, along with explanations of what each parameter does and why it matters.
What you'll need:
-
Python 3.6 or higher
-
A working microphone
-
About 10 minutes to get everything set up
What you'll learn:
-
Installing PyAudio and handling its dependencies
-
Recording audio from your microphone
-
Understanding audio parameters (sample rate, bit depth, channels)
-
Saving recordings as WAV files
-
Playing back audio files
The code examples are meant to be copy-paste ready. I've kept them minimal to focus on the core concepts, but I'll also show you how to handle common edge cases like missing microphones or buffer overflows.
2. Audio Recording Workflow
The diagram below shows the complete audio recording pipeline we'll be implementing. Here's what happens at each stage:
-
Speak - You talk into your microphone, which converts sound waves into an electrical signal
-
Audio Signal - The microphone sends this analog signal to your computer's sound card
-
Record Audio - PyAudio captures the digital audio stream and stores it in memory as chunks of data
-
Save Audio - The Python
wavemodule writes these chunks to a WAV file on your disk -
Play Audio - SimpleAudio (or other libraries) reads the WAV file and sends it back through your speakers
Each arrow represents data flowing through your system. We'll write Python code to control steps 3, 4, and 5 - the actual recording, saving, and playback.
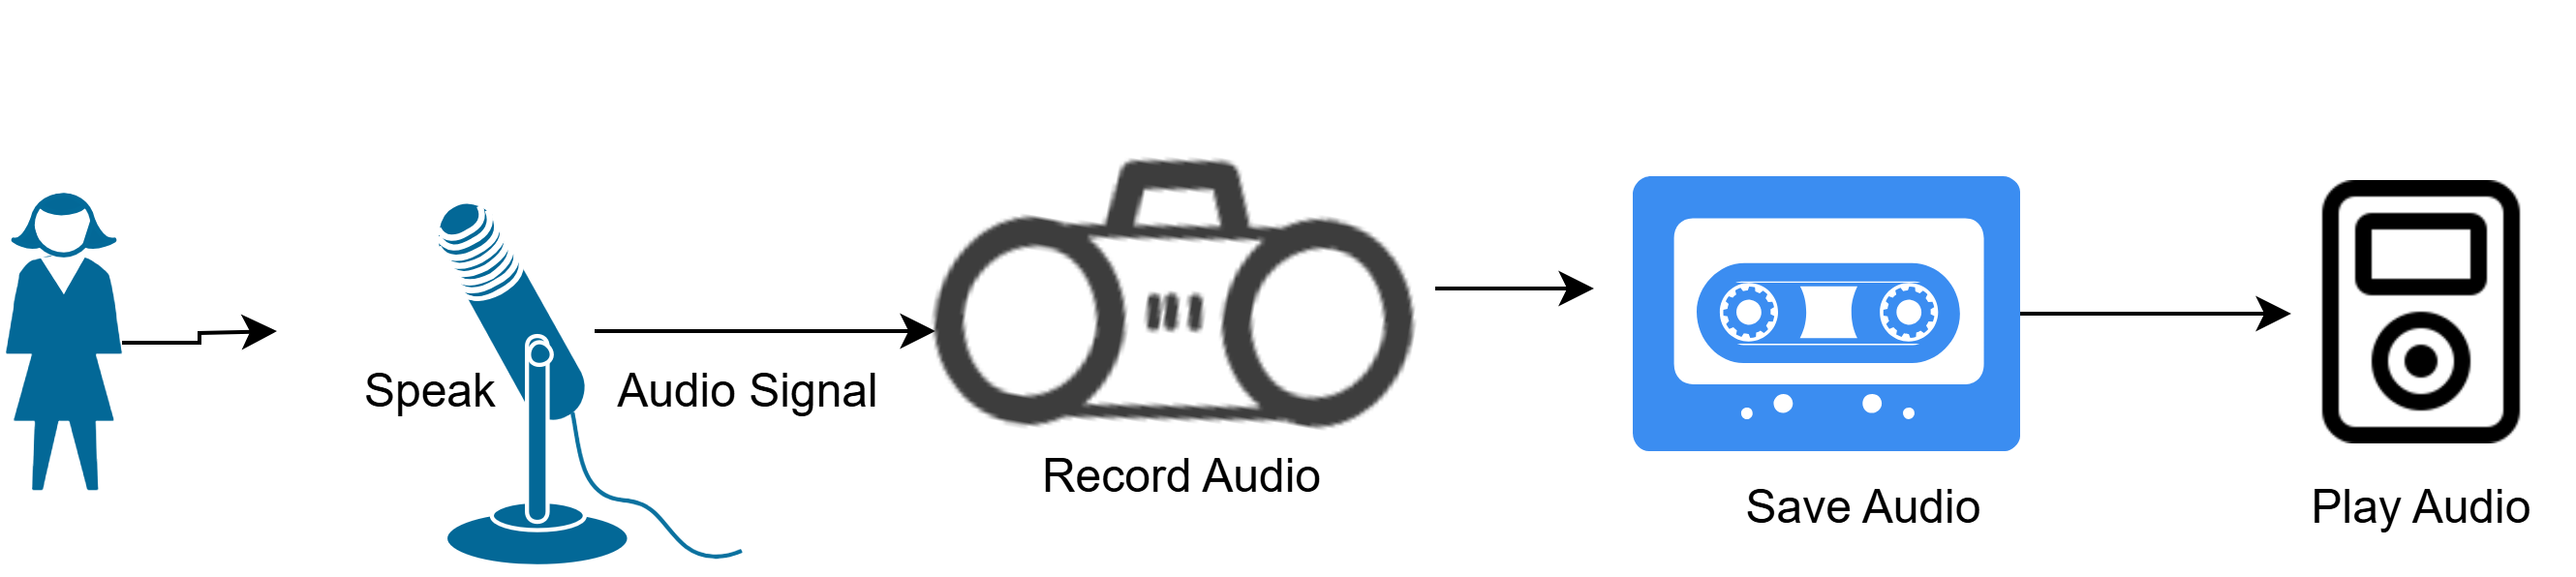
Figure 1: Audio Recording Workflow
2.1 Why This Workflow Matters
Understanding this pipeline helps you debug issues more effectively. If recording fails, you'll know whether the problem is with hardware (microphone), drivers (sound card), your code (PyAudio), or file handling (wave module). Each stage has different failure modes and solutions.
Let's start with the installation steps you'll need.
3. Installation
Estimated time: 5-10 minutes
Before we jump into the code, we need to get PyAudio installed. Fair warning: this is usually the trickiest part of working with audio in Python. PyAudio requires PortAudio, a cross-platform audio library, to be installed at the system level before you can install the Python package.
3.1 Why Installation Can Be Tricky
PyAudio is a Python wrapper around PortAudio (a C library). When you run pip install pyaudio, pip tries to compile the C extension, which fails if PortAudio isn't already on your system. This catches a lot of people off guard because most Python packages "just work" with pip.
3.2 System Dependencies First
Install the system-level audio libraries based on your operating system:
Linux (Ubuntu/Debian)
bash
sudo apt-get updatesudo apt-get install portaudio19-dev python3-pyaudiosudo apt-get updatesudo apt-get install portaudio19-dev python3-pyaudioFor other Linux distributions:
-
Fedora/RHEL:
sudo dnf install portaudio-devel -
Arch Linux:
sudo pacman -S portaudio
macOS
Using Homebrew (install from https://brew.sh if you don't have it):
bash
brew install portaudiobrew install portaudioWindows
Windows is actually the easiest here. You can install PyAudio directly using precompiled wheels:
bash
pip install pipwinpipwin install pyaudiopip install pipwinpipwin install pyaudioAlternatively, download the appropriate .whl file for your Python version from Christoph Gohlke's unofficial binaries and install it with:
bash
pip install PyAudio‑0.2.11‑cp311‑cp311‑win_amd64.whlpip install PyAudio‑0.2.11‑cp311‑cp311‑win_amd64.whl3.3 Python Packages
Once the system dependencies are in place, install the required Python libraries:
bash
pip install pyaudio wave simpleaudiopip install pyaudio wave simpleaudioNote: The wave module is actually built into Python's standard library, so you don't need to install it separately. I'm listing it here for completeness.
3.4 Verify Installation
Let's make sure everything works. Run this quick check:
python
import pyaudioimport pprint<div></div>p = pyaudio.PyAudio()pp = pprint.PrettyPrinter(indent=4)<div></div>try: device_info = p.get_default_input_device_info() pp.pprint(device_info) print(f"\n✓ Microphone available: {device_info.get('name', 'Unknown')}")except IOError as e: print(f"✗ No microphone available: {e}") print("Please check your audio input devices and try again.")except Exception as e: # Catch any other unexpected errors print(f"✗ Unexpected error: {e}")finally: p.terminate() # Always cleanup, no matter what happensimport pyaudioimport pprintp = pyaudio.PyAudio()pp = pprint.PrettyPrinter(indent=4)try: device_info = p.get_default_input_device_info() pp.pprint(device_info) print(f"\n✓ Microphone available: {device_info.get('name', 'Unknown')}")except IOError as e: print(f"✗ No microphone available: {e}") print("Please check your audio input devices and try again.")except Exception as e: # Catch any other unexpected errors print(f"✗ Unexpected error: {e}")finally: p.terminate() # Always cleanup, no matter what happensIf you see your microphone details printed out, you're good to go. If you get an error, double-check that:
-
Your microphone is physically connected
-
Your OS recognizes the microphone (check system settings)
-
PyAudio installed correctly (try
pip list | grep -i pyaudio)
3.5 Common Installation Issues
"command 'gcc' failed with exit status 1"
This means the C compiler can't find PortAudio headers. Go back and install the system dependencies for your OS.
"No module named '_portaudio'"
The PyAudio installation didn't complete properly. Try uninstalling and reinstalling:
bash
pip uninstall pyaudiopip install --no-cache-dir pyaudiopip uninstall pyaudiopip install --no-cache-dir pyaudio"Jack server is not running" (Linux)
This is just a warning, not an error. PyAudio tries to connect to JACK (a professional audio server) but falls back to ALSA if it's not available. You can safely ignore this.
ImportError on simpleaudio
On Linux, simpleaudio needs ALSA development files:
bash
sudo apt-get install libasound2-devpip install simpleaudiosudo apt-get install libasound2-devpip install simpleaudio"Permission denied" accessing audio device (Linux)
Your user might not be in the 'audio' group:
# Add your user to audio groupsudo usermod -a -G audio $USER<div></div># Log out and log back in for changes to take effect# Add your user to audio groupsudo usermod -a -G audio $USER# Log out and log back in for changes to take effect3.6 Alternative: Using Virtual Environments
I strongly recommend using a virtual environment to avoid conflicts with system Python packages:
bash
# Create virtual environmentpython -m venv audio_env<div></div># Activate it# On Linux/macOS:source audio_env/bin/activate# On Windows:audio_env\Scripts\activate<div></div># Install packagespip install pyaudio simpleaudio# Create virtual environmentpython -m venv audio_env# Activate it# On Linux/macOS:source audio_env/bin/activate# On Windows:audio_env\Scripts\activate# Install packagespip install pyaudio simpleaudioThis keeps your audio project dependencies isolated and makes troubleshooting easier.
3.7 Quick Sanity Check
Here's a one-liner to verify all imports work:
python
python -c "import pyaudio, wave, simpleaudio; print('All packages imported successfully!')"python -c "import pyaudio, wave, simpleaudio; print('All packages imported successfully!')"If that runs without errors, you're ready to start recording audio.
4. Verifying Your Microphone (Check mic Check)
Now that we have PyAudio installed, let's make sure your microphone is recognized and working properly. This step is crucial because audio issues are much easier to debug before you start recording.
4.1 Check Default Microphone
First, let's verify that PyAudio can detect your default microphone:
python
import pyaudioimport pprint<div></div>p = pyaudio.PyAudio()pp = pprint.PrettyPrinter(indent=4)<div></div>try: device_info = p.get_default_input_device_info() pp.pprint(device_info) print(f"\n✓ Microphone available: {device_info.get('name', 'Unknown')}")except IOError as e: print(f"✗ No microphone available: {e}") print("Please check your audio input devices and try again.")finally: p.terminate()import pyaudioimport pprintp = pyaudio.PyAudio()pp = pprint.PrettyPrinter(indent=4)try: device_info = p.get_default_input_device_info() pp.pprint(device_info) print(f"\n✓ Microphone available: {device_info.get('name', 'Unknown')}")except IOError as e: print(f"✗ No microphone available: {e}") print("Please check your audio input devices and try again.")finally: p.terminate()Example Output
If everything is working, you'll see something like this:
{ 'defaultHighInputLatency': 0.034829931972789115, 'defaultHighOutputLatency': 0.034829931972789115, 'defaultLowInputLatency': 0.011609977324263039, 'defaultLowOutputLatency': 0.011609977324263039, 'defaultSampleRate': 44100.0, 'hostApi': 0, 'index': 0, 'maxInputChannels': 2, 'maxOutputChannels': 2, 'name': 'Built-in Microphone', 'structVersion': 2}<div></div>✓ Microphone available: Built-in Microphone{ 'defaultHighInputLatency': 0.034829931972789115, 'defaultHighOutputLatency': 0.034829931972789115, 'defaultLowInputLatency': 0.011609977324263039, 'defaultLowOutputLatency': 0.011609977324263039, 'defaultSampleRate': 44100.0, 'hostApi': 0, 'index': 0, 'maxInputChannels': 2, 'maxOutputChannels': 2, 'name': 'Built-in Microphone', 'structVersion': 2}✓ Microphone available: Built-in MicrophoneThe key things to note:
-
name: Your microphone's name (useful if you have multiple devices)
-
defaultSampleRate: The default recording rate (usually 44100 Hz)
-
maxInputChannels: Maximum channels supported (1=mono, 2=stereo)
4.2 List All Available Devices
If you have multiple microphones or want to choose a specific one, use this code to list all available input devices:
python
import pyaudio<div></div>p = pyaudio.PyAudio()<div></div>try: print("Available Audio Input Devices:") print("=" * 70) device_count = p.get_device_count() if device_count == 0: print("✗ No audio devices found") else: input_devices_found = False for i in range(device_count): try: info = p.get_device_info_by_index(i) if info['maxInputChannels'] > 0: input_devices_found = True print(f"\nDevice Index: {i}") print(f" Name: {info['name']}") print(f" Max Input Channels: {info['maxInputChannels']}") print(f" Default Sample Rate: {int(info['defaultSampleRate'])} Hz") print(f" Host API: {info['hostApi']}") print("-" * 70) except Exception as e: print(f"Warning: Could not get info for device {i}: {e}") continue if not input_devices_found: print("\n✗ No input devices found. Please connect a microphone.") except Exception as e: print(f"✗ Error listing devices: {e}")finally: p.terminate()import pyaudiop = pyaudio.PyAudio()try: print("Available Audio Input Devices:") print("=" * 70) device_count = p.get_device_count() if device_count == 0: print("✗ No audio devices found") else: input_devices_found = False for i in range(device_count): try: info = p.get_device_info_by_index(i) if info['maxInputChannels'] > 0: input_devices_found = True print(f"\nDevice Index: {i}") print(f" Name: {info['name']}") print(f" Max Input Channels: {info['maxInputChannels']}") print(f" Default Sample Rate: {int(info['defaultSampleRate'])} Hz") print(f" Host API: {info['hostApi']}") print("-" * 70) except Exception as e: print(f"Warning: Could not get info for device {i}: {e}") continue if not input_devices_found: print("\n✗ No input devices found. Please connect a microphone.") except Exception as e: print(f"✗ Error listing devices: {e}")finally: p.terminate()Why This Matters
If you see multiple devices, you'll need to specify which one to use when recording. Make note of the Device Index number - you'll use this later if you want to record from a specific microphone.
For example, if you have:
-
Device 0: Built-in Microphone
-
Device 2: USB Microphone
-
Device 4: Bluetooth Headset
You can choose Device 2 (USB Microphone) by passing input_device_index=2 when opening the audio stream.
Why Test Recording Capability?
The previous checks only verify that PyAudio can see your microphone. This test ensures it can actually capture audio data. Some issues (like incorrect permissions, driver problems, or conflicting applications) only appear when you try to record.
4.3 Test Recording Capability
Here's a quick test to verify your microphone can actually capture audio (not just that it exists):
python
import pyaudio<div></div>CHUNK = 1024FORMAT = pyaudio.paInt16CHANNELS = 1RATE = 44100<div></div>p = pyaudio.PyAudio()stream = None<div></div>try: stream = p.open( format=FORMAT, channels=CHANNELS, rate=RATE, input=True, frames_per_buffer=CHUNK ) print("Testing microphone...") print("Speak into your microphone for 2 seconds...") for i in range(0, int(RATE / CHUNK * 2)): data = stream.read(CHUNK, exception_on_overflow=False) print("✓ Microphone test successful!") print("Your microphone is working and ready to record.") except IOError as e: print(f"✗ Microphone test failed: {e}") print("\nPossible issues:") print("- Microphone is not connected properly") print("- Another application is using the microphone") print("- Sample rate not supported by your device")except Exception as e: print(f"✗ Unexpected error during microphone test: {e}") finally: # Cleanup stream if it was opened if stream is not None: try: if stream.is_active(): stream.stop_stream() stream.close() except: pass # Always cleanup PyAudio p.terminate()import pyaudioCHUNK = 1024FORMAT = pyaudio.paInt16CHANNELS = 1RATE = 44100p = pyaudio.PyAudio()stream = Nonetry: stream = p.open( format=FORMAT, channels=CHANNELS, rate=RATE, input=True, frames_per_buffer=CHUNK ) print("Testing microphone...") print("Speak into your microphone for 2 seconds...") for i in range(0, int(RATE / CHUNK * 2)): data = stream.read(CHUNK, exception_on_overflow=False) print("✓ Microphone test successful!") print("Your microphone is working and ready to record.") except IOError as e: print(f"✗ Microphone test failed: {e}") print("\nPossible issues:") print("- Microphone is not connected properly") print("- Another application is using the microphone") print("- Sample rate not supported by your device")except Exception as e: print(f"✗ Unexpected error during microphone test: {e}") finally: # Cleanup stream if it was opened if stream is not None: try: if stream.is_active(): stream.stop_stream() stream.close() except: pass # Always cleanup PyAudio p.terminate()This test actually attempts to record audio, which catches issues that won't show up in a simple device query.
4.4 Troubleshooting Tips
No Devices Found
If you don't see any input devices:
-
Check physical connection: Make sure your microphone is plugged in
-
Check OS settings:
-
macOS: System Preferences → Sound → Input
-
Windows: Settings → System → Sound → Input
-
Linux: Run
arecord -lto list recording devices
-
-
Restart your application: Sometimes the OS needs to refresh device list
Multiple Devices Listed
If you see devices you don't recognize:
-
Some sound cards appear as multiple devices (different modes/configs)
-
Virtual audio devices (like Loopback or Soundflower) also show up
-
When in doubt, test each device index to find the right one
Sample Rate Errors
If you get errors about unsupported sample rates, check which rates your device supports:
python
import pyaudio<div></div>p = pyaudio.PyAudio()device_index = 0 # Change this to your device<div></div>try: print(f"Testing supported sample rates for device {device_index}...") # Verify device exists try: device_info = p.get_device_info_by_index(device_index) print(f"Device: {device_info['name']}\n") except IOError: print(f"✗ Device {device_index} not found") print("Run the device listing code to see available devices.") else: for rate in [8000, 16000, 22050, 44100, 48000, 96000]: try: supported = p.is_format_supported( rate, input_device=device_index, input_channels=1, input_format=pyaudio.paInt16 ) if supported: print(f"✓ {rate} Hz - Supported") except ValueError: print(f"✗ {rate} Hz - Not supported") except Exception as e: print(f"✗ {rate} Hz - Error testing: {e}") except Exception as e: print(f"✗ Error during sample rate testing: {e}")finally: p.terminate()import pyaudiop = pyaudio.PyAudio()device_index = 0 # Change this to your devicetry: print(f"Testing supported sample rates for device {device_index}...") # Verify device exists try: device_info = p.get_device_info_by_index(device_index) print(f"Device: {device_info['name']}\n") except IOError: print(f"✗ Device {device_index} not found") print("Run the device listing code to see available devices.") else: for rate in [8000, 16000, 22050, 44100, 48000, 96000]: try: supported = p.is_format_supported( rate, input_device=device_index, input_channels=1, input_format=pyaudio.paInt16 ) if supported: print(f"✓ {rate} Hz - Supported") except ValueError: print(f"✗ {rate} Hz - Not supported") except Exception as e: print(f"✗ {rate} Hz - Error testing: {e}") except Exception as e: print(f"✗ Error during sample rate testing: {e}")finally: p.terminate()Most modern microphones support 44100 Hz (CD quality) and 48000 Hz (professional audio), so stick with one of those.
4.5 Ready to Record?
If your microphone shows up in the device list and the test recording runs without errors, you're all set! The next step is understanding the audio parameters before we write the actual recording code.
5. Record the audio
Now for the main event - actually recording audio! The process is straightforward: open an audio stream, read data in chunks, and store those chunks in memory.
5.1 How Recording Works
Think of it like filling a bucket with water from a tap:
-
The microphone is the tap (constant stream of audio)
-
The CHUNK size is your bucket (how much you grab at once)
-
The frames list is your storage tank (where you keep everything)
The following is the code snippet to record the audio:
import pyaudioimport wave<div></div>CHUNK = 512FORMAT = pyaudio.paInt16CHANNELS = 1RATE = 44100RECORD_SECONDS = 5<div></div>p = pyaudio.PyAudio()stream = None<div></div>try: stream = p.open(format=FORMAT, channels=CHANNELS, rate=RATE, input=True, frames_per_buffer=CHUNK)<div></div> print("* Recording started...") frames = []<div></div> for i in range(0, int(RATE / CHUNK * RECORD_SECONDS)): try: data = stream.read(CHUNK, exception_on_overflow=False) frames.append(data) except IOError as e: print(f"Warning: Buffer overflow - {e}") continue<div></div> print("* Recording complete") except IOError as e: print(f"✗ Recording failed: {e}") print("Check that your microphone is connected and not in use.") frames = []except KeyboardInterrupt: print("\n✗ Recording interrupted by user") frames = []except Exception as e: print(f"✗ Unexpected error: {e}") frames = [] finally: # Cleanup stream if stream is not None: try: if stream.is_active(): stream.stop_stream() stream.close() except: pass # Cleanup PyAudio p.terminate()import pyaudioimport waveCHUNK = 512FORMAT = pyaudio.paInt16CHANNELS = 1RATE = 44100RECORD_SECONDS = 5p = pyaudio.PyAudio()stream = Nonetry: stream = p.open(format=FORMAT, channels=CHANNELS, rate=RATE, input=True, frames_per_buffer=CHUNK) print("* Recording started...") frames = [] for i in range(0, int(RATE / CHUNK * RECORD_SECONDS)): try: data = stream.read(CHUNK, exception_on_overflow=False) frames.append(data) except IOError as e: print(f"Warning: Buffer overflow - {e}") continue print("* Recording complete") except IOError as e: print(f"✗ Recording failed: {e}") print("Check that your microphone is connected and not in use.") frames = []except KeyboardInterrupt: print("\n✗ Recording interrupted by user") frames = []except Exception as e: print(f"✗ Unexpected error: {e}") frames = [] finally: # Cleanup stream if stream is not None: try: if stream.is_active(): stream.stop_stream() stream.close() except: pass # Cleanup PyAudio p.terminate()5.2 Understanding the Recording Loop
The heart of the recording code is this loop:
for i in range(0, int(RATE / CHUNK * RECORD_SECONDS)): data = stream.read(CHUNK, exception_on_overflow=False) frames.append(data)for i in range(0, int(RATE / CHUNK * RECORD_SECONDS)): data = stream.read(CHUNK, exception_on_overflow=False) frames.append(data)This calculates how many chunks we need to record for the desired duration:
-
RATE (44100) / CHUNK (512) = ~86 chunks per second
-
86 chunks/sec × 5 seconds = 430 total chunks to record
Each iteration grabs one chunk (512 samples) and adds it to our frames list.
5.3 Why `exception_on_overflow=False`?
This parameter tells PyAudio not to crash if the buffer overflows (when your CPU is too busy to process audio fast enough). Instead, it just drops some frames and continues. For most applications, losing a few milliseconds is better than crashing.
5.4 Parameters Explained
Let's break down what each parameter means:
CHUNK = 512
-
Buffer size: how many audio samples to process at once
-
Smaller values = lower latency, higher CPU usage
-
512-2048 is typical for recording
-
Too small: choppy audio, high CPU
-
Too large: delayed response, memory issues
FORMAT = pyaudio.paInt16
-
Sample format: how audio data is represented
-
`paInt16` = 16-bit integers (range: -32768 to 32767)
-
This is CD-quality and works for most applications
-
Alternative: `paFloat32` for higher dynamic range
CHANNELS = 1
-
Number of audio channels
-
1 = mono (single microphone)
-
2 = stereo (left and right channels)
-
Use mono for voice, stereo for music
RATE = 44100
-
Sample rate: how many samples per second
-
44100 Hz = CD quality (industry standard)
-
48000 Hz = professional audio
-
16000 Hz = good enough for speech
-
Higher = better quality but larger files
RECORD_SECONDS = 5
-
How long to record
-
Can be any positive number
-
Memory usage = RATE × CHANNELS × 2 bytes × RECORD_SECONDS
-
For 5 seconds: 44100 × 1 × 2 × 5 = ~430 KB
5.5 What Happens Behind the Scenes
-
`
p.open()` tells your sound card to start capturing audio -
The sound card continuously fills an internal buffer with audio data
-
`
stream.read(CHUNK)` grabs the oldest CHUNK samples from that buffer -
We store those samples in our `
frames` list -
Repeat until we have enough audio
-
`
stream.stop_stream()` tells the sound card to stop
5.6 Error Handling Explained
The code handles three types of errors:
-
IOError: Microphone issues (disconnected, in use, unsupported format)
-
KeyboardInterrupt: User presses Ctrl+C to stop recording
-
Exception: Any unexpected error
All errors result in an empty `frames` list, which the save function will detect and handle appropriately.
6. Saving the audio
After recording, we have a list of raw audio chunks in memory. Now we need to save them to a file that other programs can open. We'll use Python's built-in `wave` module to create a WAV file.
6.1 Why WAV Format?
WAV (Waveform Audio File Format) is uncompressed audio:
✅ Universal compatibility (plays everywhere)
✅ No quality loss
✅ Simple to work with
❌ Large file sizes (~10MB per minute of CD-quality audio)
For production applications, you might want to compress to MP3 or OGG afterwards, but WAV is perfect for recording because it's simple and reliable.
Here's the saving code:
WAVE_OUTPUT_FILENAME = "myaudio.wav"<div></div>wf = Nonetry: if not frames: print("✗ No audio data to save") else: # Save the recorded audio file wf = wave.open(WAVE_OUTPUT_FILENAME, 'wb') wf.setnchannels(CHANNELS) wf.setsampwidth(p.get_sample_size(FORMAT)) wf.setframerate(RATE) wf.writeframes(b''.join(frames)) print(f"✓ Audio saved to {WAVE_OUTPUT_FILENAME}") # Calculate and display file info duration = len(frames) * CHUNK / RATE print(f" Duration: {duration:.1f} seconds") except IOError as e: print(f"✗ Failed to save audio file: {e}") print("Check file permissions and disk space.")except Exception as e: print(f"✗ Unexpected error saving file: {e}")finally: if wf is not None: try: wf.close() except: passWAVE_OUTPUT_FILENAME = "myaudio.wav"wf = Nonetry: if not frames: print("✗ No audio data to save") else: # Save the recorded audio file wf = wave.open(WAVE_OUTPUT_FILENAME, 'wb') wf.setnchannels(CHANNELS) wf.setsampwidth(p.get_sample_size(FORMAT)) wf.setframerate(RATE) wf.writeframes(b''.join(frames)) print(f"✓ Audio saved to {WAVE_OUTPUT_FILENAME}") # Calculate and display file info duration = len(frames) * CHUNK / RATE print(f" Duration: {duration:.1f} seconds") except IOError as e: print(f"✗ Failed to save audio file: {e}") print("Check file permissions and disk space.")except Exception as e: print(f"✗ Unexpected error saving file: {e}")finally: if wf is not None: try: wf.close() except: pass6.2 Understanding the WAV File Structure
A WAV file has two parts:
1. Header (metadata):
-
Number of channels (mono/stereo)
-
Sample width (bytes per sample)
-
Sample rate (samples per second)
-
Total number of frames
2. Data (the actual audio):
-
All the audio samples concatenated together
-
For our recording:
`b''.join(frames)`combines all chunks
6.3 What Each Line Does
wf = wave.open(WAVE_OUTPUT_FILENAME, 'wb') # Open file in write-binary modewf.setnchannels(CHANNELS) # 1 channel (mono)wf.setsampwidth(p.get_sample_size(FORMAT)) # 2 bytes (16-bit)wf.setframerate(RATE) # 44100 samples/secondwf.writeframes(b''.join(frames)) # Write all audio datawf = wave.open(WAVE_OUTPUT_FILENAME, 'wb') # Open file in write-binary modewf.setnchannels(CHANNELS) # 1 channel (mono)wf.setsampwidth(p.get_sample_size(FORMAT)) # 2 bytes (16-bit)wf.setframerate(RATE) # 44100 samples/secondwf.writeframes(b''.join(frames)) # Write all audio data6.4 File Size Calculation
The code calculates and displays file information:
duration = len(frames) * CHUNK / RATE# len(frames) = number of chunks recorded# CHUNK = samples per chunk# RATE = samples per second# Result: duration in seconds<div></div>file_size = os.path.getsize(WAVE_OUTPUT_FILENAME) / 1024# Get file size in KBduration = len(frames) * CHUNK / RATE# len(frames) = number of chunks recorded# CHUNK = samples per chunk# RATE = samples per second# Result: duration in secondsfile_size = os.path.getsize(WAVE_OUTPUT_FILENAME) / 1024# Get file size in KBFor a 5-second recording:
-
Duration: 5.0 seconds
-
Size: ~430 KB (44100 Hz × 1 channel × 2 bytes × 5 seconds)
6.5 Why Check if frames:?
If recording failed or was interrupted, `frames` might be empty. Attempting to save an empty WAV file would create a corrupt file that can't be played. The check prevents this:
if not frames: print("✗ No audio data to save")if not frames: print("✗ No audio data to save")6.6 Error Handling
The code handles file system errors:
-
IOError: Permission denied, disk full, invalid filename
-
Exception: Unexpected errors during file writing
The `finally` block ensures the file is properly closed even if an error occurs, preventing data corruption.
7. Play the audio
Now that we've recorded and saved our audio, let's play it back to verify everything worked. We'll use the `simpleaudio` library, which lives up to its name - it's refreshingly simple.
7.1 Why SimpleAudio?
There are several audio playback libraries for Python:
-
simpleaudio: Simple, lightweight, no dependencies -
pygame: Full game library (overkill for just audio) -
pyaudio: Can play audio but requires more setup -
playsound: Even simpler but less control
I chose simpleaudio because it's the sweet spot between simplicity and functionality.
Here's the playback code:
import simpleaudio as sa<div></div>filename = "myaudio.wav"<div></div>try: print(f"▶ Playing: {filename}") wave_obj = sa.WaveObject.from_wave_file(filename) play_obj = wave_obj.play() play_obj.wait_done() print("✓ Playback complete") except FileNotFoundError: print(f"✗ File not found: {filename}") print("Make sure the file exists and the path is correct.")except Exception as e: print(f"✗ Playback failed: {e}") print("Check that your audio output device is working.")import simpleaudio as safilename = "myaudio.wav"try: print(f"▶ Playing: {filename}") wave_obj = sa.WaveObject.from_wave_file(filename) play_obj = wave_obj.play() play_obj.wait_done() print("✓ Playback complete") except FileNotFoundError: print(f"✗ File not found: {filename}") print("Make sure the file exists and the path is correct.")except Exception as e: print(f"✗ Playback failed: {e}") print("Check that your audio output device is working.")7.2 How Playback Works
The process is straightforward:
1. Load the WAV file:
wave_obj = sa.WaveObject.from_wave_file(filename)wave_obj = sa.WaveObject.from_wave_file(filename)This reads the file and creates a playback object in memory.
2. Start playback:
play_obj = wave_obj.play()play_obj = wave_obj.play()This sends the audio to your speakers and returns immediately (non-blocking).
3. Wait for completion:
play_obj.wait_done()play_obj.wait_done()This blocks until the audio finishes playing.
7.3 Why Non-blocking Playback?
The `play()` method returns immediately without waiting for audio to finish. This allows you to:
-
Show a progress bar while audio plays
-
Allow users to stop playback early
-
Play multiple sounds simultaneously
-
Continue other work while audio plays
If you don't need these features, just call `wait_done()` immediately.
7.4 Error Handling
The code handles two specific errors:
FileNotFoundError: The WAV file doesn't exist
-
Check the filename and path
-
Make sure the recording/saving steps completed successfully
General Exception: Audio device issues
-
Sound card not working
-
File format corrupted
-
Output device in use by another application
7.5 Alternative: Play Without Installing simpleaudio
If you can't install simpleaudio, PyAudio can also play audio:
import pyaudioimport wave<div></div># Open the WAV filewf = wave.open("myaudio.wav", 'rb')<div></div># Initialize PyAudiop = pyaudio.PyAudio()<div></div># Open streamstream = p.open( format=p.get_format_from_width(wf.getsampwidth()), channels=wf.getnchannels(), rate=wf.getframerate(), output=True)<div></div># Play audiodata = wf.readframes(1024)while data: stream.write(data) data = wf.readframes(1024)<div></div># Cleanupstream.close()p.terminate()wf.close()import pyaudioimport wave# Open the WAV filewf = wave.open("myaudio.wav", 'rb')# Initialize PyAudiop = pyaudio.PyAudio()# Open streamstream = p.open( format=p.get_format_from_width(wf.getsampwidth()), channels=wf.getnchannels(), rate=wf.getframerate(), output=True)# Play audiodata = wf.readframes(1024)while data: stream.write(data) data = wf.readframes(1024)# Cleanupstream.close()p.terminate()wf.close()However, simpleaudio's API is much cleaner for basic playback.
8. Complete Code
Here's everything put together in one production-ready script. This code includes all the error handling, resource cleanup, and user feedback we've discussed. You can copy-paste this directly and it will work.
8.1 What This Script Does
-
Records 5 seconds of audio from your default microphone
-
Saves it as "myaudio.wav" in the current directory
-
Displays recording progress and file information
-
Handles errors gracefully with helpful messages
-
Cleans up all resources properly
8.2 Customization Options
Before running, you can modify these parameters at the top:
-
CHUNK: 512 works well; try 1024 for lower CPU usage
-
CHANNELS: Change to 2 for stereo recording
-
RATE: Use 48000 for higher quality or 16000 for smaller files
-
RECORD_SECONDS: Any positive number
-
WAVE_OUTPUT_FILENAME: Change the output filename
import pyaudioimport wave<div></div>CHUNK = 512FORMAT = pyaudio.paInt16CHANNELS = 1RATE = 44100RECORD_SECONDS = 5WAVE_OUTPUT_FILENAME = "myaudio.wav"<div></div>p = pyaudio.PyAudio()stream = Nonewf = None<div></div>try: # Open audio stream stream = p.open(format=FORMAT, channels=CHANNELS, rate=RATE, input=True, frames_per_buffer=CHUNK)<div></div> print("* Recording started...") print(f" Duration: {RECORD_SECONDS} seconds") frames = []<div></div> # Record audio for i in range(0, int(RATE / CHUNK * RECORD_SECONDS)): try: data = stream.read(CHUNK, exception_on_overflow=False) frames.append(data) except IOError as e: print(f"Warning: Buffer overflow - continuing...") continue<div></div> print("* Recording complete") # Save the recorded audio file if frames: wf = wave.open(WAVE_OUTPUT_FILENAME, 'wb') wf.setnchannels(CHANNELS) wf.setsampwidth(p.get_sample_size(FORMAT)) wf.setframerate(RATE) wf.writeframes(b''.join(frames)) # Calculate file info duration = len(frames) * CHUNK / RATE import os file_size = os.path.getsize(WAVE_OUTPUT_FILENAME) / 1024 # KB print(f"✓ Saved to {WAVE_OUTPUT_FILENAME}") print(f" Duration: {duration:.1f} seconds") print(f" Size: {file_size:.1f} KB") else: print("✗ No audio data recorded")<div></div>except IOError as e: print(f"✗ Recording failed: {e}") print("Check that your microphone is connected and not in use.")except KeyboardInterrupt: print("\n✗ Recording interrupted by user")except Exception as e: print(f"✗ Unexpected error: {e}") finally: # Cleanup stream if stream is not None: try: if stream.is_active(): stream.stop_stream() stream.close() except: pass # Cleanup PyAudio if p is not None: try: p.terminate() except: pass # Cleanup wave file if wf is not None: try: wf.close() except: passimport pyaudioimport waveCHUNK = 512FORMAT = pyaudio.paInt16CHANNELS = 1RATE = 44100RECORD_SECONDS = 5WAVE_OUTPUT_FILENAME = "myaudio.wav"p = pyaudio.PyAudio()stream = Nonewf = Nonetry: # Open audio stream stream = p.open(format=FORMAT, channels=CHANNELS, rate=RATE, input=True, frames_per_buffer=CHUNK) print("* Recording started...") print(f" Duration: {RECORD_SECONDS} seconds") frames = [] # Record audio for i in range(0, int(RATE / CHUNK * RECORD_SECONDS)): try: data = stream.read(CHUNK, exception_on_overflow=False) frames.append(data) except IOError as e: print(f"Warning: Buffer overflow - continuing...") continue print("* Recording complete") # Save the recorded audio file if frames: wf = wave.open(WAVE_OUTPUT_FILENAME, 'wb') wf.setnchannels(CHANNELS) wf.setsampwidth(p.get_sample_size(FORMAT)) wf.setframerate(RATE) wf.writeframes(b''.join(frames)) # Calculate file info duration = len(frames) * CHUNK / RATE import os file_size = os.path.getsize(WAVE_OUTPUT_FILENAME) / 1024 # KB print(f"✓ Saved to {WAVE_OUTPUT_FILENAME}") print(f" Duration: {duration:.1f} seconds") print(f" Size: {file_size:.1f} KB") else: print("✗ No audio data recorded")except IOError as e: print(f"✗ Recording failed: {e}") print("Check that your microphone is connected and not in use.")except KeyboardInterrupt: print("\n✗ Recording interrupted by user")except Exception as e: print(f"✗ Unexpected error: {e}") finally: # Cleanup stream if stream is not None: try: if stream.is_active(): stream.stop_stream() stream.close() except: pass # Cleanup PyAudio if p is not None: try: p.terminate() except: pass # Cleanup wave file if wf is not None: try: wf.close() except: pass8.3 Running the Code
Save this as `audio_recorder.py` and run:
python audio_recorder.pypython audio_recorder.pyExpected output:
Recording started... Duration: 5 seconds
Recording complete ✓ Saved to myaudio.wav Duration: 5.0 seconds Size: 430.2 KB
8.4 What Could Go Wrong?
Even with error handling, here are potential issues:
"Recording failed: [Errno -9996]"
-
Microphone not connected or not recognized
-
Try running the verification code from Section 4
"Buffer overflow - continuing..."
-
Your CPU was too busy - This is usually fine
-
audio quality might have tiny gaps
-
Increase CHUNK size to reduce CPU load
"No audio data recorded"
-
Recording was interrupted
-
Microphone issue occurred
-
Check error messages above this line
8.5 Next Steps
Now that you have working recording code, you might want to:
-
Add real-time volume monitoring
-
Implement pause/resume functionality
-
Convert recordings to MP3 format
-
Build a GUI with
tkinterorPyQt -
Integrate with speech recognition (speech_recognition library)
-
Add audio visualization with matplotlib
9. Troubleshooting Common Issues
Even with proper error handling, you might encounter problems. Here are solutions to the most common
issues.
9.1 Installation Problems
"No module named 'pyaudio'" after installation
Problem: PyAudio installed but Python can't find it
Solutions:
# Check if installedpip list | grep -i pyaudio<div></div># Reinstallpip uninstall pyaudiopip install pyaudio --no-cache-dir<div></div># On Windows, use pipwinpip install pipwinpipwin install pyaudio# Check if installedpip list | grep -i pyaudio# Reinstallpip uninstall pyaudiopip install pyaudio --no-cache-dir# On Windows, use pipwinpip install pipwinpipwin install pyaudio**"gcc failed with exit status 1"**
Problem: C compiler can't find PortAudio
Solutions:
# Ubuntu/Debiansudo apt-get install portaudio19-dev python3-dev<div></div># macOSbrew install portaudio<div></div># Fedorasudo dnf install portaudio-devel# Ubuntu/Debiansudo apt-get install portaudio19-dev python3-dev# macOSbrew install portaudio# Fedorasudo dnf install portaudio-devel9.2 Recording Problems
"Invalid input device" or "[Errno -9996]"
Problem: PyAudio can't access your microphone
Checklist:
-
Microphone is physically connected
-
Microphone works in other applications
-
Check system audio settings
-
Try different device index:
stream = p.open(..., input_device_index=0) # Try 0, 1, 2, etc.stream = p.open(..., input_device_index=0) # Try 0, 1, 2, etc.Frequent buffer overflows
Problem: Audio is choppy with many "Buffer overflow" warnings
Solutions:
# Increase CHUNK sizeCHUNK = 2048 # or 4096<div></div># Lower sample rateRATE = 22050 # instead of 44100<div></div># Use callback-based recording (more advanced)# Increase CHUNK sizeCHUNK = 2048 # or 4096# Lower sample rateRATE = 22050 # instead of 44100# Use callback-based recording (more advanced)Recording is silent or too quiet
Problem: Audio file plays but volume is very low
Solutions:
-
Check microphone input level in system settings
-
Try a different microphone or input device
-
Boost volume after recording (requires additional processing)
9.3 Playback Problems
"No such file or directory"
Problem: WAV file wasn't created or is in wrong location
Solutions:
import os<div></div># Check if file existsif os.path.exists("myaudio.wav"): print("File found!")else: print("File not found. Check recording step.")<div></div># Use absolute pathWAVE_OUTPUT_FILENAME = "/full/path/to/myaudio.wav"import os# Check if file existsif os.path.exists("myaudio.wav"): print("File found!")else: print("File not found. Check recording step.")# Use absolute pathWAVE_OUTPUT_FILENAME = "/full/path/to/myaudio.wav""wave_obj.play() does nothing"
Problem: Playback doesn't work
Solutions:
# Make sure you wait for playbackplay_obj = wave_obj.play()play_obj.wait_done() # Don't forget this!<div></div># Check output device# Try playing in VLC or other player to verify file is good# Make sure you wait for playbackplay_obj = wave_obj.play()play_obj.wait_done() # Don't forget this!# Check output device# Try playing in VLC or other player to verify file is good9.4 Permission Issues (Linux)
"Permission denied" accessing audio device
Problem: User doesn't have audio permissions
Solution:
# Add user to audio groupsudo usermod -a -G audio $USER<div></div># Log out and log back in<div></div># Verify membershipgroups | grep audio# Add user to audio groupsudo usermod -a -G audio $USER# Log out and log back in# Verify membershipgroups | grep audio9.5 Platform-Specific Issues
macOS: "Operation not permitted"
Problem: macOS privacy settings blocking microphone access
Solution:
System Preferences → Security & Privacy → Microphone → Check Python/Terminal
Windows: "mmsystem" errors
Problem: Windows audio subsystem issues
Solutions:
-
Update audio drivers
-
Restart audio services:
-
Open Services
-
Restart "Windows Audio" service
-
-
Try different audio API (WASAPI vs DirectSound)
9.6 Still Having Issues?
If none of these solutions work:
1. Verify PyAudio works at all:
import pyaudiop = pyaudio.PyAudio()print(f"PyAudio version: {pyaudio.__version__}")print(f"Devices: {p.get_device_count()}")p.terminate() import pyaudio p = pyaudio.PyAudio() print(f"PyAudio version: {pyaudio.__version__}") print(f"Devices: {p.get_device_count()}") p.terminate()2. Check system audio:
-
Test microphone in other applications
-
Try headphones/speakers for playback
-
Update audio drivers
3. Try alternative libraries:
-
sounddevice:
pip install sounddevice -
python-sounddevice has simpler API
-
Consider if PyAudio is necessary for your use case
4. Search for your specific error:
-
Check PyAudio GitHub issues
-
Copy exact error message
-
Search StackOverflow
10. Best Practices for Production Use
The code in this tutorial is ready for basic use, but here are some improvements for production
applications.
10.1 Configuration Management
Don't hardcode audio parameters:
# BadCHUNK = 512RATE = 44100<div></div># Goodimport json<div></div>with open('audio_config.json') as f: config = json.load(f)<div></div>CHUNK = config.get('chunk_size', 512)RATE = config.get('sample_rate', 44100)# BadCHUNK = 512RATE = 44100# Goodimport jsonwith open('audio_config.json') as f: config = json.load(f)CHUNK = config.get('chunk_size', 512)RATE = config.get('sample_rate', 44100)10.2 Progress Callbacks
For long recordings, show progress:
def record_with_progress(duration, callback=None): total_chunks = int(RATE / CHUNK * duration)<div></div> for i in range(total_chunks): data = stream.read(CHUNK) frames.append(data)<div></div> if callback: progress = (i + 1) / total_chunks callback(progress)<div></div># Usagedef show_progress(percent): print(f"\rRecording: {percent*100:.1f}%", end='')<div></div>record_with_progress(5, show_progress)def record_with_progress(duration, callback=None): total_chunks = int(RATE / CHUNK * duration) for i in range(total_chunks): data = stream.read(CHUNK) frames.append(data) if callback: progress = (i + 1) / total_chunks callback(progress)# Usagedef show_progress(percent): print(f"\rRecording: {percent*100:.1f}%", end='')record_with_progress(5, show_progress)10.3 Automatic Silence Detection
Stop recording when user stops speaking:
import numpy as np<div></div>def is_silent(data, threshold=500): """Check if audio data is below threshold""" audio_data = np.frombuffer(data, dtype=np.int16) return np.abs(audio_data).mean() < threshold<div></div># In recording loopsilent_chunks = 0while True: data = stream.read(CHUNK) frames.append(data)<div></div> if is_silent(data): silent_chunks += 1 if silent_chunks > 20: # 20 chunks of silence break else: silent_chunks = 0import numpy as npdef is_silent(data, threshold=500): """Check if audio data is below threshold""" audio_data = np.frombuffer(data, dtype=np.int16) return np.abs(audio_data).mean() < threshold# In recording loopsilent_chunks = 0while True: data = stream.read(CHUNK) frames.append(data) if is_silent(data): silent_chunks += 1 if silent_chunks > 20: # 20 chunks of silence break else: silent_chunks = 010.4 Resource Management with Context Managers
Use context managers for automatic cleanup:
class AudioRecorder: def __enter__(self): self.p = pyaudio.PyAudio() self.stream = self.p.open(...) return self<div></div> def __exit__(self, *args): if self.stream: self.stream.close() if self.p: self.p.terminate()<div></div># Usagewith AudioRecorder() as recorder: recorder.record(5) # Cleanup happens automaticallyclass AudioRecorder: def __enter__(self): self.p = pyaudio.PyAudio() self.stream = self.p.open(...) return self def __exit__(self, *args): if self.stream: self.stream.close() if self.p: self.p.terminate()# Usagewith AudioRecorder() as recorder: recorder.record(5) # Cleanup happens automatically10.5 Format Conversion
Convert WAV to compressed formats:
from pydub import AudioSegment<div></div># Convert to MP3 (much smaller)sound = AudioSegment.from_wav("recording.wav")sound.export("recording.mp3", format="mp3", bitrate="128k")<div></div># Reduces file size by ~90%from pydub import AudioSegment# Convert to MP3 (much smaller)sound = AudioSegment.from_wav("recording.wav")sound.export("recording.mp3", format="mp3", bitrate="128k")# Reduces file size by ~90%10.6 Testing
Write tests for audio functionality:
import unittestimport os<div></div>class TestAudioRecording(unittest.TestCase): def test_recording_creates_file(self): record_audio(duration=1) self.assertTrue(os.path.exists("test.wav"))<div></div> def test_file_size_reasonable(self): record_audio(duration=1) size = os.path.getsize("test.wav") # 1 second at 44100 Hz, 16-bit, mono ≈ 88KB self.assertGreater(size, 80000) self.assertLess(size, 100000)import unittestimport osclass TestAudioRecording(unittest.TestCase): def test_recording_creates_file(self): record_audio(duration=1) self.assertTrue(os.path.exists("test.wav")) def test_file_size_reasonable(self): record_audio(duration=1) size = os.path.getsize("test.wav") # 1 second at 44100 Hz, 16-bit, mono ≈ 88KB self.assertGreater(size, 80000) self.assertLess(size, 100000)10.7 Logging
Add logging instead of print statements:
import logging<div></div>logging.basicConfig(level=logging.INFO)logger = logging.getLogger(__name__)<div></div># Instead of print()logger.info("Recording started")logger.warning("Buffer overflow detected")logger.error("Failed to save file")import logginglogging.basicConfig(level=logging.INFO)logger = logging.getLogger(__name__)# Instead of print()logger.info("Recording started")logger.warning("Buffer overflow detected")logger.error("Failed to save file")10.8 Memory Management
For very long recordings, write to disk incrementally:
wf = wave.open(filename, 'wb')wf.setnchannels(CHANNELS)wf.setsampwidth(p.get_sample_size(FORMAT))wf.setframerate(RATE)<div></div># Write as you record (no frames list needed)for i in range(total_chunks): data = stream.read(CHUNK) wf.writeframes(data) # Write immediately<div></div>wf.close()wf = wave.open(filename, 'wb')wf.setnchannels(CHANNELS)wf.setsampwidth(p.get_sample_size(FORMAT))wf.setframerate(RATE)# Write as you record (no frames list needed)for i in range(total_chunks): data = stream.read(CHUNK) wf.writeframes(data) # Write immediatelywf.close()10.9 Cross-Platform Paths
Use pathlib for cross-platform compatibility:
from pathlib import Path<div></div># Badoutput_file = "recordings/audio.wav"<div></div># Goodoutput_dir = Path("recordings")output_dir.mkdir(exist_ok=True)output_file = output_dir / "audio.wav"from pathlib import Path# Badoutput_file = "recordings/audio.wav"# Goodoutput_dir = Path("recordings")output_dir.mkdir(exist_ok=True)output_file = output_dir / "audio.wav"10.10 User Feedback
Provide clear feedback for all operations:
try: print("🎤 Recording...") frames = record_audio(5) print("✓ Recording complete")<div></div> print("💾 Saving...") save_audio(frames, "output.wav") print("✓ Saved successfully")<div></div>except Exception as e: print(f"✗ Error: {e}") print("Please check troubleshooting section")try: print("🎤 Recording...") frames = record_audio(5) print("✓ Recording complete") print("💾 Saving...") save_audio(frames, "output.wav") print("✓ Saved successfully")except Exception as e: print(f"✗ Error: {e}") print("Please check troubleshooting section")These practices will make your audio applications more robust, maintainable, and user-friendly.
12. References
-
https://stackoverflow.com/questions/35970282/what-are-chunks-samples-and-frames-when-using-pyaudio
-
https://stackoverflow.com/questions/47961954/what-is-a-sample-format
Related Articles
- A Deep Dive into Cross Encoders and How they work
- Hands-on Tutorial on Making an Audio Bot using LLM, and RAG
Follow for more technical deep dives on AI/ML systems, production engineering, and building real-world applications: